


The last thing the internet needs is another guide on HTML email. Every day, many email campaigns go out successfully without a deep dive into the code behind them…
Or, do they? 🤔 They may, but not successfully!
Fail to understand HTML and you’ll get:
- Undeliverable emails
- Broken templates
- Wasted budgets
- Poor brand image
I created this guide distilling the knowledge of 20+ experts from Mailtrap (myself included) to help you avoid failure.
So my dear email marketers, designers, QAs and email developers let’s dive in.
What is an HTML email?
HTML email is a type of email that uses HyperText Markup Language (HTML) to create visually engaging messages with rich content, such as images, links, and formatted text.
This email type is essential, as it enables the creation of visually appealing messages. All with the goal of improving user experience, engagement, and conversions.
But, HTML emails are not just about aesthetics.
From email developers’ perspective, they’re powerful tools to:
- Create responsive messages that perform well across different devices.
- Do advanced tracking and analytics of various email elements.
- Deal better with mass mailing and interactions with databases. (For instance, share work-hour data from a MySQL database with your colleagues.)
- Incorporate interactive features such as accordions, carousels, and forms.
- Ensure emails are accessible to users with disabilities by using semantic HTML tags and ARIA attributes.
So, knowing the fundamentals of HTML email coding is key to avoiding issues like undeliverable emails and broken templates.
HTML email vs plain-text email
The debate between HTML emails and plain-text emails centers around functionality versus simplicity.

As mentioned, HTML emails offer enhanced design capabilities with support for images, buttons, and various styles, making them perfect for marketing and promotional content.
However, HTML emails can be more complex to design and might not display consistently across all email clients, potentially landing in spam folders more frequently.
In contrast, plain-text emails excel in simplicity and reliability. They are universally readable, quick to load, and highly accessible, particularly for users with visual impairments who rely on screen readers.
Here’s a quick breakdown in a table format.
| Feature | HTML email | Plain-text email |
| Design and visuals | Rich formatting, images, colors, interactive elements | Simple text, no images or advanced formatting |
| Creation complexity | Requires knowledge of HTML/CSS | Easy to create, no coding required |
| Deliverability | Higher chance of being flagged as spam | Higher chance of landing in inbox |
| Load time | Slower due to images and code complexity | Faster load times |
| Compatibility | May not render correctly in all email clients | Consistent display across all email clients |
| Tracking and analytics | Supports detailed tracking of opens, clicks, etc. | Limited tracking capabilities |
| Accessibility | Less accessible, can be problematic for screen readers | Highly accessible, easy to read for everyone |
| Engagement | More engaging due to multimedia elements | Less engaging, relies on text alone |
| Use cases | Marketing campaigns, newsletters, promotions | Personal communication, transactional emails |
Pro Tip [Important]:
Incorporating the multipart/alternative MIME type, on the server side when sending the email, allows the email to include both HTML and plain text versions. For instance, it means that if the HTML email newsletter fails, the email automatically falls back to it’s plain-text version.
Note that this method isn’t directly in the HTML code. However, in the section where I provide free HTML email templates, I included the full code (server-side included) so you can copy-paste it.
How to create HTML email
The quick answer is, to choose a builder ( I made a selection top builders for you, click here to jump), use a drag and drop editor, and be done with it.
However, I believe you want highly deliverable emails that convert, so the story’s not that easy. In a nutshell, building an HTML email boils down to integrating design and coding elements to create an effective and engaging message.
Therefore, I’ll summarize the process by providing practical examples and code snippets to illustrate each step. And that may help you quickly tweak the HTML side of a drag-and-drop editor if need be.
Also note that creating an HTML email involves several stages, including:
- Coding the HTML email for high deliverability
- Designing a beautiful and responsive HTML email
- Creating an email copy that resonates with your audience
- Email signature in the email footer (optional)
I’ll be covering all that aiming to help you overcome common HTML email development challenges, including:
- Diverse rendering engines
- Limited CSS support
- Mobile optimization
- Media queries
- Blocked images and alt text
- Limited interactivity and fallbacks
- Etc.
How to code an HTML email
Here is the step-by-step guide on how to code the email to create your own HTML template. It will help you understand the best practices better, and tweak drag-and-drop templates faster if necessary.
Header, Body, and Footer
Start by outlining the structure of your email. Typically, it includes a header for branding, a body for the main content, and a footer for additional information and links. See the example below:
<!DOCTYPE html>
<html lang="en">
<head>
    <meta charset="UTF-8">
    <title>Your Email Title</title>
    <style>
        /* Add your CSS here */
    </style>
</head>
<body>
    <table width="100%" cellpadding="0" cellspacing="0">
        <tr>
            <td align="center">
                <table width="600" cellpadding="0" cellspacing="0">
                    <!-- Header -->
                    <tr>
                        <td style="background-color: #345C72; color: #ffffff; text-align: center; padding: 20px;">
                            <h1>Welcome to Our Newsletter</h1>
                        </td>
                    </tr>
                    <!-- Body -->
                    <tr>
                        <td style="padding: 20px; font-size: 16px; line-height: 1.6;">
                            <p>Here's what you need to know.</p>
                        </td>
                    </tr>
                    <!-- Footer -->
                    <tr>
                        <td style="background-color: #333333; color: #999999; text-align: center; padding: 20px;">
                            <p>Contact us at support@example.com</p>
                        </td>
                    </tr>
                </table>
            </td>
        </tr>
    </table>
</body>
</html>
Coding the Email
HTML emails rely on tables for layout, as they ensure better compatibility across various email clients. Avoid using CSS for layout since many email clients have limited CSS support.
<table width="100%" cellpadding="0" cellspacing="0">
    <tr>
        <td align="center">
            <table width="600" cellpadding="0" cellspacing="0" style="border: 1px solid #cccccc; padding: 20px;">
                <tr>
                    <td align="center">
                        <h1 style="color: #345C72;">Hello, World!</h1>
                        <p style="font-size: 16px; color: #555555;">Welcome to our email.</p>
                    </td>
                </tr>
            </table>
        </td>
    </tr>
</table>
Inline CSS
Use inline CSS to style your email elements. It ensures that styles are rendered correctly across different email clients. For example:
<p style="font-size: 16px; color: blue;">This is a styled paragraph.</p>Media Queries
Here’s the code to ensure your email is responsive, use media queries to adjust styles for different screen sizes. This adds to the email’s overall responsiveness.
<style>
    @media screen and (max-width: 600px) {
        .container {
            width: 100% !important;
            padding: 10px !important;
        }
    }
</style>
<table class="container" width="600">
    <!-- Content -->
</table>
Buttons and Links
Here’s an example of incorporating interactive elements like buttons.
<table cellpadding="0" cellspacing="0" style="margin: auto;">
    <tr>
        <td align="center" style="background-color: #345C72; padding: 10px 20px; border-radius: 5px;">
            <a href="https://www.example.com" target="_blank" style="color: #ffffff; text-decoration: none; font-weight: bold;">Call to Action</a>
        </td>
    </tr>
</table>
Based on everything covered now, here’s the full template:
<!DOCTYPE html>
<html lang="en">
<head>
    <meta charset="UTF-8">
    <meta name="viewport" content="width=device-width, initial-scale=1">
    <meta http-equiv="X-UA-Compatible" content="IE=edge">
    <title>Your Email Title</title>
    <style>
        body { margin: 0; padding: 0; background-color: #f4f4f4; font-family: Arial, sans-serif; }
        table { border-collapse: collapse; }
        .container { width: 100%; max-width: 600px; margin: 0 auto; background-color: #ffffff; }
        .header { background-color: #345C72; color: #ffffff; text-align: center; padding: 20px; }
        .body { padding: 20px; font-size: 16px; line-height: 1.6; color: #555555; }
        .footer { background-color: #333333; color: #999999; text-align: center; padding: 20px; }
        .cta { background-color: #345C72; padding: 10px 20px; border-radius: 5px; color: #ffffff; text-decoration: none; font-weight: bold; }
        @media screen and (max-width: 600px) {
            .container {
                width: 100% !important;
                padding: 10px !important;
            }
        }
    </style>
</head>
<body>
    <table width="100%" cellpadding="0" cellspacing="0">
        <tr>
            <td align="center">
                <table class="container" width="600" cellpadding="0" cellspacing="0">
                    <!-- Header -->
                    <tr>
                        <td class="header">
                            <h1>Welcome to Our Newsletter</h1>
                        </td>
                    </tr>
                    <!-- Body -->
                    <tr>
                        <td class="body">
                            <p>Here's what you need to know.</p>
                            <p style="font-size: 16px; color: blue;">This is a styled paragraph.</p>
                            <table width="100%" cellpadding="0" cellspacing="0" style="border: 1px solid #cccccc; padding: 20px;">
                                <tr>
                                    <td align="center">
                                        <h1 style="color: #345C72;">Hello, World!</h1>
                                        <p>Welcome to our email.</p>
                                    </td>
                                </tr>
                            </table>
                            <table cellpadding="0" cellspacing="0" style="margin: auto;">
                                <tr>
                                    <td align="center">
                                        <a href="https://www.example.com" target="_blank" class="cta">Call to Action</a>
                                    </td>
                                </tr>
                            </table>
                        </td>
                    </tr>
                    <!-- Footer -->
                    <tr>
                        <td class="footer">
                            <p>Contact us at support@example.com</p>
                        </td>
                    </tr>
                </table>
            </td>
        </tr>
    </table>
</body>
</html>
How to design HTML email
HTML email design is about branding and conversion rate optimization. However, the UX and UI design phases are a completely different ballgame.
Here, I’ll focus more on UI and describe the technical aspect to which you should pay attention to when working with HTML email templates
Semantic HTML
Use semantic HTML tags (like <header>, <nav>, <main>, <footer>) to structure your email content meaningfully. This helps screen readers interpret the content correctly.
For instance, it may look like this:
<header>
    <h1>Welcome to Our Newsletter</h1>
</header>
<main>
    <p>Here's what you need to know.</p>
</main>
<footer>
    <p>Contact us at support@example.com</p>
</footer>
Responsive Design
Use a single-column layout and media queries to adjust styles in the main table for different apps and devices. That makes an email more responsive and helps it adapt to various screen sizes.
Here’s the exemplary code:
<style>
    @media only screen and (max-width: 600px) {
        .container {
            width: 100% !important;
        }
    }
</style>
<table class="container" width="600">
    <!-- Email content -->
</table>
Whitespace
Here’s the snippet to use whitespace effectively. It helps guide the reader’s attention and makes the content more digestible.
<div style="padding: 20px;">
    <p>This paragraph has padding to provide whitespace around it.</p>
</div>
Call-to-Action (CTA)
Design prominent CTA buttons with contrasting colors to attract attention. Position them strategically within the email to drive actions. Also, I’d advise testing different positioning and colors to see which drives the highest engagement.
Check the exemplary CTA below:
<a href="https://example.com" style="background-color: #007BFF; color: #FFFFFF; padding: 10px 20px; text-decoration: none; border-radius: 5px;">Click Here</a>Accessibility
Always include descriptive alt text for images. This ensures that users who cannot view the images (due to visual impairments or email client settings) still understand the content. For example:
<img src="logo.png" alt="Company Logo">Font Usage
Use web-safe fonts to make sure your text displays consistently across different email clients. Reliable choices include:
- Arial
- Tahoma
- Verdana
- Times New Roman
Okay, some of those choices may seem dated to you. However, these are both accessible and web-safe formats. So, email recipients won’t struggle to read your emails regardless of their device.
Here’s a snippet to use Arial in your emails:
<p style="font-family: Arial, sans-serif;">This is a paragraph with Arial font.</p>Font Size and Readability
Maintain a minimum font size of 14px to ensure readability, especially on mobile devices. This helps make the text clear and legible without the need for zooming. For example:
<p style="font-size: 14px;">This is a readable paragraph.</p>High Contrast Colors [Optional]
Use high-contrast color combinations to improve readability for users with visual impairments. Or, more generally, ensure that the text stands out clearly against the background.
<div style="color: #000000; background-color: #FFFFFF;">
    This text has high contrast.
</div>
How to write HTML email
Creating engaging and effective HTML email content involves several key principles to ensure your message is clear, compelling, and visually appealing.
And of course, the email content needs to align with your brand and target audience perfectly. Hit the play button below for a two-minute guide on how to achieve that.

Below are the tips on crafting HTML email content, complete with examples.
Write concise and relevant subject lines
Subject lines should be brief and to the point, ideally under 35 characters to display well on different devices. The goal is to capture attention and encourage recipients to open the email. The example of Miro Welcome email checks all the right boxes in that respect.

Use preheader text wisely
The preheader text is the snippet that appears below the subject line in most email clients. Use it as an extension to the subject line to provide additional context or a compelling reason to open the email. And keep it under 100 characters.
But, I know you want to take it a step further. So…
You’d never guess what the preheader is for this email from KEEPS because they use an advanced trick. (It’s not “GET FREE SHIPPING ON….”)

To cut to the chase, they use tag and &zwjn; (zero-width non-joiner). That creates invisible spaces and ensures the email copy that follows won’t be pulled into the preheader. In HTML it looks something like this:
<div style="display:none;font-size:1px;color:#ffffff;line-height:1px;max-height:0px;max-width:0px;opacity:0;overflow:hidden;">
step into a world of timeless style and sustainable living ͏ ͏ ͏ ͏ ͏ ͏ ͏ ͏ ͏ ͏ ͏ ͏ ͏ ͏ ͏ ͏ ͏ ͏ ͏ ͏ ͏ ͏ ͏ ͏ ͏ ͏ ͏ ͏ ͏ ͏ ͏ ͏ ͏ ͏ ͏ ͏ ͏ ͏ ͏ ͏ ͏ ͏ ͏ ͏ ͏ ͏ ͏ ͏ ͏ ͏ ͏ ͏ ͏ ͏ ͏ ͏ ͏ ͏ ͏ ͏ ͏ ͏ ͏ ͏ ͏ ͏ ͏ ͏ ͏ ͏ ͏ ͏ ͏ ͏ ͏ ͏ ͏ ͏ ͏ ͏ ͏ ͏ ͏ ͏ ͏ ͏ ͏ ͏ ͏ ͏ ͏ ͏ ͏ ͏ ͏ ͏ ͏ ͏ ͏ ͏ ͏ ͏ ͏ ͏ ͏ ͏ ͏ ͏ ͏ ͏ ͏ ͏ ͏ ͏ ͏ ͏ ͏ ͏ ͏ ͏ ͏ ͏ ͏ ͏ ͏ ͏ ͏ ͏ ͏ ͏ ͏ ͏ ͏ ͏ ͏ ͏ ͏ ͏ ͏ ͏ ͏ ͏ ͏ ͏ ͏ ͏ ͏ ͏ ͏ ͏
</div>And yeah, the huge gap in the <div> class is the invisible space and the preheader always displays as: step into a world of timeless style and sustainable living regardless of the email client.
If you want more details, check this article about ‘ ’.
Craft Engaging Content
Yeah, you’ve probably heard the “craft engaging content” a million times before. But let me put it into perspective for you.
It means that you need to focus on one primary message and deliver that message as concisely and clearly as possible. Simply, it should be obvious to the recipient what the email is about by just skimming the content, check the Outsite example below.

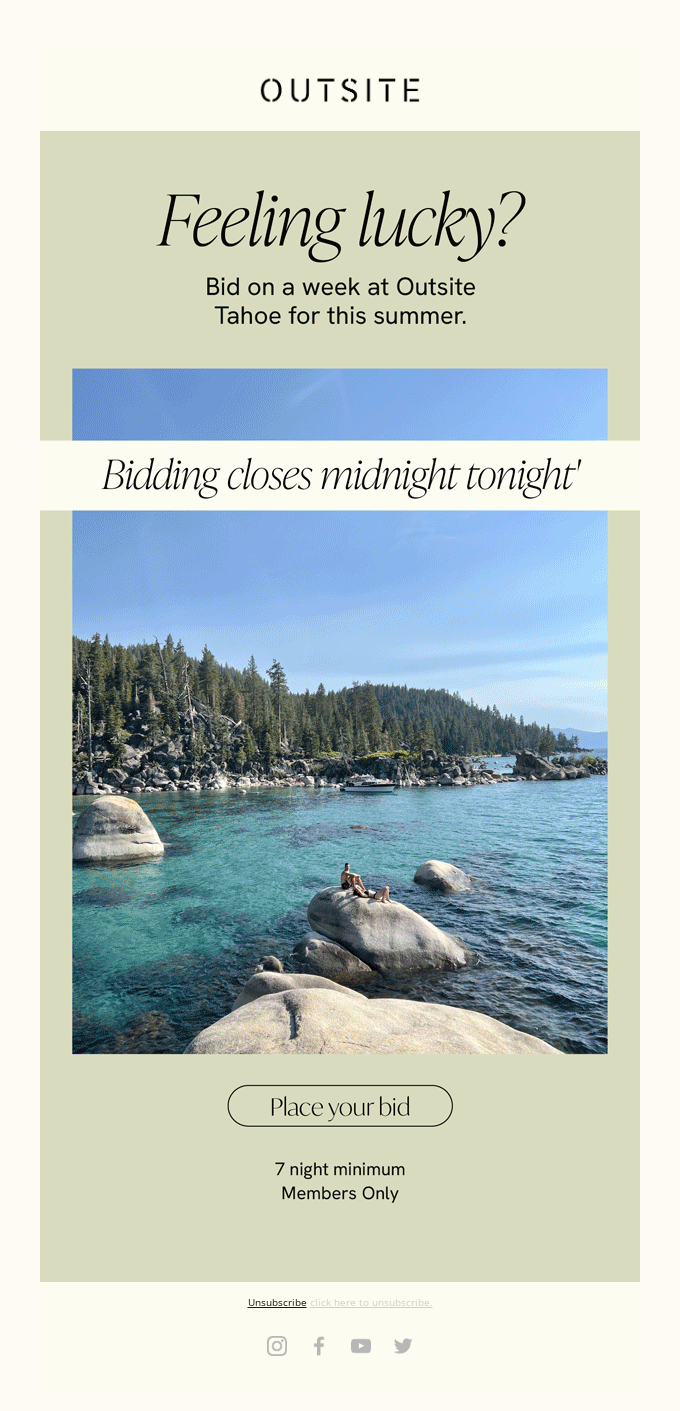
Lastly, you can also break up text with subheadings, short paragraphs, and bullet points to improve readability. But still, make sure not to cram too much info into the email, and always keep the 80/20 rule in mind.

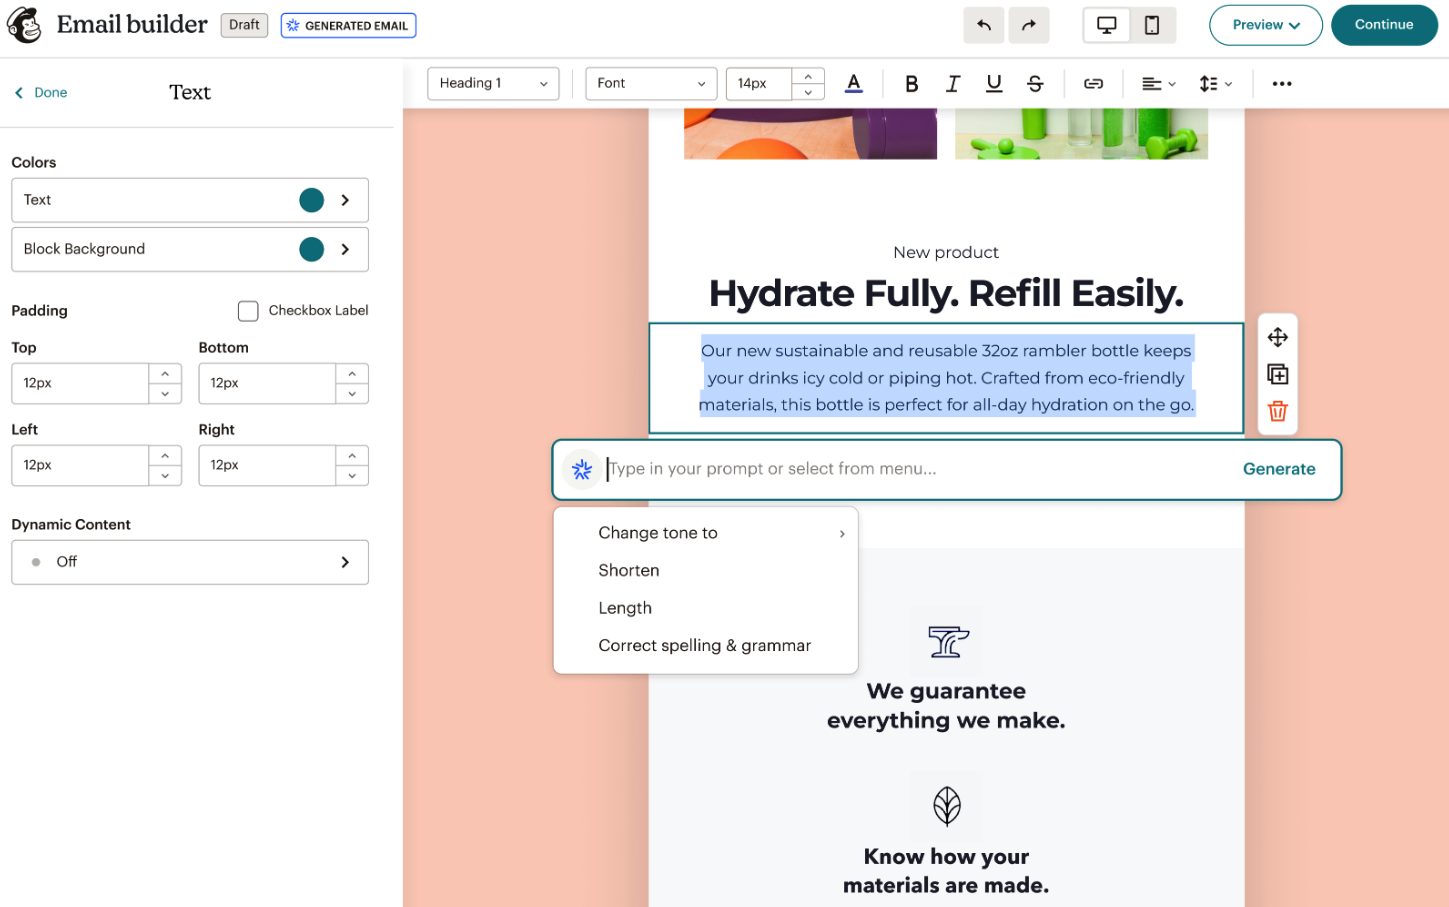
Bonus: Using AI to create effective email content
Yes, you can use generative AI to create email content. And no, if you know what you’re doing, the emails won’t sound as if they’ve been done by a robot.
The trick is to treat your preferred AI tool as a new employee and prompt it accordingly. For instance, if you’re using chat GPT, you should create a new custom model and train it to write emails. Check out how to do it step by step, in our quick tutorial below:

Personalize Your Emails
Personalization can significantly increase engagement. Use merge tags to include the recipient’s name or other personal details. And I chose to show you code here since there’s little point in showing actual personalized emails unless you understand how to do it.
<p>Hi {{first_name}},</p>
<p>Thank you for joining us! We have exciting updates for you.</p>
Include a Clear CTA
From the copy perspective, you should test out different actionable wording. These need to strictly relate to the action you want to take and the destination of the copy button.


I like the “Tell Me More” example from De Soi above, which is their primary CTA (you can see it without scrolling). It aligns with the novelty of the drink, and has a very engaging first-person copy which may drive more clicks.
HTML email builders
Choosing an email builder can be a pain. I want to make life easier and give you tried-and-tested options.
These solutions are good for marketers and designers since they allow for fast email template iterations to prove (or disprove) hypotheses related to email templates.
I won’t go into detailed descriptions here. Instead, the focus is on who would get the most benefits from a builder and the reasons to choose the tool.
Disclaimer: The quick reviews below contain pricing and software catalog ratings. These were valid at the time of writing but could be subject to change by the time you’re reading the article.
Mailtrap Email API/SMTP

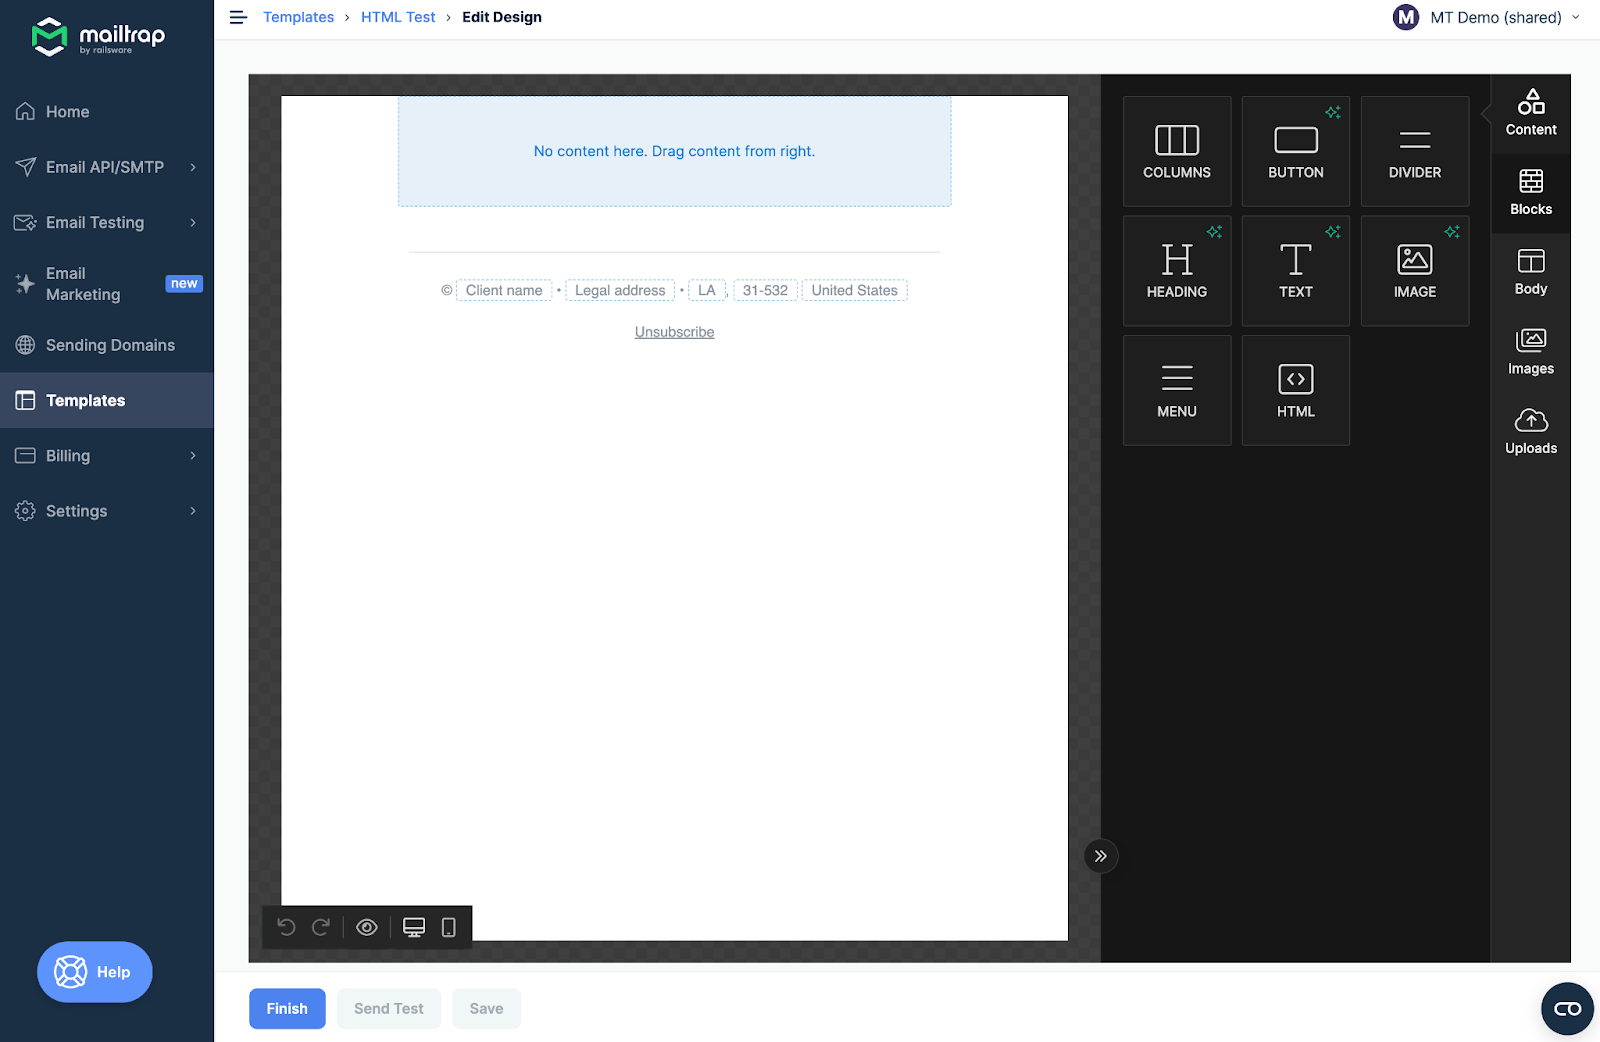
Mailtrap Email API/SMTP is part of Mailtrap Email Delivery Platform. It provides you with an email infrastructure solution to reach email recipients in seconds. On top of that, Mailtrap offers:
- Intuitive drag-and-drop template builder with desktop and mobile preview
- Secure setup (all DNS records provided)
- API and SMTP service, even on a free plan
- In-depth analytics with helicopter-view dashboard and drill-down reports
- Up to 30 days of email logs
Pricing:
- Free forever plan available – 1000 emails per month
- Basic plan starting at $15 per month
Stripo

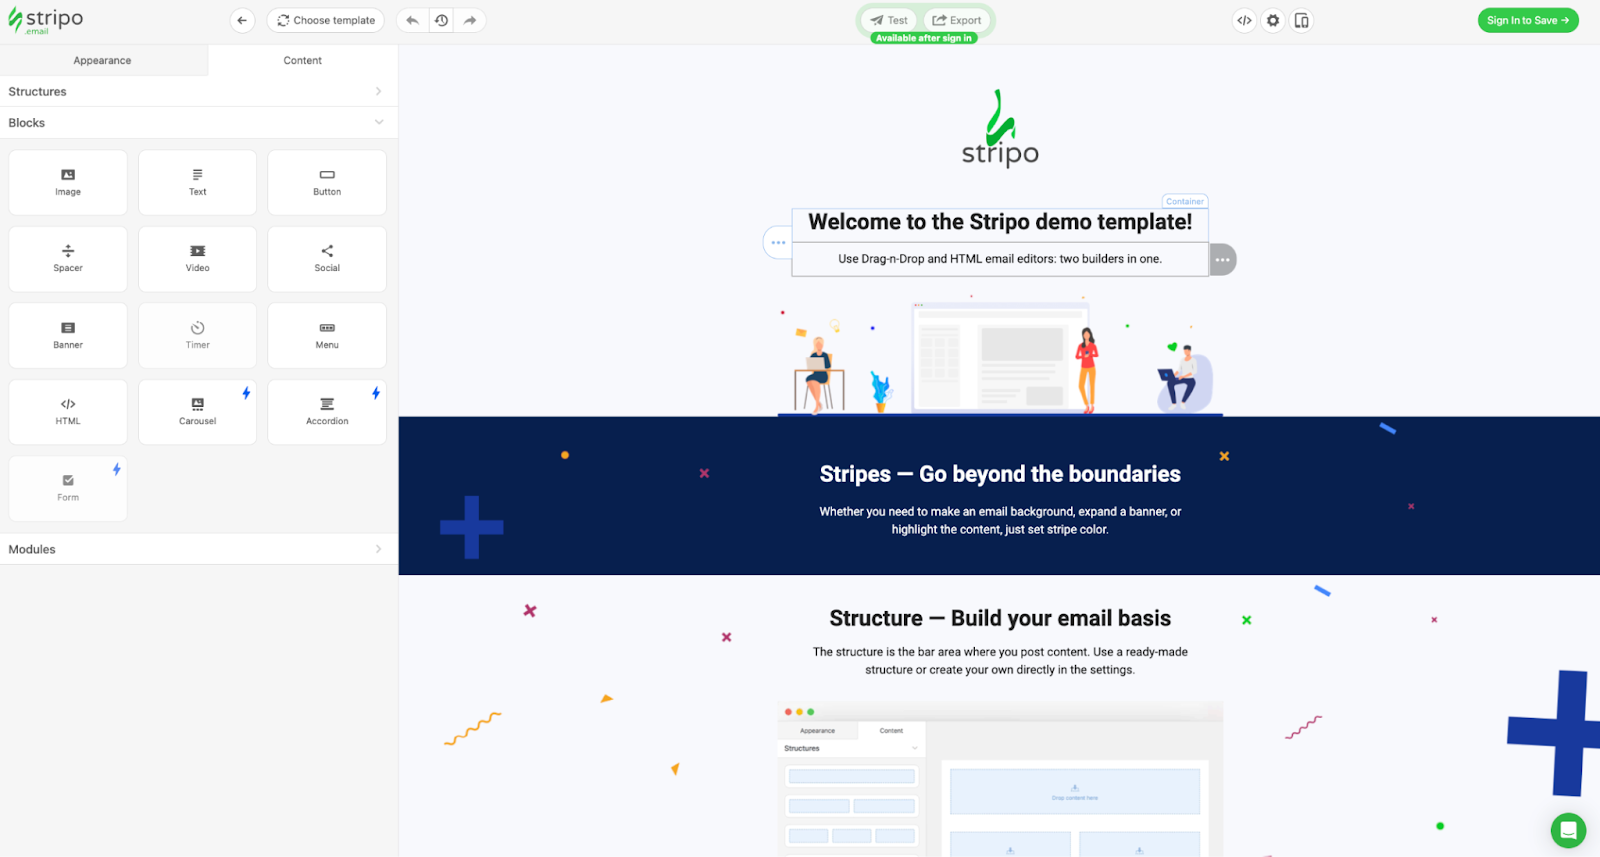
Stripo is for marketers, designers, and businesses of different sizes. Its strong suite is an intuitive email template builder, allowing you to create visually appealing, responsive email designs without extensive coding knowledge.
Check the quick breakdown of the key features:
- Drag-and-drop email template builder
- Integration with over 80 ESPs and email clients
- Pre-designed email templates and blocks
- AMP for Email support
- Customizable design settings
- Collaboration tools for teams
- Embedded testing tool for email rendering
Pricing:
- Free plan: available with a maximum of 4 templates per month
- The Basic paid plan starts at $15 per month
Mailchimp

Mailchimp is good for small to medium-sized businesses, entrepreneurs, and marketers seeking an all-in-one email marketing solution. And, I’d argue that its user-friendly interface, catering to beginners and experienced users, is also one of the reasons behind Mailchimp’s mass appeal.
Anyway, here are the goodies that put it on the list:
- Drag-and-drop email template builder
- Email marketing automation tools
- Audience segmentation and personalization
- Pre-designed and customizable email templates
- A/B testing for optimizing email performance
- Integration with numerous apps and services
Pricing:
- Free plan: Available with basic features – up to 500 contacts and 1,000 sends per month
- The paid Essentials plan starts at $13 a month
Beefree

Beefree is for marketers, designers, and businesses that need a fast way to create responsive email designs. It’s particularly beneficial for agencies and freelancers who handle multiple clients. The same goes for companies looking to streamline their email design process with a user-friendly interface.
Now, here are the main highlights:
- Drag-and-drop email template builder
- Extensive library of pre-designed templates and content blocks
- Mobile-responsive design capabilities
- Integration with major email service providers (ESPs)
- Collaboration tools for team editing
- HTML and MJML code export options
- Email preview for different devices
Pricing:
- Free plan: Available with basic features and limited template usage
- Professional plan starts at $35 a month
Unlayer
G2: 4.1 Capterra: N/A


Unlayer is designed for developers and marketers who require a flexible and customizable email template builder. It’s particularly useful for those who want to embed an email editor into their applications or websites.
Here are the key features:
- Drag-and-drop email template builder
- Embeddable email editor for seamless integration
- Pre-designed email templates and content blocks
- Mobile-responsive design support
- Customizable design elements and settings
- HTML and JSON export options
Pricing:
- Free plan: available but includes Unlayer branding
- Startup paid plan starts at $149 a month
If you want a more comprehensive list and reviews, you can check this article from our Product Lead Oleksii.
Responsive HTML email templates
Here, I’ll provide three popular templates that employ best practices in HTML email design, such as using tables for layout, including images, and featuring clear calls-to-action (CTAs).
Each example also contains server side code to support the multipart/alternative MIME type. As mentioned, this way a plain text version is available if the HTML cannot be displayed. In turn, you may get higher engagement.
Note: The SMTP settings are geared towards Mailtrap Email API/SMTP users.
Order confirmation template

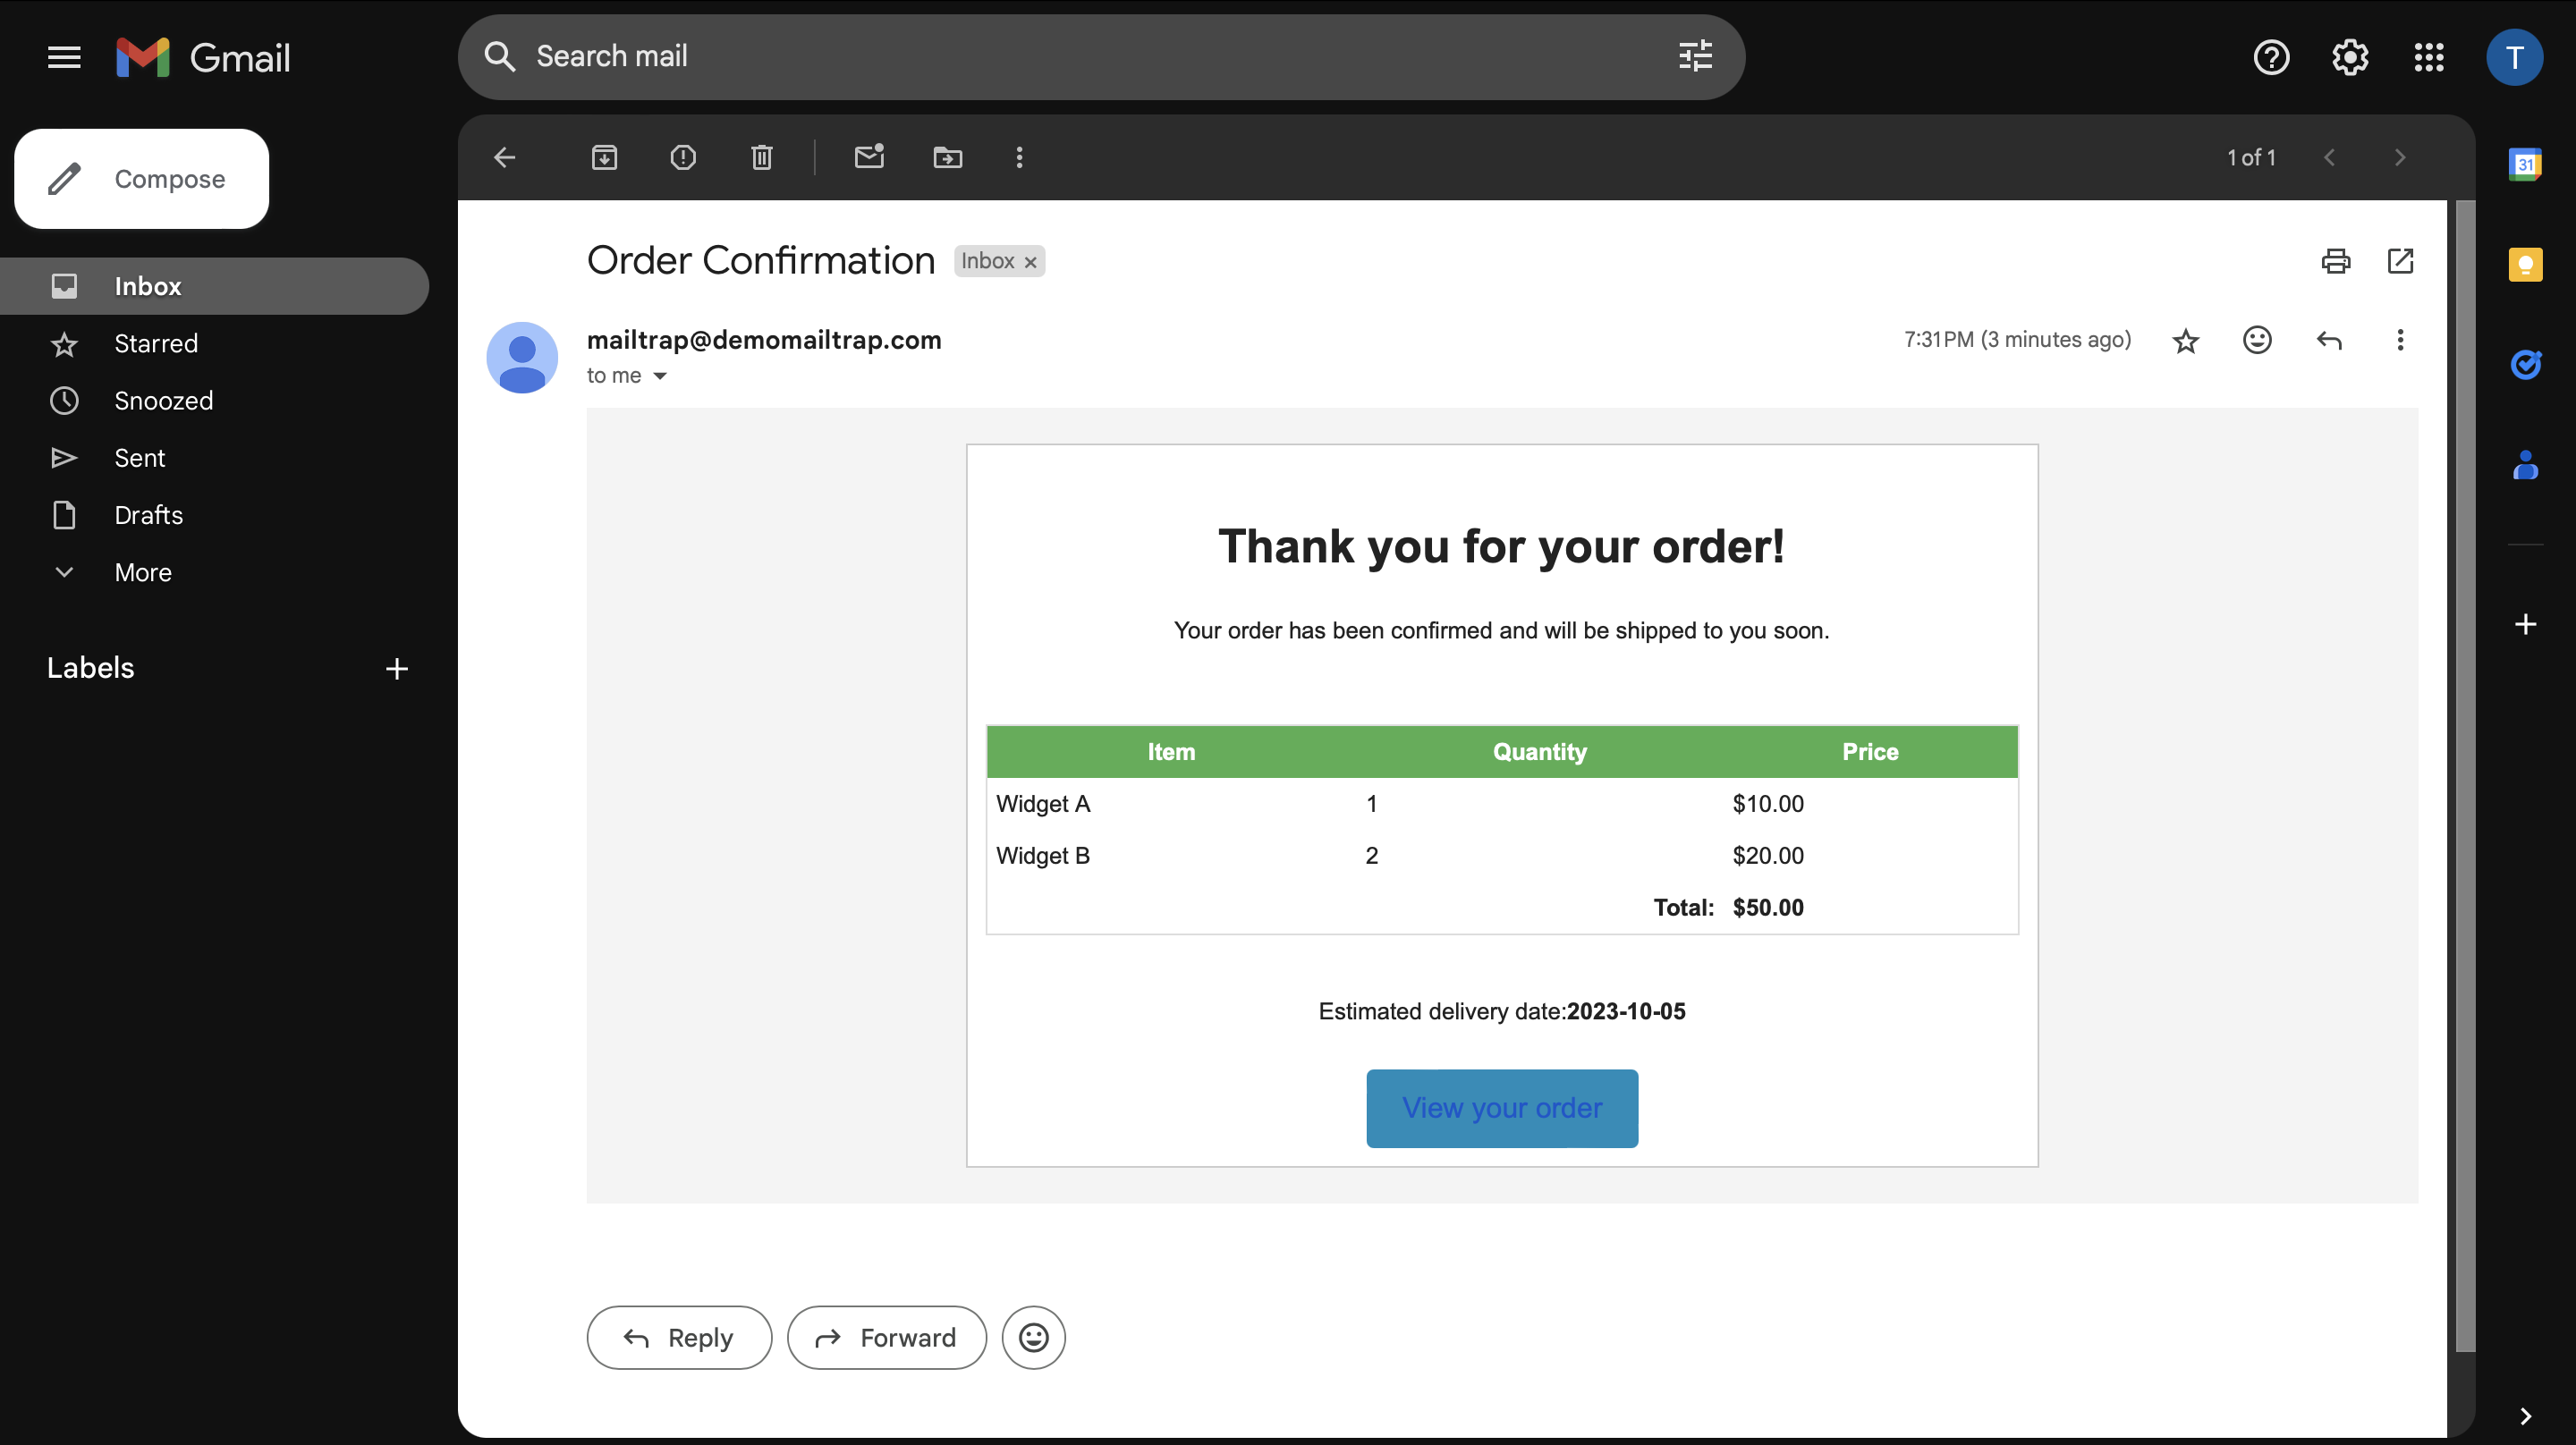
The HTML template uses a responsive table to display order items, quantities, and prices. The plain text version simplifies this information into an easy-to-read format, providing all necessary order details in a straightforward manner.
This ensures that the message is accessible even in email clients that do not support HTML or when the recipient prefers plain text emails. Here’s the code for the template shown above.
import smtplib
from email.mime.multipart import MIMEMultipart
from email.mime.text import MIMEText

# Email settings
smtp_server = 'live.smtp.mailtrap.io'
port = 587
username = 'api'
password = 'your-mailtrap-password'

# Create message container
msg = MIMEMultipart('alternative')
msg['Subject'] = "Order Confirmation"
msg['From'] = "sales@example.com"
msg['To'] = "customer@example.com"

# Plain text and HTML versions
text = """\
Thank you for your order!

Your order has been confirmed and will be shipped to you soon. Here are the details of your order:

- Widget A: 1 x $10.00
- Widget B: 2 x $20.00

Total: $50.00

Estimated delivery date: 2023-10-05

You can view your order here: https://example.com
"""

html = """\
<!DOCTYPE html>
<html>
<head>
<title>Order Confirmation</title>
<style>
    body, table, td, th { font-family: Arial, sans-serif; }
    th { background-color: #4CAF50; color: white; }
    .button { background-color: #008CBA; color: white; padding: 10px 20px; text-align: center; text-decoration: none; display: inline-block; font-size: 16px; margin-top: 10px; border-radius: 4px; }
</style>
</head>
<body>
<table width="100%" cellspacing="0" cellpadding="20" bgcolor="#f4f4f4">
    <tr>
        <td align="center">
            <table width="600" cellspacing="0" cellpadding="10" bgcolor="#ffffff" style="border-collapse: collapse; border: 1px solid #cccccc;">
                <tr>
                    <td style="text-align: center; padding: 20px;">
                        <h1>Thank you for your order!</h1>
                        <p>Your order has been confirmed and will be shipped to you soon.</p>
                    </td>
                </tr>
                <tr>
                    <td>
                        <table width="100%" cellspacing="0" cellpadding="5" style="border-collapse: collapse; border: 1px solid #ddd;">
                            <thead>
                                <tr>
                                    <th>Item</th>
                                    <th>Quantity</th>
                                    <th>Price</th>
                                </tr>
                            </thead>
                            <tbody>
                                <tr>
                                    <td>Widget A</td>
                                    <td>1</td>
                                    <td>$10.00</td>
                                </tr>
                                <tr>
                                    <td>Widget B</td>
                                    <td>2</td>
                                    <td>$20.00</td>
                                </tr>
                                <tr>
                                    <td colspan="2" style="text-align: right;"><strong>Total:</strong></td>
                                    <td><strong>$50.00</strong></td>
                                </tr>
                            </tbody>
                        </table>
                    </td>
                </tr>
                <tr>
                    <td style="text-align: center;">
                        <p>Estimated delivery date: <strong>2023-10-05</strong></p>
                        <a href="https://example.com" class="button">View your order</a>
                    </td>
                </tr>
            </table>
        </td>
    </tr>
</table>
</body>
</html>
"""

# Attach MIMEText objects for plain text and HTML to the MIMEMultipart message
part1 = MIMEText(text, 'plain')
part2 = MIMEText(html, 'html')
msg.attach(part1)
msg.attach(part2)

# Send the message via SMTP server
server = smtplib.SMTP(smtp_server, port)
server.starttls()
server.login(username, password)
server.sendmail(msg['From'], msg['To'], msg.as_string())
server.quit()
Account confirmation template

Among confirmation email templates, account confirmation is the most widely used.
The template below uses a simple, focused design with a single call to action, which is the confirmation link. This makes it easy for users to understand what they need to do next.
I opted for a neutral color scheme and a clear, legible font to ensure the email is accessible and professional-looking.
The plain text version maintains all critical information and the confirmation link, ensuring that the message is still effective even without HTML formatting. Again, check the code for the template shown above.
import smtplib
from email.mime.multipart import MIMEMultipart
from email.mime.text import MIMEText

# Email settings
smtp_server = 'live.smtp.mailtrap.io'
port = 587
username = 'api'
password = 'your-mailtrap-password'

# Create message container
msg = MIMEMultipart('alternative')
msg['Subject'] = "Confirm Your Account"
msg['From'] = "noreply@example.com"
msg['To'] = "newuser@example.com"

# Plain text and HTML versions
text = """\
Welcome to Our Service!

Thank you for registering. Please confirm your email address by clicking the link below:

https://example.com/confirm?email=user@example.com

If you did not create an account, no further action is required.
"""

html = """\
<!DOCTYPE html>
<html>
<head>
<title>Confirm Your Account</title>
<style>
    body, table, td { font-family: Arial, sans-serif; }
    .button { background-color: #008CBA; color: white; padding: 15px 25px; text-align: center; text-decoration: none; display: inline-block; font-size: 18px; margin-top: 10px; border-radius: 4px; }
</style>
</head>
<body>
<table width="100%" cellspacing="0" cellpadding="20" bgcolor="#f4f4f4">
    <tr>
        <td align="center">
            <table width="600" cellspacing="0" cellpadding="10" bgcolor="#ffffff" style="border-collapse: collapse; border: 1px solid #cccccc;">
                <tr>
                    <td style="text-align: center; padding: 20px;">
                        <h1>Welcome to Our Service!</h1>
                        <p>Thank you for registering. Please confirm your email address by clicking the link below.</p>
                        <a href="https://example.com/confirm?email=user@example.com" class="button">Confirm Email</a>
                    </td>
                </tr>
                <tr>
                    <td style="text-align: center; font-size: 16px; color: #666; padding: 20px;">
                        If you did not create an account, no further action is required.
                    </td>
                </tr>
            </table>
        </td>
    </tr>
</table>
</body>
</html>
"""

# Attach MIMEText objects for plain text and HTML to the MIMEMultipart message
part1 = MIMEText(text, 'plain')
part2 = MIMEText(html, 'html')
msg.attach(part1)
msg.attach(part2)

# Send the message via SMTP server
server = smtplib.SMTP(smtp_server, port)
server.starttls()
server.login(username, password)
server.sendmail(msg['From'], msg['To'], msg.as_string())
server.quit()
Price drop alert
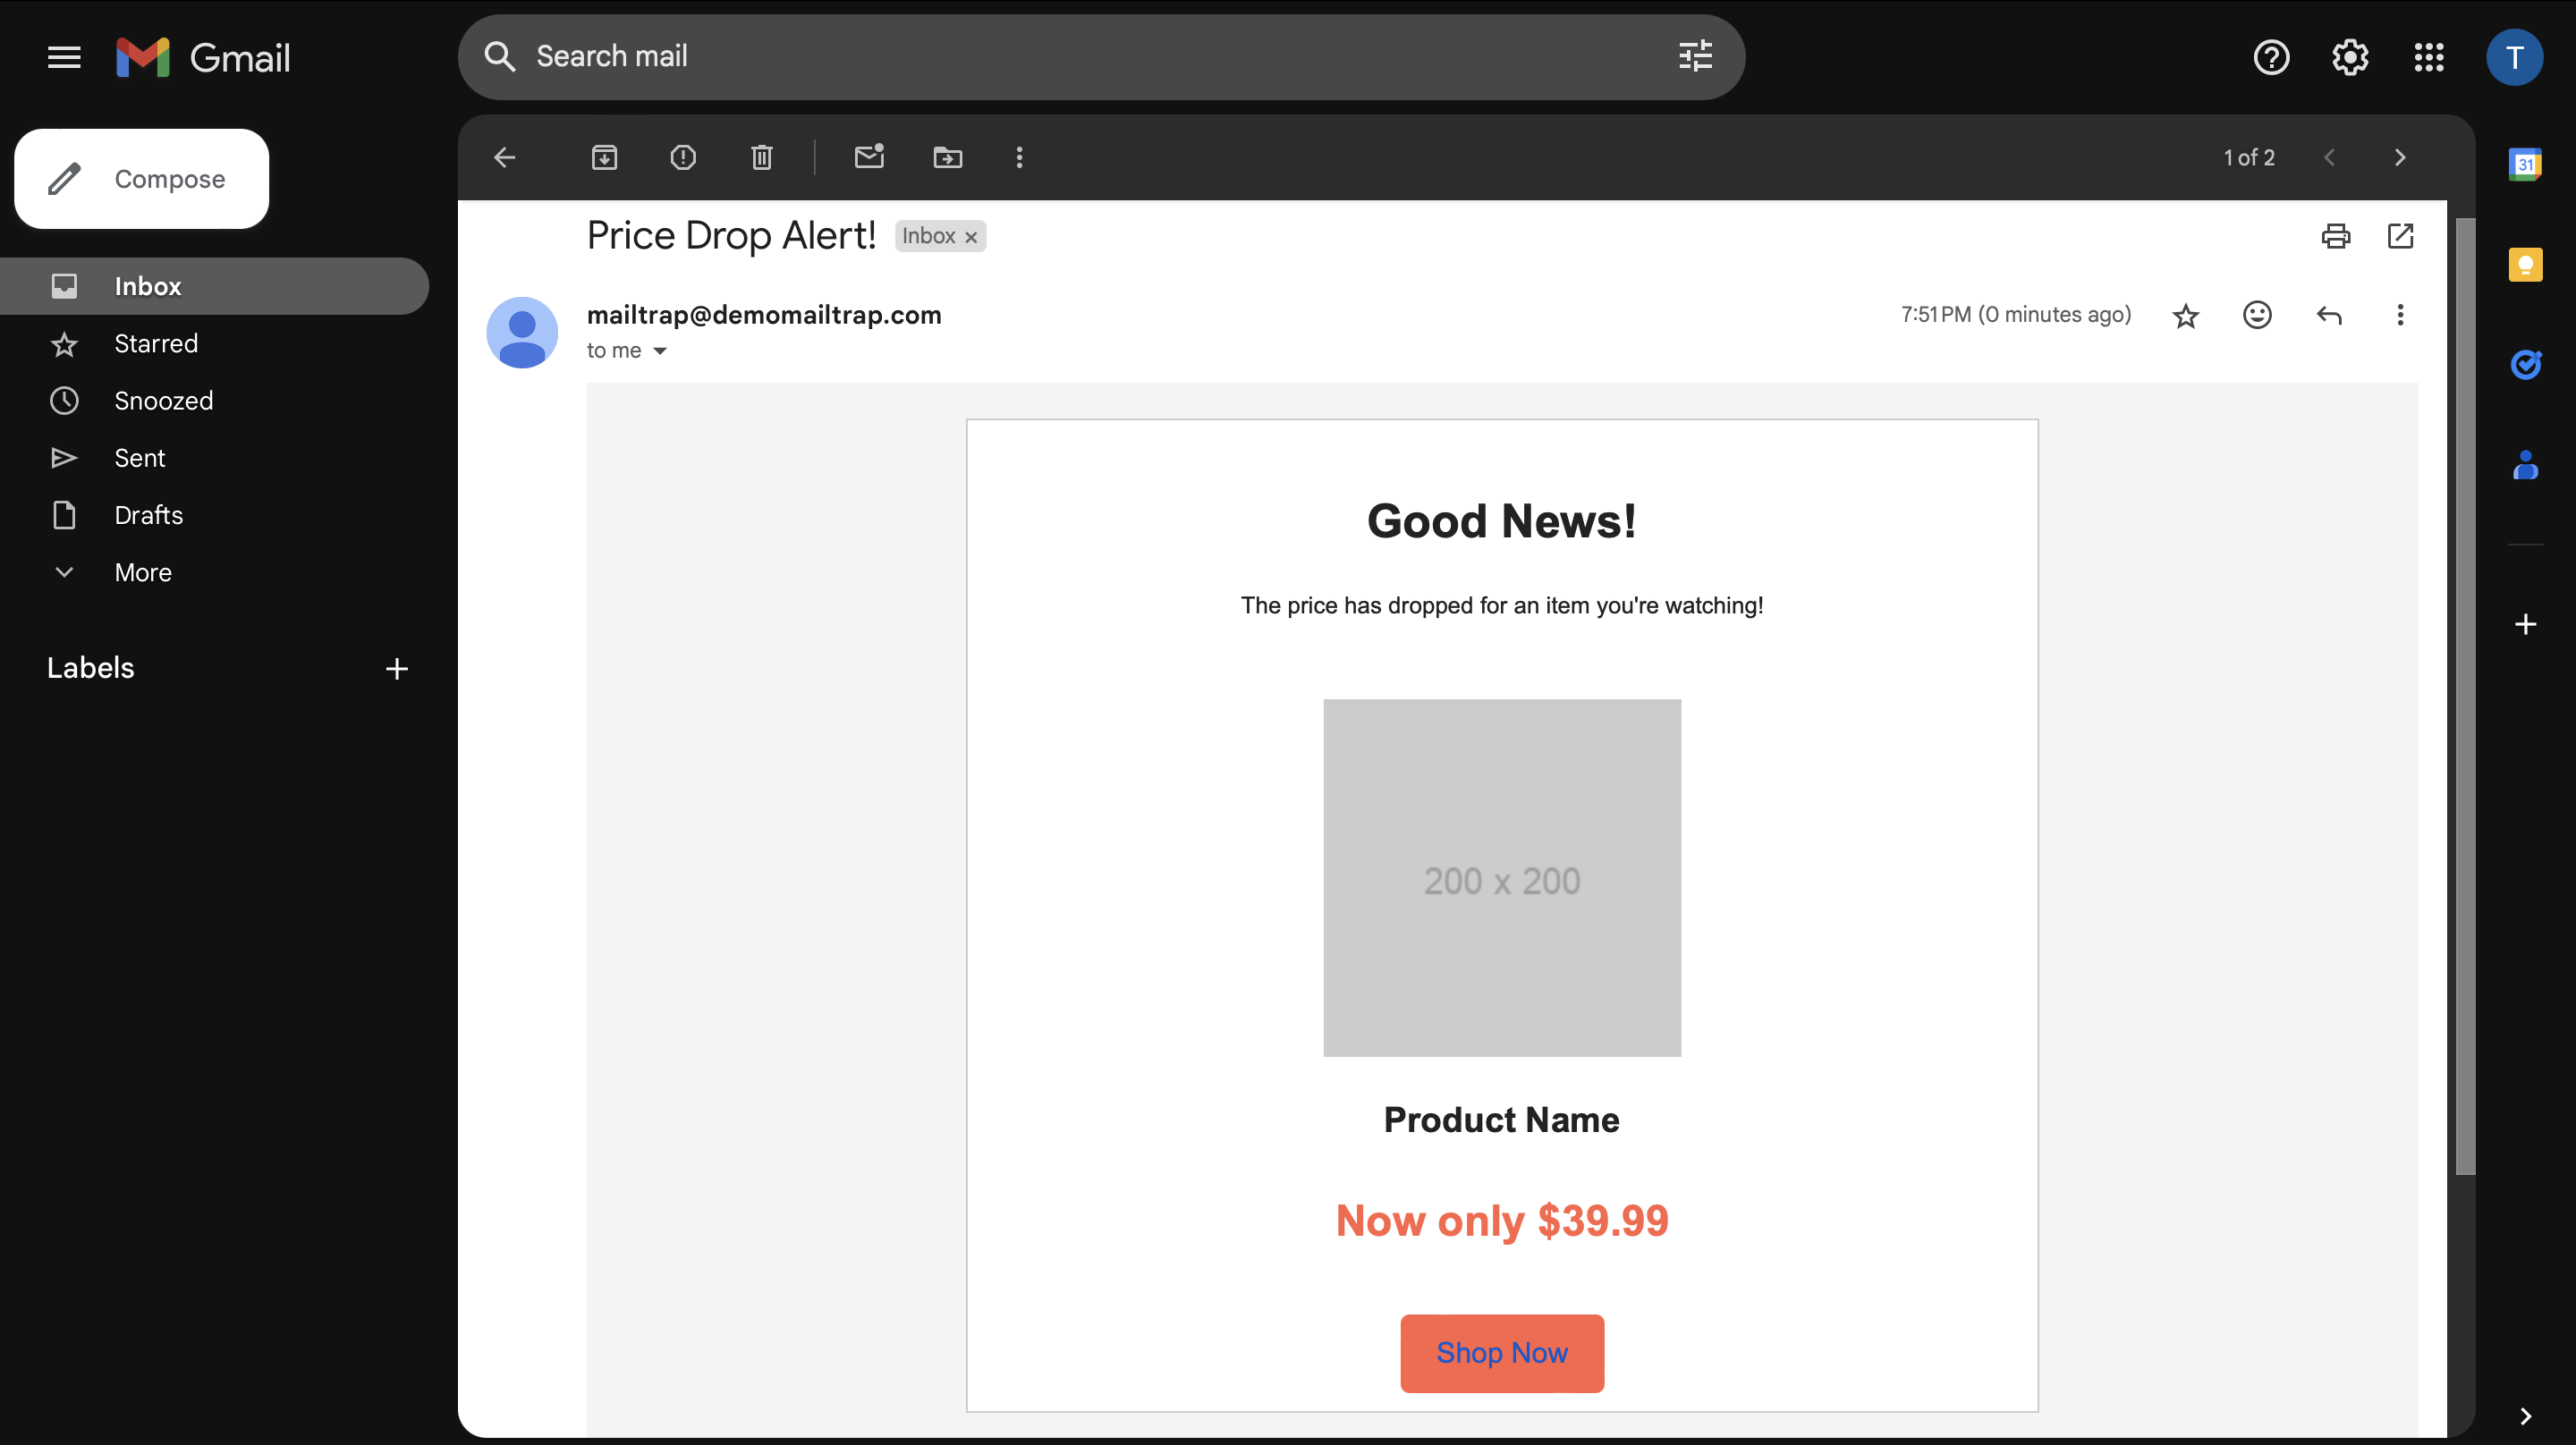
Due to the specifics of this email type, I wanted to make the HTML version of this template is visually appealing, so it has:
- A large, clear image of the product
- Bold text for the new price
- An eye-catching button that contrasts with the rest of the content.
The design aims to quickly convey the message and motivate the user to act immediately.
The plain text version, while simpler, still communicates all essential information and includes a direct link to purchase the product. Check the code below.
import smtplib
from email.mime.multipart import MIMEMultipart
from email.mime.text import MIMEText

# Email settings
smtp_server = 'smtp.example.com'
port = 587
username = 'your-username'
password = 'your-password'

# Create message container
msg = MIMEMultipart('alternative')
msg['Subject'] = "Price Drop Alert!"
msg['From'] = "deals@example.com"
msg['To'] = "shopper@example.com"

# Plain text and HTML versions
text = """\
Good News!

The price has dropped for an item you're watching!

Product Name
Now only $39.99

Shop now by visiting:
https://example.com
"""

html = """\
<!DOCTYPE html>
<html>
<head>
<title>Price Drop Alert!</title>
<style>
    body, table, td { font-family: Arial, sans-serif; }
    .button { background-color: #FF6347; color: white; padding: 10px 20px; text-align: center; text-decoration: none; display: inline-block; font-size: 16px; margin-top: 10px; border-radius: 5px; }
    .price { color: #FF6347; font-size: 24px; font-weight: bold; }
</style>
</head>
<body>
<table width="100%" cellspacing="0" cellpadding="20" bgcolor="#f4f4f4">
    <tr>
        <td align="center">
            <table width="600" cellspacing="0" cellpadding="10" bgcolor="#ffffff" style="border-collapse: collapse; border: 1px solid #cccccc;">
                <tr>
                    <td style="text-align: center; padding: 20px;">
                        <h1>Good News!</h1>
                        <p>The price has dropped for an item you're watching!</p>
                    </td>
                </tr>
                <tr>
                    <td align="center">
                        <img src="https://via.placeholder.com/200x200" alt="Product Image" style="width:200px; height:200px;">
                        <h2>Product Name</h2>
                        <p class="price">Now only $39.99</p>
                        <a href="https://example.com" class="button">Shop Now</a>
                    </td>
                </tr>
            </table>
        </td>
    </tr>
</table>
</body>
</html>
"""

# Attach MIMEText objects for plain text and HTML to the MIMEMultipart message
part1 = MIMEText(text, 'plain')
part2 = MIMEText(html, 'html')
msg.attach(part1)
msg.attach(part2)

# Send the message via SMTP server
server = smtplib.SMTP(smtp_server, port)
server.starttls()
server.login(username, password)
server.sendmail(msg['From'], msg['To'], msg.as_string())
server.quit()
HTML email deliverability
The hard truth is that you can have the coolest-looking template in the world, but if it’s not deliverable it’ll keep landing in spam instead of the inbox folder.
Note that it involves deliverability and understanding a bunch of technical factors (some of which I have already covered). Now, I’ll break it down into two sections covering the HTML best practices for high deliverability as simply as possible.

Technical aspects impacting deliverability
- Email authentication: Implementing authentication protocols such as SPF, DKIM, and DMARC is a must. I understand the process may seem tricky, but, as of recently, Gmail and Yahoo have made it a requirement, and for a good reason( ◀️check the linked video for more details). These protocols help verify your identity as a sender and protect against email spoofing and phishing attacks, improving your email’s chances of landing in the inbox.
- Sender Reputation: ISPs (Internet Service Providers) evaluate your sender reputation, which is influenced by factors such as the number of spam complaints, bounce rates, and user engagement. Maintaining a positive sender reputation is essential for high deliverability. Use tools like SenderScore and Google Postmaster Tools to monitor and improve your sender score if need be.
- Dedicated IP Address: For high-volume senders (more than 100K emails a month), using a dedicated IP address helps build a strong sending reputation because all the control is in their hands. This ensures that your deliverability is not affected by the behavior of other senders sharing the same IP.
- Shared IPs: If you send less than 100K emails a month, be very careful when vetting your email service provider to their deliverability stats on shared IPs. Top ESPs typically share the overall deliverability data, if not, dig around a little to see what other users are saying. In my experience, aside from Mailtrap, other reliable shared IPs are on Campaign Monitor and Litmus.
- Email Content [reminder]: Crafting relevant and engaging content is vital. Ensure your subject lines are clear and concise, and avoid excessive use of images and links. Also, based on our deliverability expert’s research, spam trigger words like “free,” “guaranteed,” and “act now,” aren’t a mayor decisive factor anymore. But this doesn’t mean you should use them liberally; at the very least, it could make your brand appear pushy.
- Proper HTML Structure [reminder]: As mentioned, use clean, well-structured HTML code with inline CSS to ensure compatibility across different email clients. Avoid using JavaScript and other dynamic content that is often blocked by email clients.
- Unsubscribe Options: With marketing emails, unsubscribe buttons or links are a necessity. Otherwise, you’re breaching CAN-SPAM and GDPR. So, do your best to allow for a two-step unsubscription (and I literally mean that). For instance, Mailtrap API/SMTP allows you to have a clear and simple unsubscribe link in every email to reduce spam complaints and maintain a positive sender reputation.
Email sending aspects that impact deliverability
- Don’t Use Purchased Email Lists: Sending emails to purchased lists leads to high bounce rates and spam complaints. In turn, your sender’s reputation may get destroyed beyond repair. Build your own email list through opt-ins and ensure that your recipients have given explicit permission to receive your emails.
- Monitor Bounce Rates: Ideally, the bounce rate should be under 2%, and if it starts getting close to 10%, you need to act immediately. Clean your email list to remove invalid or inactive email addresses, and repeat the process whenever necessary.
- Frequency and Timing: Avoid sending too many emails in a short period, as this can trigger spam filters. Schedule your emails at regular intervals and test different times to find the optimal sending times for your audience. Note that there’s no cookie-cutter frequency and timing, you need to test. But of course, you mustn’t email people daily either.
- Engagement Metrics: Track engagement metrics like open rates, click-through rates, and spam complaints for each campaign. Use this data to adjust your email strategies and improve engagement. Should you opt to use Mailtrap API/SMTP, you get actionable in-depth analytics and unique monitoring capabilities to control how your email infrastructure works and troubleshoot unexpected sending issues easy and fast.
- Tracking Pixel Tip: Some users, particularly on Microsoft Outlook and Apple Mail, may have tracking pixel turned off. Worse yet, there are cases where your emails may land in spam or not get delivered at all because of it. This may happen with newer senders and outreach campaigns. So, if all else checks out, and your metrics is still a bit down, consider disabling the pixel.
- Always Test Before You Send: I don’t want to go into details here. This is a critical step, and I dedicate the whole next section to it.
Test HTML Email
I wouldn’t recommend sending any emails with out testing them first. Doing that helps maintain high deliverability and user engagement.
Here, I focus on the importance of testing without delving too deeply into technical examples.
The key aspects of email testing you should focus on include:
- HTML/CSS Validation: Ensures that the email’s structure and style render correctly across different email clients and devices.

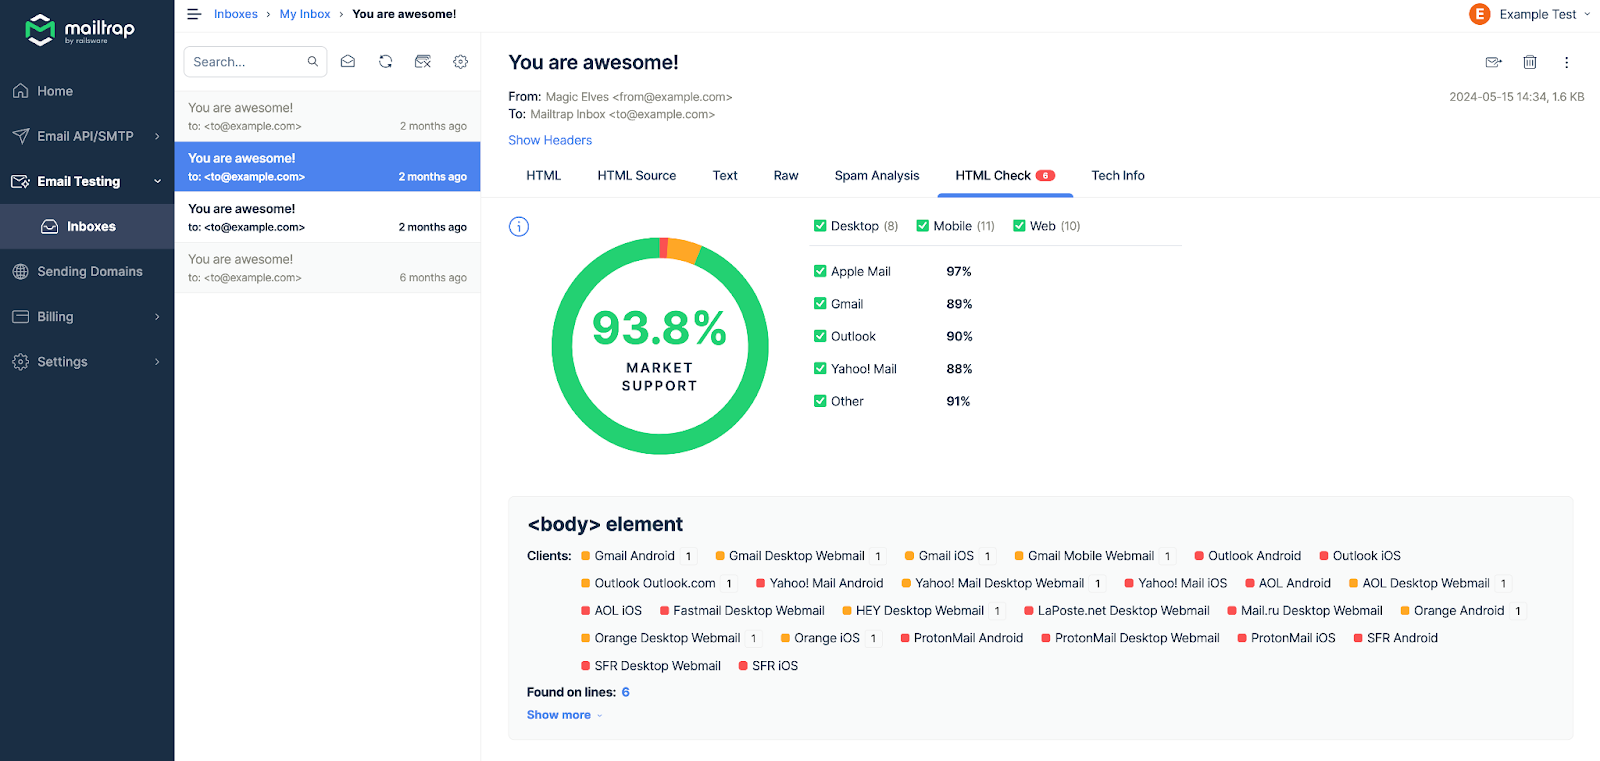
- Spam Score Check: Identifies elements in your email that might trigger spam filters, helping to keep your emails out of the spam folder.

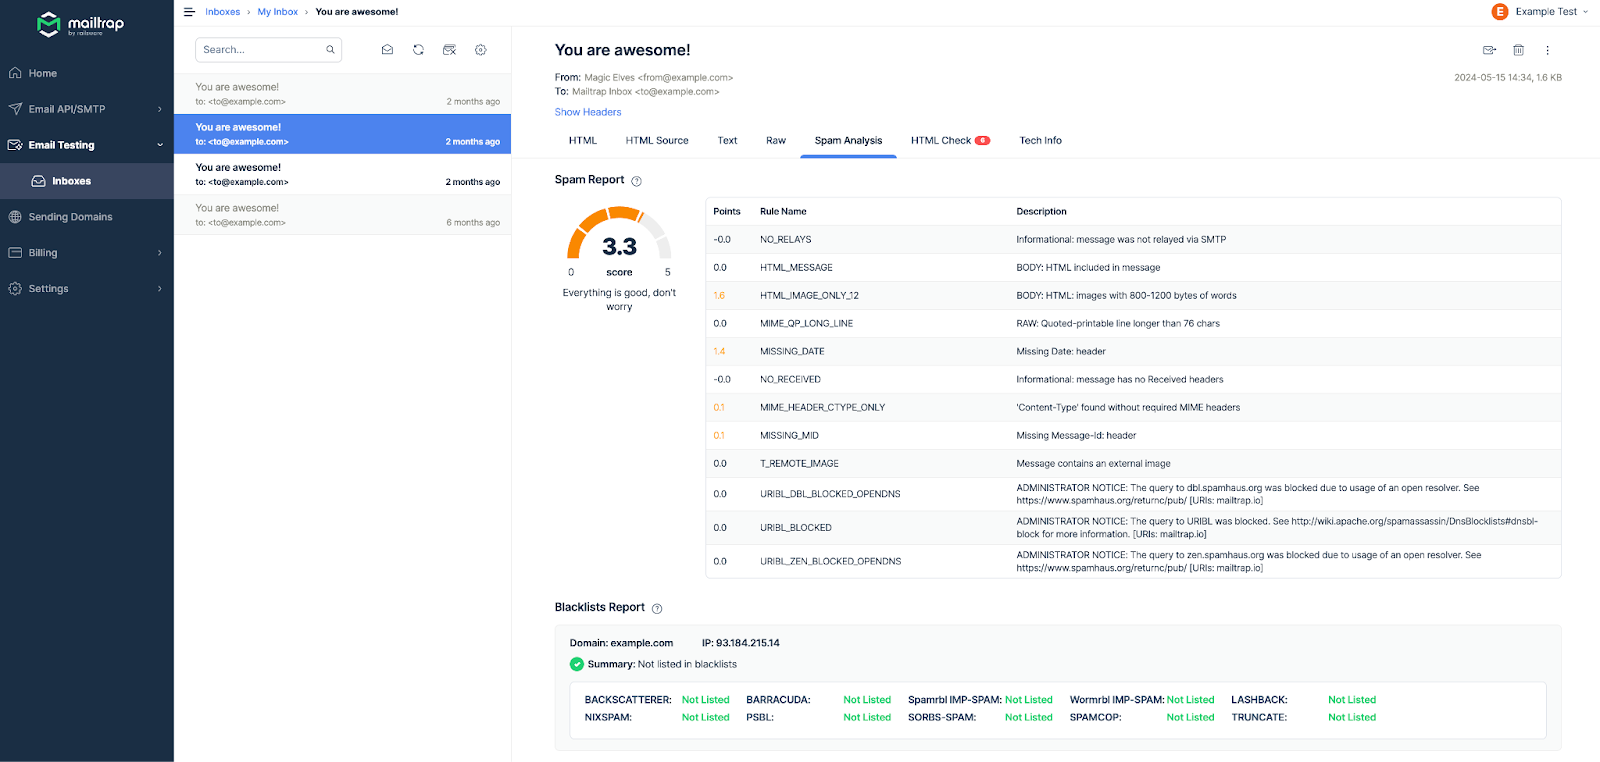
- Email Preview: Allows you to see how your email will appear in various email clients, including desktop and mobile views.

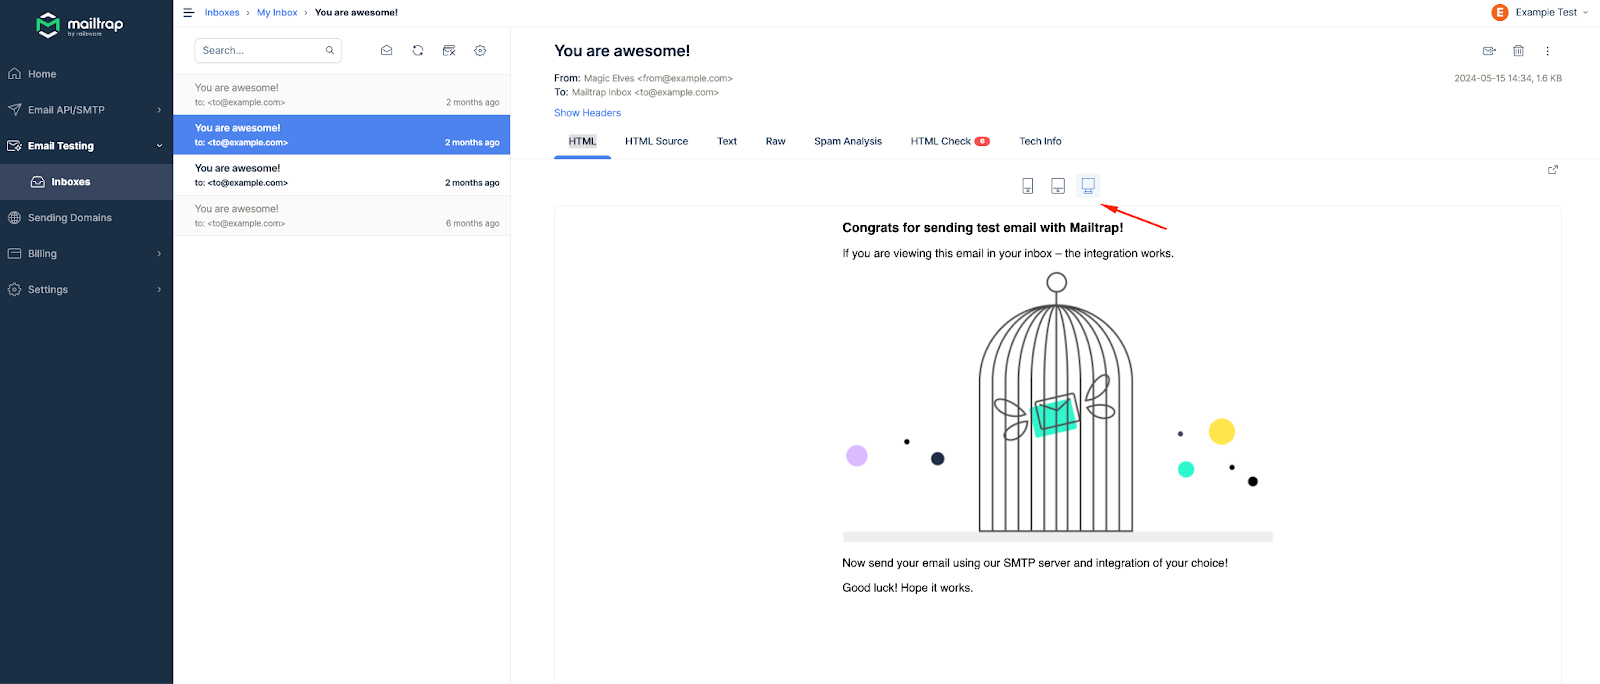
- API for Automation: Integrates testing into your development workflow, allowing automated checks for consistency and quality.
And if you use Email Sandbox, you get all that plus different testing inboxes and user management to have better control of your campaign and template tests.
But don’t take my word for it, check the video below.

Pro Tip: Always create a fallback version. This way you ensure your email gets delivered no matter what (even if the HTML element breaks).
Further reading: How to Test Emails in Different Clients | Mailtrap Blog
Wrapping up
HTML email mastery is crucial for anyone involved in marketing.
We’ve covered everything from the fundamentals of HTML email, to advanced techniques for creating, designing, and testing your emails.
Whether you’re an email marketer, designer, or developer, applying these best practices will help you craft compelling and effective email campaigns. Stay updated with the latest trends and continue refining your skills for sustained success in email marketing.