


Salesforce email relay is a versatile tool that serves as a bridge between your Salesforce organization and your preferred email server.
This article covers what this tool is, how it operates, and how you can configure it to suit your specific needs.
Moreover, we’ll offer micro tutorials on integrations with platforms like Mailtrap, Google Gmail, and Microsoft 365. So, let’s look at what the Salesforce email relay does, where it fits, and how to configure it.
What is email relay in Salesforce?
An email relay is a process that facilitates email transmission from one server to another.
However, it’s important to make a distinction between Salesforce’s own SMTP (Simple Mail Transfer Protocol) server and the Email Relay feature.
Salesforce’s own SMTP sends (relays) emails directly from the platform. Whereas, the Email Relay feature allows you to set up a third-party SMTP, or use your own. However, you’ll still be sending emails created within the Salesforce platform.
The emails will be routed through the servers you integrated within the system, giving you more control over email deliverability for each domain you own.
Also, you may have a better overview of critical metrics such as opens, bounces, and spam complaints.
How does email relay work in Salesforce?
As said, Salesforce’s Email Relay is a process that enables your company’s SMTP server to send Salesforce-generated emails.
This process relays the emails, as opposed to routing them directly through Salesforce’s servers. That is – the emails are routed through the SMTP servers you own or use, and integrate with Salesforce. But you can still use Salesforce templates and email personalization features.
To integrate a third-party solution and start sending emails, you need to configure the email relay within Salesforce. Here’s what to do.
Setting up Email Relay – Lightning Experience general steps
- Type Email Relay in Lightning search and click Create Email Relay.


- Type the SMTP credentials of your provider into the designated fields.

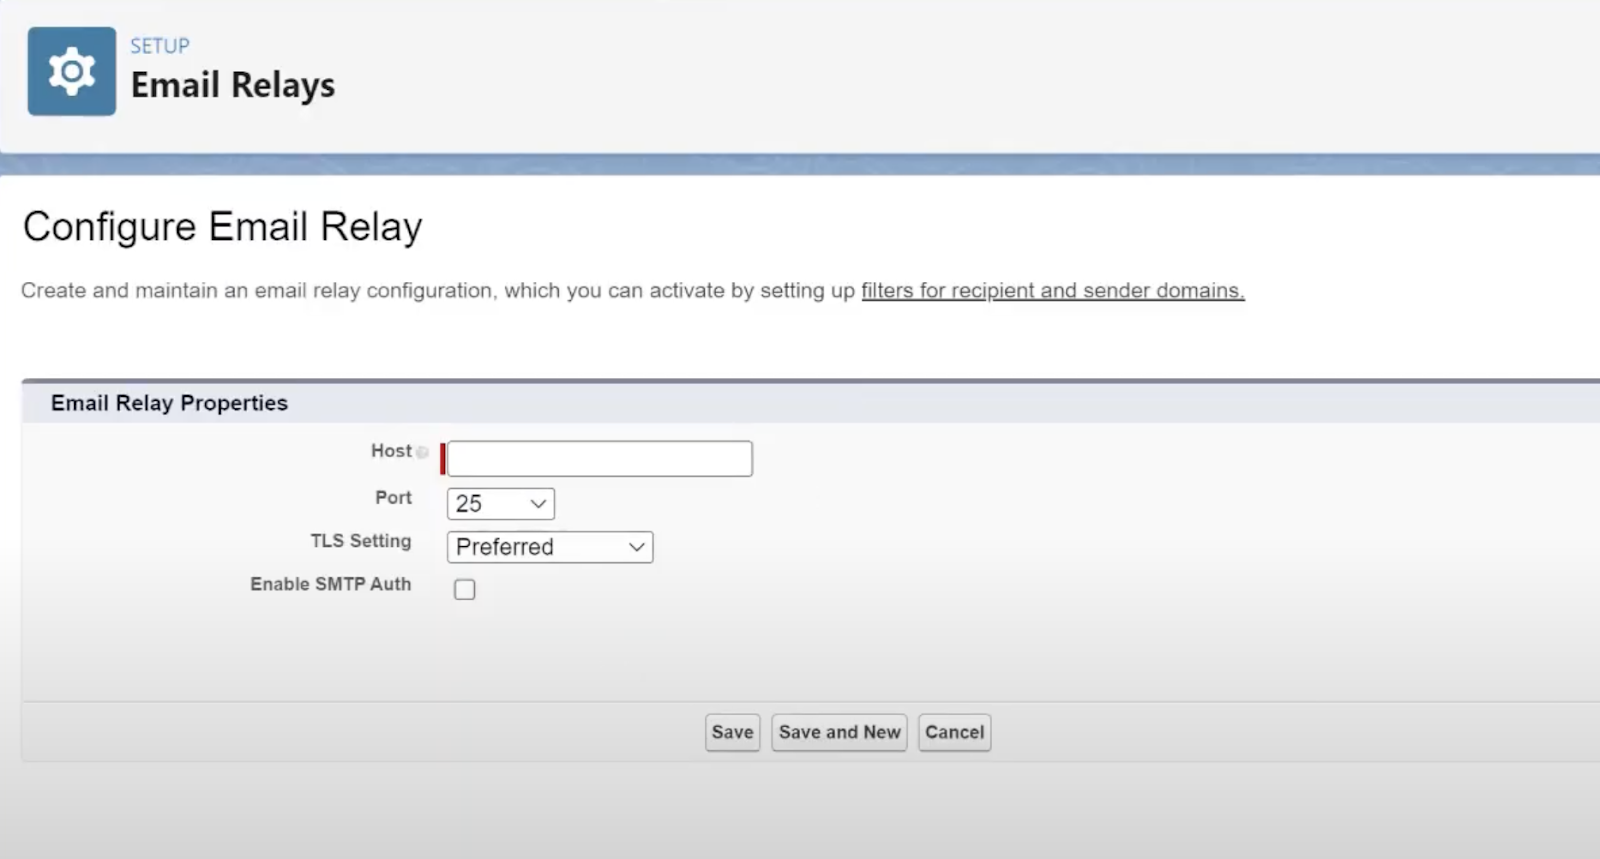
- Once done, click the Save button and proceed to create email domain filter.

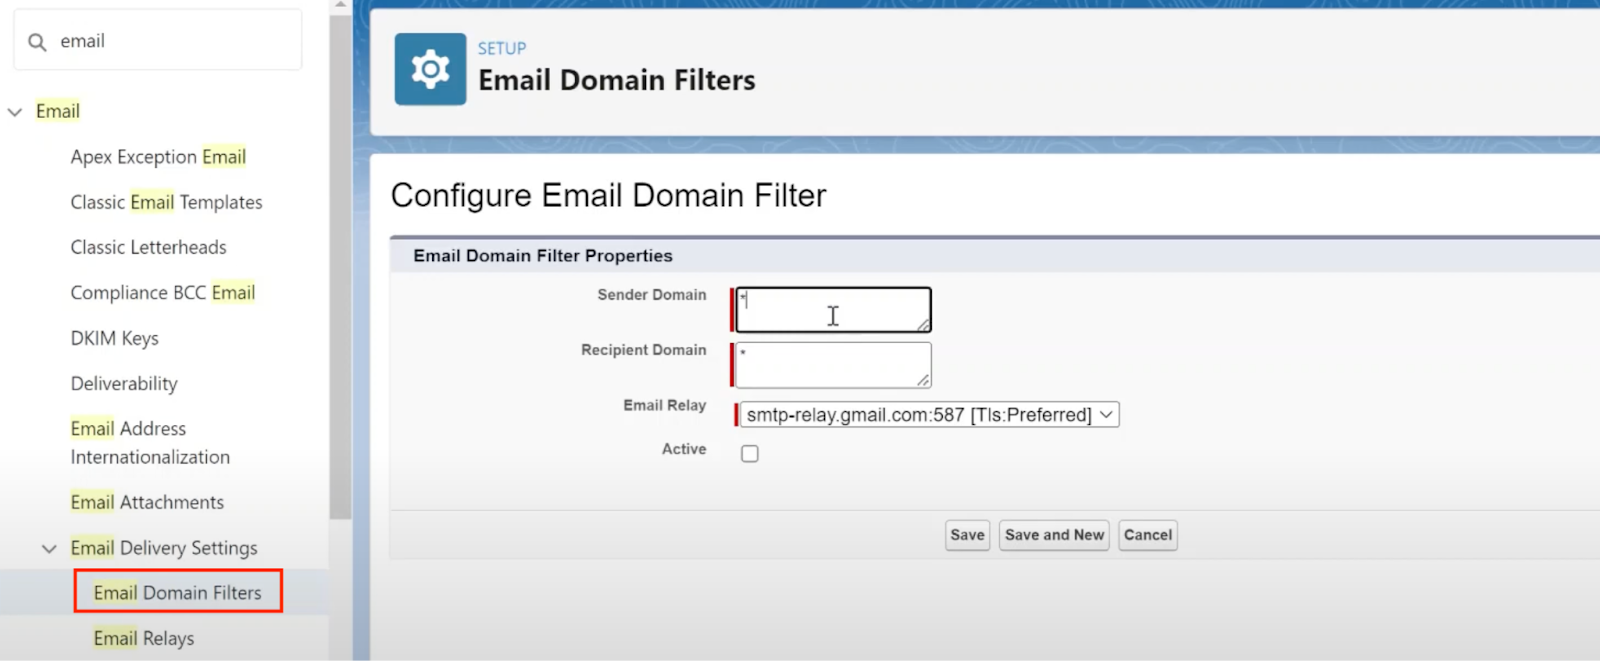
Tip: Keep the asterisk in Sender and Recipient Domain fields to allow sending from the domain you’re using (have registered with Salesforce) to any recipient domain.
- Click the box next to Active to activate the relay service, and click Save to confirm preferences.
Remember that these are just the general steps for email relay activation and setup. Later, we’ll cover detailed steps and credentials for Mailtrap, Google, and the Microsoft 365 relay server. Plus, there’s a separate section on how to see what your relay actually sends.
Salesforce email relay limits
There are a few limitations in relation to Salesforce email relays. To help you wrap your mind around these, we’ll put them into two categories – Functional limitations and Throughput limitations (how many emails you can send).
Functional limitations
- Email Relay is available in Professional, Enterprise, Performance, Unlimited, and Developer editions.
- Regions where the relays are available include Japan, Asia Pacific, Europe, and the Americas. This is reflected in the available Salesforce IP addresses for sending.
- Sender email address needs to be owned by your business, that is – the organization or domain you’re using with Salesforce needs to ‘own’ the email address.
- The SMTP server you’re using has to meet Salesforce’s email security compliance. Typically, it means the server must be configured to support standard email security mechanisms such as TLS.
Throughput limitations
Using a relay does not raise your Salesforce sending limits. In Salesforce’s own words, send limits still apply to email relaying — the relay changes which server delivers the message, not how many you are allowed to send.
- Each user can send to no more than 250 external recipients an hour from the email composer.
- Your org can send single email to 5,000 external recipients a day.
- Mass email and list email have their own 5,000 external addresses a day.
- Both are counted on a Greenwich Mean Time day, and duplicate addresses count each time they appear.
- In Developer Edition and trial orgs the figures are far smaller: 50 recipients per user per day, 15 on a single email, and only 10 external recipients per org per day for mass and list email.
These come from Salesforce’s Email Allocations per Edition and Mass Email Limitations. Re-check them before you plan around them, and for limits tied to a specific edition or cloud, reach out to Salesforce support.
What are the benefits of using Salesforce email relay?
There are several benefits, but they all have a common thread – relays give you more control and flexibility in your email campaigns. And Salesforce allows you to set up multiple email relay servers.
Consequently, you should be able to have more predictable conversions, as well as improved campaign management and recipient segmentation.
However, when listing the benefits below, we assume you’re using a reliable SMTP provider, focused on delivery, and email server security. If not, you probably have a team of dedicated dev wizzes to back a custom SMTP server.
Anyway, let’s break ideas into more specific chunks so you clearly understand how relays may affect your email flows.
- Logging compliance
Many businesses need to abide by compliance requirements regarding email handling. Often, they need to log and store all outbound emails and the corresponding content for a specific period of time. And with an email relay, particularly an external SMTP, these logs can be kept automatically.
Basically, the action helps with government regulation compliance. By keeping clean, complete email records automatically, you fulfil regulatory compliance and save time, bar occasional maintenance. Plus, it can be easier to retrieve data.
- Mitigate spam filtering
Since outbound emails get relayed from Salesforce, using your servers, the chances of them landing in the Inbox, rather than the Spam folder, are much higher. Why?
If some of Salesforce’s shared IPs get blacklisted, this won’t affect your deliverability. And you’re relying on your own sender reputation, not Salesforce’s.
- Enhanced email security and authenticity
Again, the emails get routed through your SMTP, Salesforce just relays them, so there’s much less risk of forging and email spoofing.
In a way, the external SMTP server acts as another security layer, allowing your business to have higher authenticity of all outbound messages. Meaning, there are more chances of being recognized as a trusted sender. Thus, relays may help safeguard your domain and sender reputation.
But keep in mind that there’s also a specific technical process to make the relay more secure. See the Important Note under the Mailtrap tutorial below.
- Content filtering and data governance
You get more options to apply content filters and scan emails for unauthorized data or content. Simply, you can ascertain that only approved content gets sent by your domains. And, in turn, you also get to:
- Maintain proper data governance
- Prevent security breaches
- Safeguard sensitive information
How to set up an email relay in Salesforce?
Previously, we covered the general steps to configure and enable email relay on Salesforce Org. The micro tutorials below give you the details for each of the SMTP providers. Note that the general steps are the same throughout.
Also, we assume you have Salesforce up and running, on the edition that supports Email Relays.
Salesforce Email Relay Mailtrap
Starting with Mailtrap, since it is the shortest of the three: you add and verify a sending domain, then copy the SMTP settings across. There is no connector to configure on the provider side and no IP allowlist to maintain.


- Type your sender domain name, and hit Add Your Domain.
- Copy-paste the DNS records Mailtrap provides (DKIM, SPF, and DMARC) to your domain provider’s DNS records. Note that Mailtrap automatically parses your SPF record, so you don’t need to tweak anything manually.


- That out of the way, you can proceed to verify your domain. Some DNS records may take up to 72 hours to update, which is outside our control. But if you want your domain to be verified faster, reach out to us at support@mailtrap.io.
- After successful verification, go to Step 3 – SMTP/API Settings. Open Salesforce, navigate to the Email Relays menu and hit Create New Relay (as previously described).

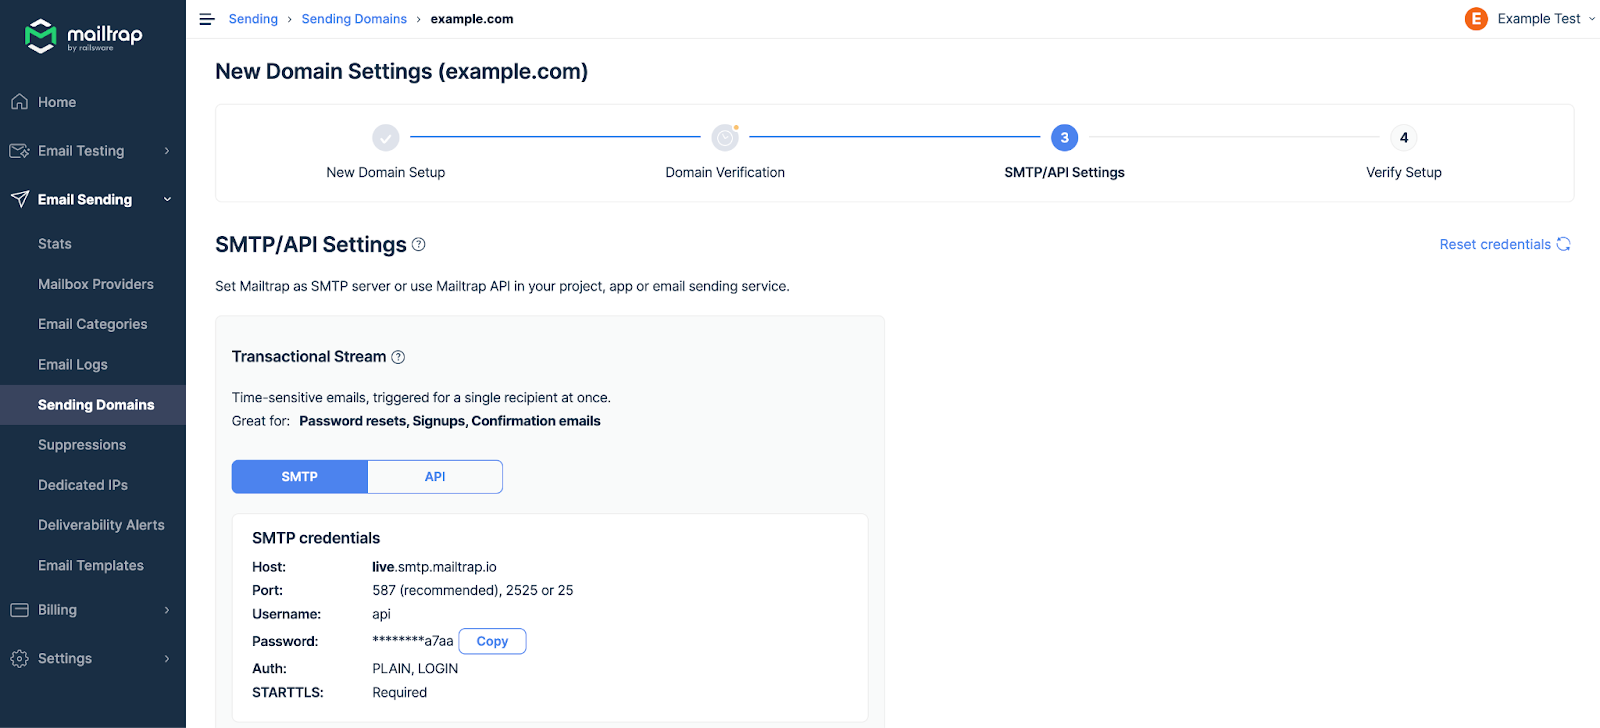
- Copy-paste Mailtrap SMTP Settings to the corresponding Salesforce Email Relay fields. Here’s a quick breakdown.
- Host: live.smtp.mailtrap.io
- Port: 587
- TLS Settings: Required Verify
- Enable SMTP Auth: Checked
Important Note:
Check the box next to Enable SMTP Auth so Salesforce authenticates against Mailtrap. Salesforce supports PLAIN and LOGIN, and so does Mailtrap; you get the credentials under SMTP/API Settings.
Set TLS Settings to “Required Verify” so the connection is both encrypted and verified. If you leave SMTP Auth unchecked, Required Verify becomes essential rather than optional.
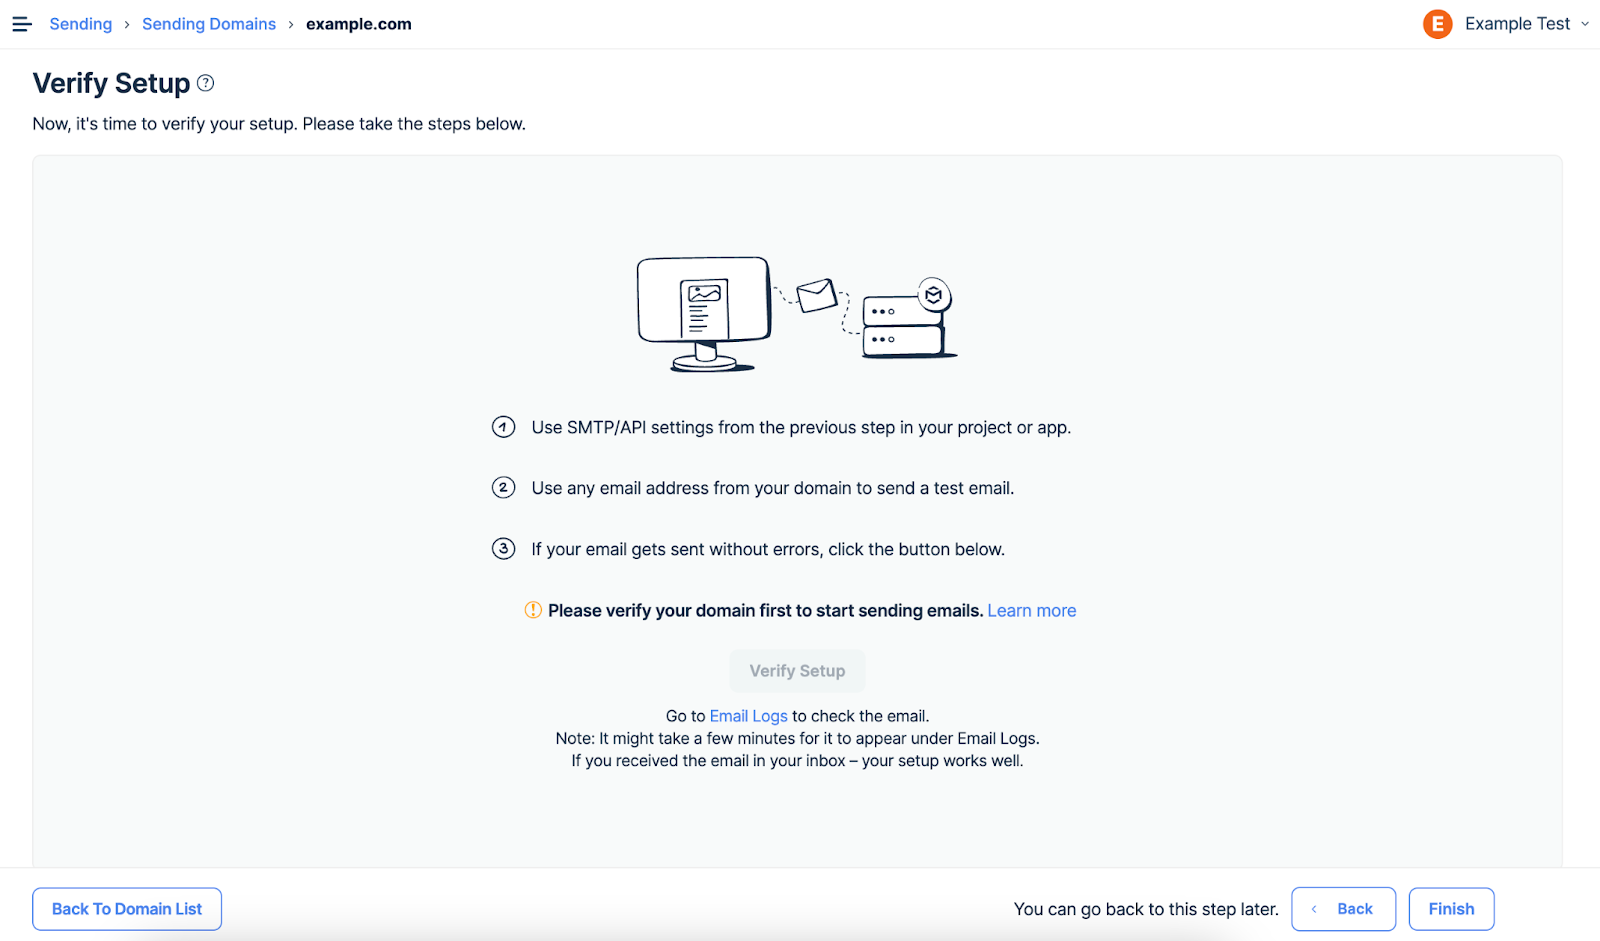
- Finally, go to Step 4 and Verify Setup with Mailtrap. Salesforce’s own Test Deliverability check, under Setup, will confirm the relay itself is wired up.

Salesforce Email Relay Gmail
There aren’t many prerequisites with Google. You need a Business account with system administrator access to Google Workspace, and you’re good to go. Of course, the steps below assume you already logged in and are ready to start relaying.
- Within the Google Console, click Apps in the menu on the left, then select Gmail.


- Once inside the Gmail menu, scroll down, and select the Routing menu. Then, navigate down to the SMTP relay service section.

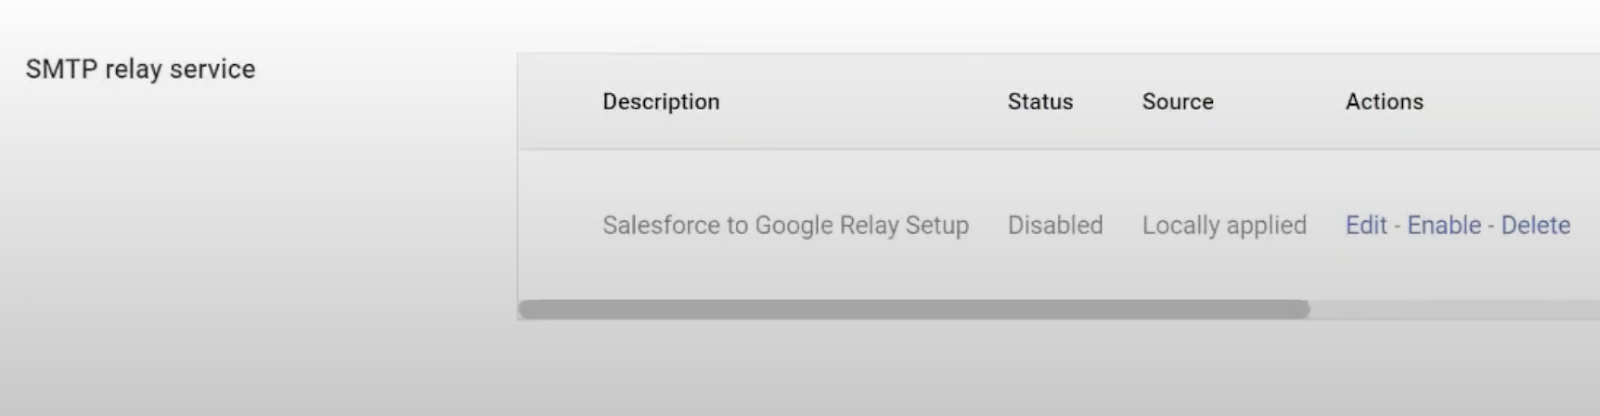
- Click on the Edit Action, then set up the relay for Salesforce using these parameters.
- Allowed Senders > “Only address in my domains”
- Authentication > check the box in front of “Only accept mail from the specified IP addresses”

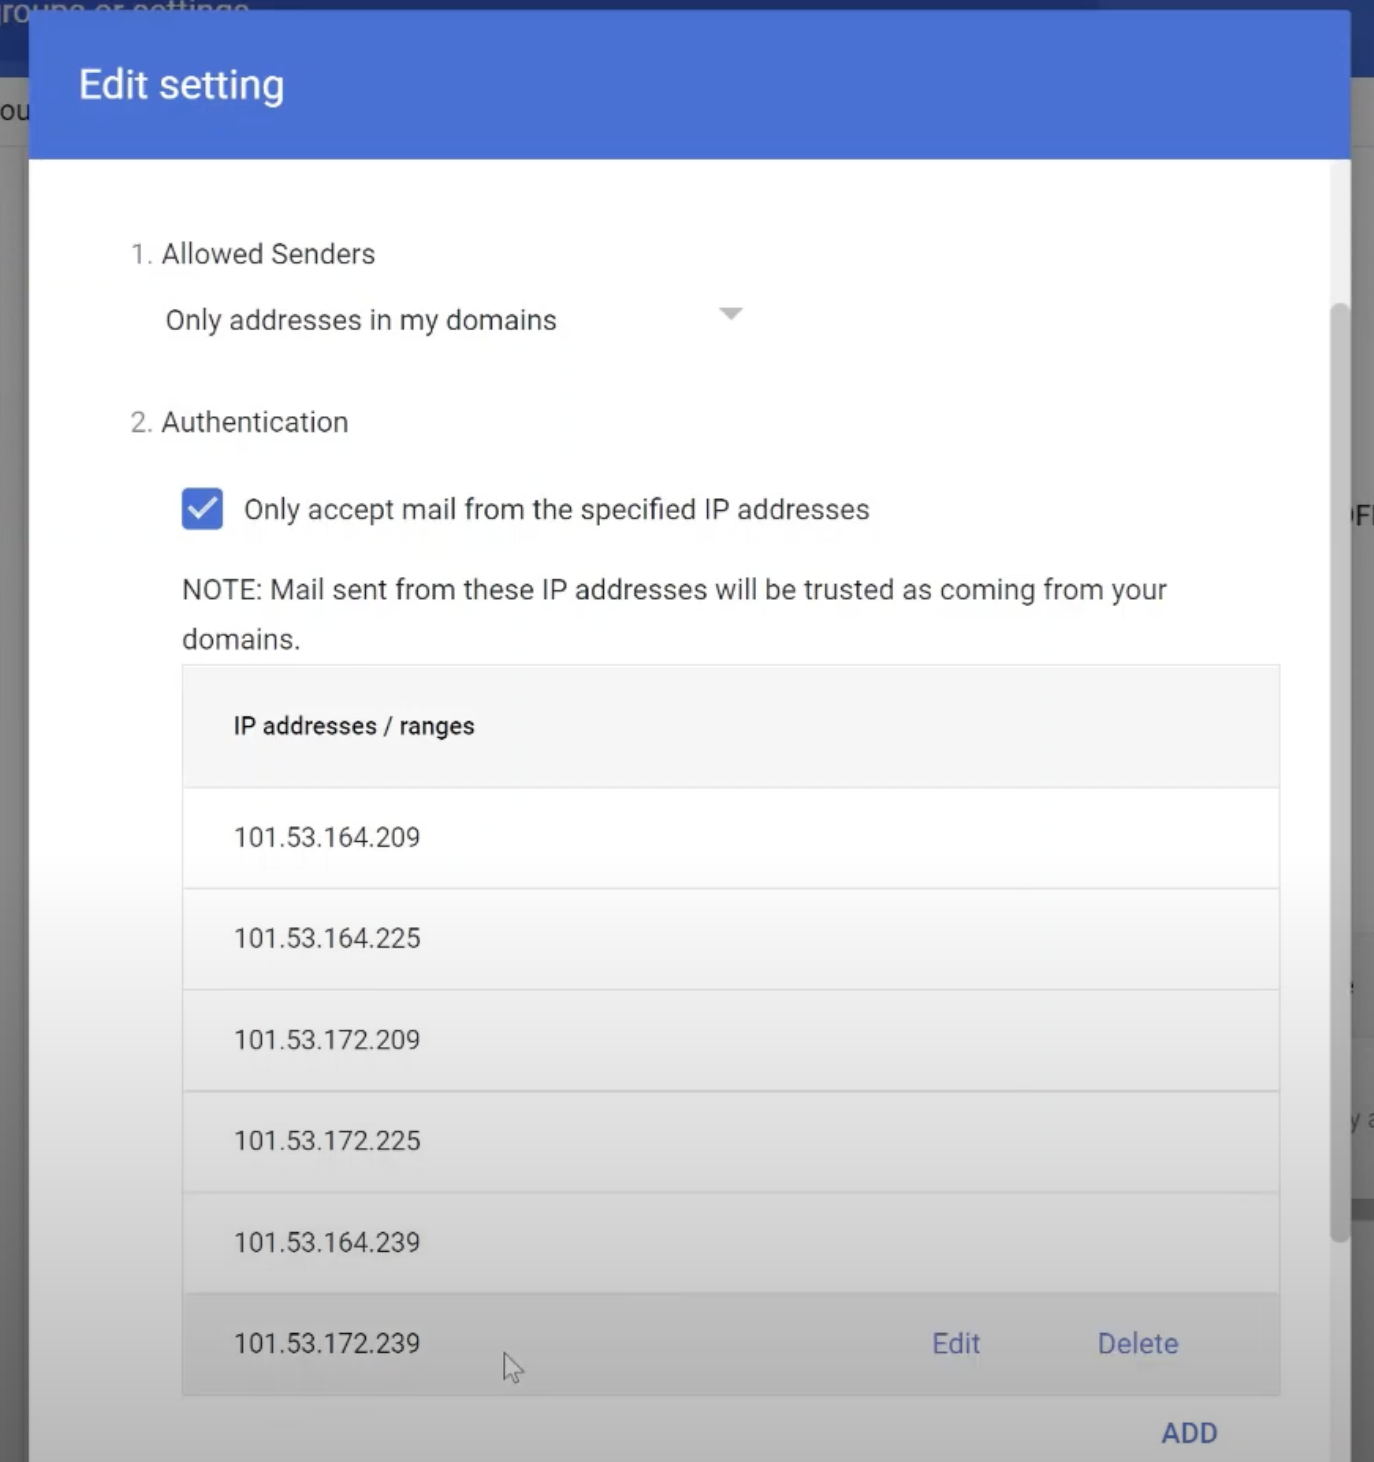
- Make sure to set up the IP addresses and ranges Salesforce uses for sending. Here’s the official documentation. To do it, just click Add, and copy-paste the IP address or range that works for you, then click Save to confirm.

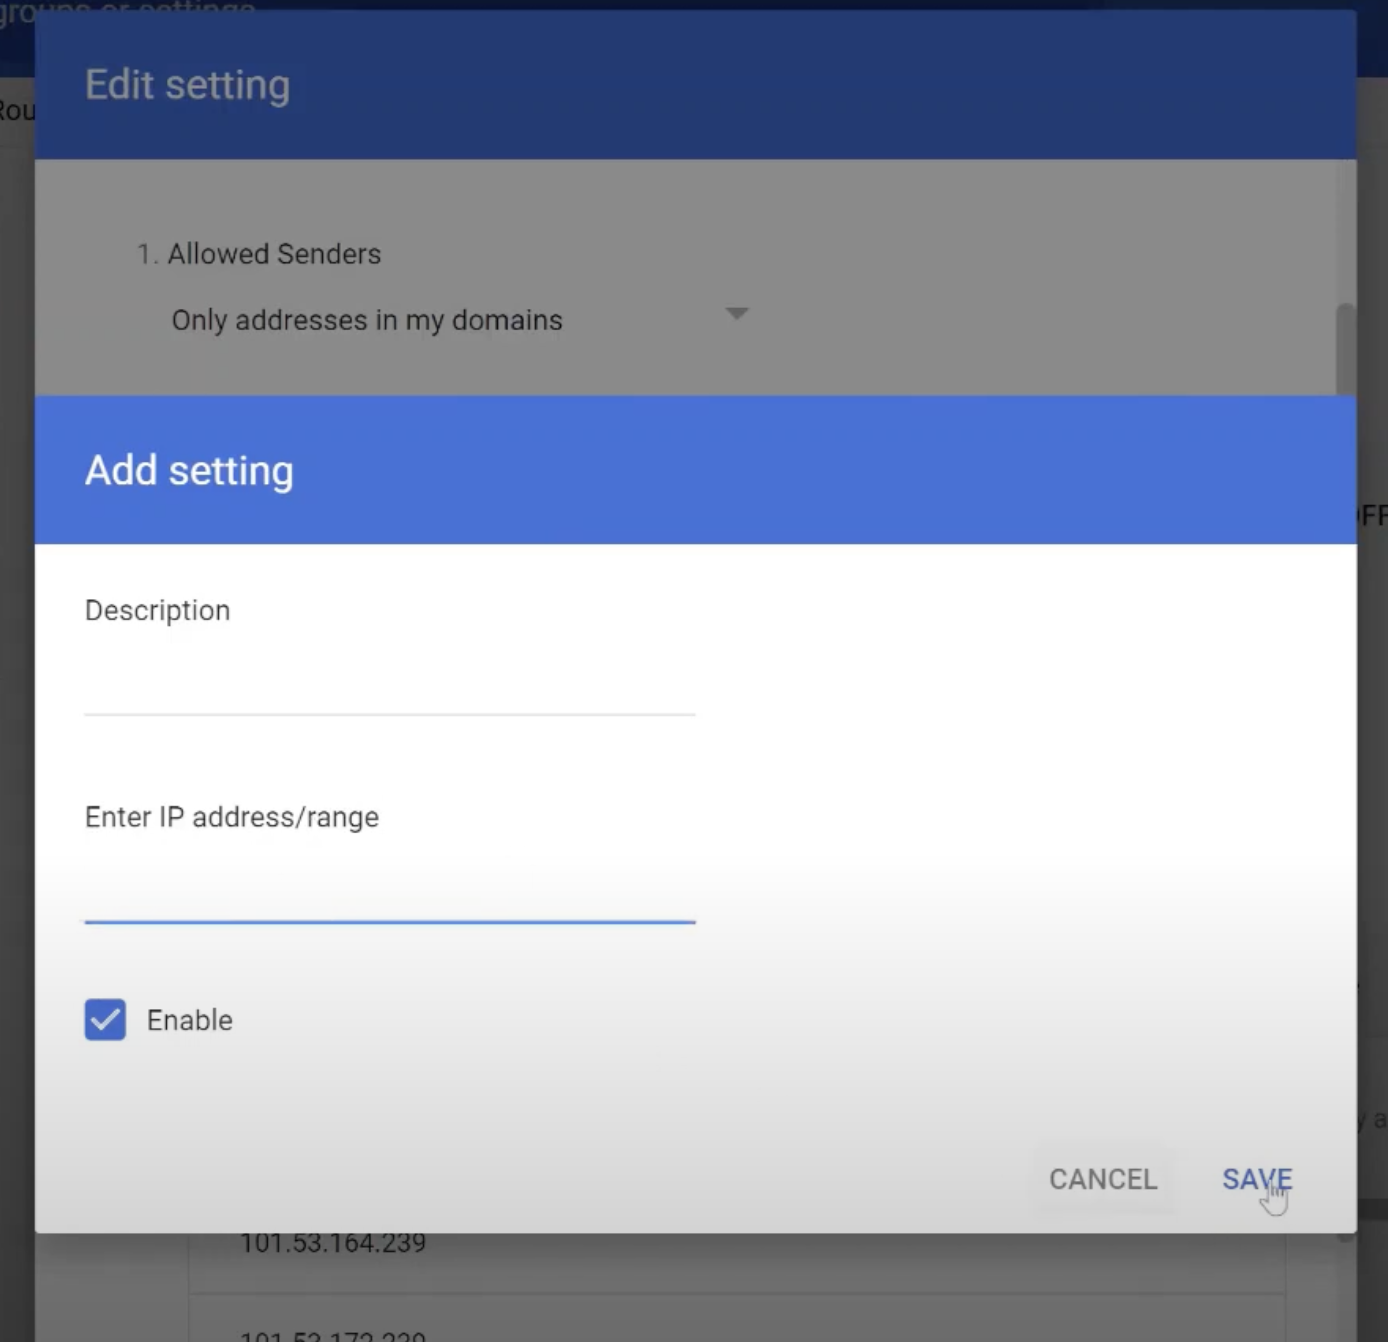
- After adding the IP addresses, leave all the default settings as is, and click Save again to confirm.
- Now, go back to Salesforce Email Relay setup we previously covered, and add credentials for Google. Here are the properties to include.
- Host > smtp-relay.gmail.com
- Port > 587 [Note: default port is 25, but it’s best to avoid it since it’s often blocked due to abuse]
- TLS Settings > Preferred
- Enable SMTP Auth > You can keep the option unchecked

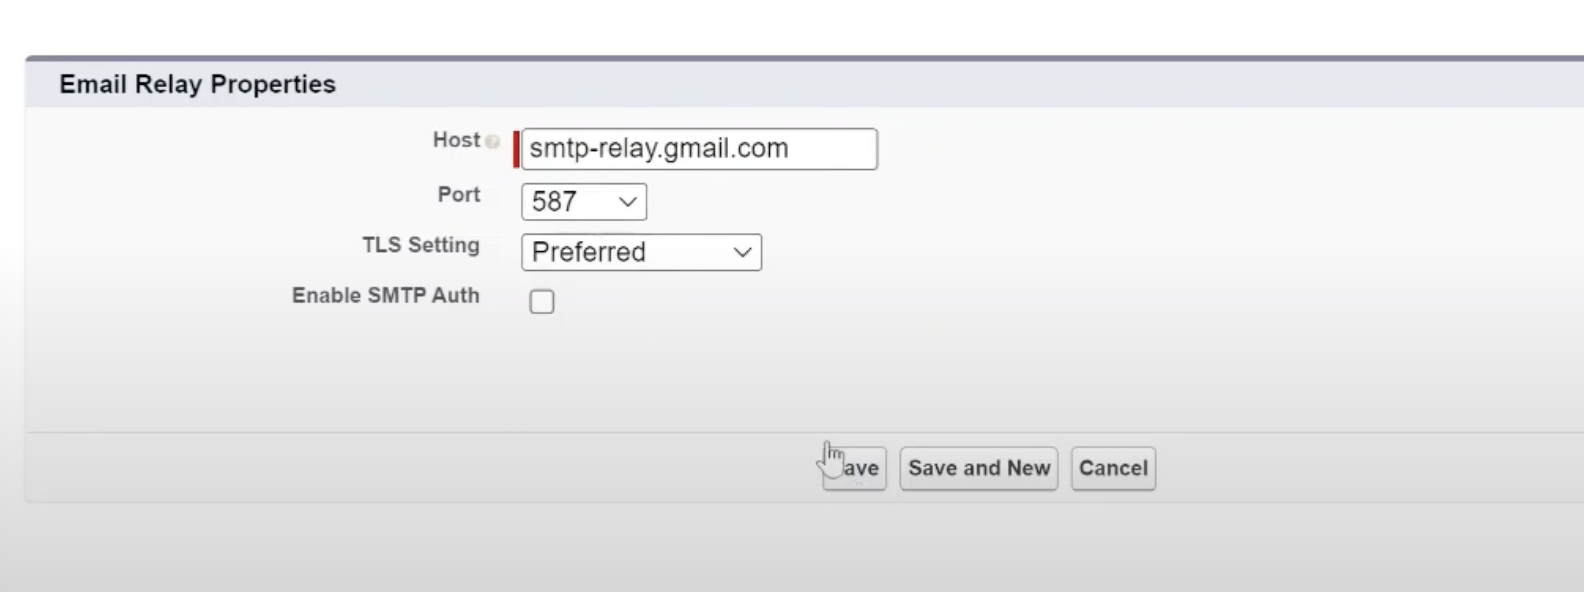
- That’s it. Run Salesforce’s Test Deliverability check to confirm the relay is wired up.
Salesforce Email Relay Office 365
Read this before you follow this section. Microsoft renamed Office 365 to Microsoft 365, though its admin screens still say “Office 365” in places, and the steps below keep the old name wherever the UI does. More importantly, Salesforce’s own documentation now states that Email Relay does not support sending through Microsoft 365 or Exchange Online to recipients outside your organization, and that it isn’t recommended. The steps below still work and are widely used for internal mail flow, but if your Salesforce email goes to customers, treat this route as unsupported and use a dedicated SMTP provider instead.
With that said, there are some further email relay considerations and limitations to note.
- According to Salesforce official docs, email relaying between Salesforce and Microsoft won’t work out of the box. Due to the multi-tenant nature of the services and all the corresponding authentications, there’s a chance to get an “Relay Access Denied ATTR36” error during the email handoff. Check the official docs to avoid it.
- You need administrative access to Microsoft 365. Or you could use developer editions under the Microsoft 365 Developer Program if you just want to test out the setup.
- You need to add and authorize a domain with Microsoft. We won’t go into details in this article, but you can check the official docs here.
- You need administrative access to Salesforce org. Salesforce.com also offers a zero-investment developer edition. You can sign up for it here, but keep in mind that it has specific limitations when it comes to relay usage and email sending.
With that in mind, let’s go into the micro tutorial.
- In the Exchange Admin Center, go to Mail Flow, then choose the Connectors tab.
- Click the ‘+’ icon to add a new connector.


- You’ll see a pop-up where you need to select “Partner organization” under From, and “Office 365” under To — that is the label Microsoft still uses on this screen.
- Hit the Next button, then name and describe your connector.


- Hit Next again and choose “Use the sender’s IP address” to identify Salesforce as a partner org.
- Again, you click the ‘+’ icon and add all the Salesforce IP addresses. Here’s the official doc to copy-paste the addresses.
- You guessed it – it’s Next again, then Save.
- Move to Salesforce, and follow the previously described steps to set up a new relay. Here are exemplary credentials, but make sure double-check what Microsoft 365 offers on your side.
- Host: (MX DNS record value – e.g. >yourdomain-com.mail.protection.outlook.com)
- Port: 25 (may also want to consider 587)
- TLS Setting: Preferred
- Enable SMTP Auth: (unchecked)
- Now, run Salesforce’s Test Deliverability check to confirm the setup.
Pro Tips — these apply to any relay, not just Microsoft 365:
- In Salesforce, navigate to Deliverability, and make sure the checkbox for “Enable compliance with standard email security mechanisms” is unchecked.
- If you activate bounce management with Salesforce, you either need to disable it, or create a DMARC policy and use Salesforce’s DKIM signing.
- All messages from Salesforce carry an X-SFDC-LK header with your Org ID. Have your relay check it, and only relay mail that has the right Org ID. It’s also best to have a mail flow rule to restrict the email origins.
- When you are checking a relay, read the message headers. Under the X-SFDC records you can see the Org ID, User ID and TLS settings, which confirm the mail took the route you think it did.
How to test your Salesforce email relay
Salesforce’s own Test Deliverability check, under Setup, tells you the relay is wired up: it pushes a message through and you go and look for it. What it does not tell you is what that message looks like once it lands, and it needs a real mailbox you are willing to send to. To read the email itself — how it renders, whether the merge fields resolved, what its spam score is — you need somewhere to catch it instead.
Mailtrap Email Sandbox for Salesforce does that from inside the org. Turn Testing Mode on and outbound email is routed to a Mailtrap sandbox instead of a Contact or Lead, so you get the full message: HTML and plain text, headers, attachments, rendering across clients, and a spam score, with merge fields resolved against real records. It works with Sales Cloud, Service Cloud, Experience Cloud and platform email, including Flow, Apex, email alerts and templates. It does not support Marketing Cloud.
Mailtrap’s Email Sandbox for Salesforce setup guide walks the connection screen by screen. In short, it is a one-time admin job: install the package from the AppExchange listing, assign the permission set, configure a Named Credential, then connect your Mailtrap API token and pick the sandbox to route into. One detail worth knowing before you start, because it fails quietly: the API token needs Viewer permission on the Mailtrap account and Admin permission on the sandboxes, or the sandbox picker comes up empty and tells you nothing useful.
After that, using it is two steps. Turn Testing Mode on, then send from Salesforce exactly as you normally would and read the message in the Mailtrap sandbox. Turn the toggle off and the relay you configured earlier carries your email again.
Two things to plan for. Testing Mode applies to the whole org, so while it is on no customer receives email from it. And messages captured while it was on are not sent afterwards when you switch it off.
If you already relay Salesforce email through Mailtrap Email API/SMTP — and this is the article that just walked you through setting that up — your relay configuration stays as it is. Testing Mode is a toggle: while it is on, email is captured instead of delivered, and when you turn it off, sending goes back through your relay as before. The install is the part to do carefully, so put the package into a Salesforce sandbox org first rather than straight into production, and confirm your sending relay is still intact before you repeat it in the org that sends to customers.
It is free to use with the Mailtrap Free plan, which covers 50 test emails a month, one sandbox, and one email every 10 seconds, and does not support multiple recipients on a single email. Connecting Salesforce to a paid Mailtrap plan requires the paid add-on. Paid Email Sandbox starts at $17 a month, or $14 a month billed annually ($168 a year). Our guide to testing emails in Salesforce has the full walkthrough.
1, 2, 3… Configure email relay with Mailtrap
Okay, pun intended, and we’re tooting our own horn a bit.
To sum up, the Salesforce email relay acts as a bridge between your Salesforce organization and your email server, making your email more reliable and easier to customize.
Whether it’s through Mailtrap, Google, or Microsoft 365, configuring it to your specifications can significantly enhance the performance of your customer engagement strategies.
The micro tutorials in this article provide a deep-dive into the integration process, ensuring you can set it up with ease.
Configured properly, an email relay gives you control over how Salesforce email leaves your org and over the sender reputation it goes out on. If you also want to see what those messages look like before they reach anyone, the Mailtrap Email Sandbox for Salesforce section above covers that.