


From big established enterprises to just-launched startups, all these businesses have a need to reach a large number of contacts simultaneously as part of their cold outreach, promotional, and other efforts. Doing so manually is obviously not an option, and that’s where sending mass email/bulk email campaigns comes in handy.
These campaigns are quick to create as they bear universal messaging and are sent to non-segmented email lists. But, on top of that, they are also efficient and effective, and can even come with a dash of personalization.
When it comes to sending bulk emails in Outlook, you have two options:
- The easy way – With Charge for Outlook, you can send up to 1,000 personalized emails per campaign, customize each email using variables, preview them before sending, and track reply rates. Charge is the great way to manage email outreach from Outlook.
- The default way – Using Mail Merge, Outlook’s built-in method, allows for bulk emailing.
In this article, using a step-by-step approach, we tackle how to send bulk emails in Outlook email client as part of our growing bulk email-sending series, covering services such as Gmail, Salesforce, and so on.
So, if you want to learn more, keep reading!
How to send bulk emails from Outlook
Step 1 – Put your contacts in a group
To make the tedious task of bulk emailing a bit easier, it’s recommended to group your selected contacts once you have your Outlook desktop app or web app running. This is done by navigating to the People tab and then selecting New contact list.
This will cause a new pop-up window to appear where you need to name the new list and select the contacts.
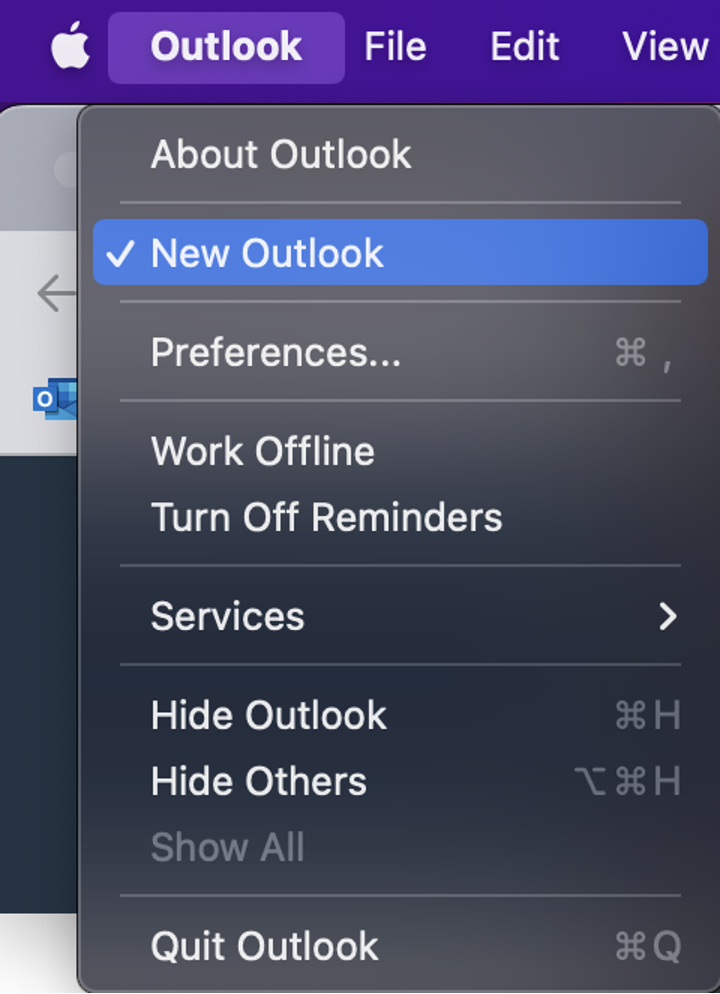
Note: If you are using the latest version of Outlook for Mac, you will need to revert back to an older version to create a contact list. This is done by unclicking the New Outlook option at the top of your screen.

Step 2 – Compose the email
The process of composing the email will look basically the same for your bulk campaign, be it email marketing or another bulk campaign type, as it does for single-email campaigns. So, to start, you can simply go into your Outlook email account, click on New Mail/New Message, and write or paste the email copy.
Step 3 – Set a contact list as the email recipient
With the email copy ready, it’s time to define the recipients of your bulk email campaign. This step is where the Outlook contact list we created earlier comes in. The name of the list should be pasted in the To field, thus making all the contacts on it recipients of your bulk campaign.

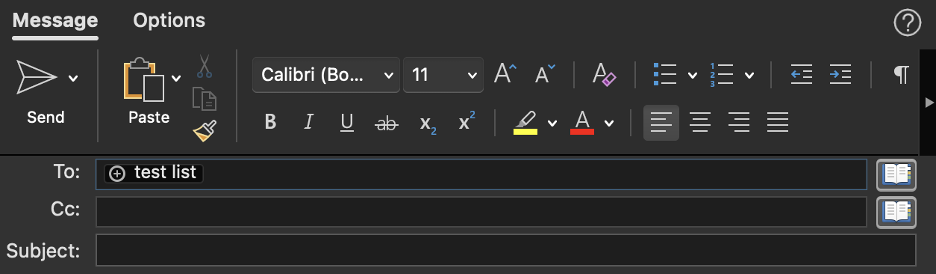
Note: Screenshot from Outlook for Mac
Do keep in mind that by using the To field, you expose the entire list of contacts to every recipient. If this is not what you want to do, please proceed to the next section of this article, where we explain how to keep the recipients hidden.
Step 4 – Complete a final review and send
Body of the email? Done! Recipients list? Set! What’s left for you to do before firing off the bulk email campaign? Conduct a final review!
First, make sure you comply with the latest sender requirements from Google and Yahoo.
And if you’re worried about landing in spam, this video walks through how to get bulk emails back on track and avoid spam filters:

Then, inspect the email either manually or using an email sandbox, and once you are are happy with how it’s looking, feel free to click the Send button.
Depending on how big your contact list is, delivering the email might take anywhere from a few seconds to a couple of minutes.
How to send bulk emails from Outlook and hide recipients
Why should you be hiding recipients?
In the previous section, we warned you that defining your bulk email recipients in the To field will lead to the exposure of the email addresses of all the recipients. In this section, we teach you how to avoid doing the same, but before proceeding to that, let’s break down why using the To field for bulk campaigns is such an issue:
- It goes against data protection and privacy regulations – With recipient email addresses exposed, you risk violating laws and regulations such as GDPR but also causing concern among the recipients regarding which third parties now have their address and how they might use that information.
- It opens the door for spammers – Spammers are looking for any way to get ahold of fresh new batches of contact information. With that said, you can be sure that if you provide this information in your bulk email campaigns, they won’t miss the opportunity to harvest it and use it for malicious activities such as sending unsolicited emails.
- It makes you look unprofessional – Professional email marketers put the privacy of their contacts as a number one priority. Just think of a time when you received an email with an exposed recipient list. You weren’t impressed by the clutter or by having your email accessible to everyone, were you? What’s more, you probably didn’t view the sender as someone who should be contacting you.
- It makes “reply all” disasters possible – Reply all is a handy Outlook feature for when all the recipients of an email should also receive a response being sent related to the same email. But the feature being there doesn’t necessarily mean it’s suitable for bulk campaigns, as people could use it to send irrelevant responses and clutter the inbox of everyone involved.
- It’s a red flag for email service providers and spam filters – Besides looking messy, bulk emails with exposed lists of recipients also give off a spammy look. For email service providers and spam filters, this could be reason enough not to deliver the emails to the main inbox and instead send them to the dreaded spam folder.
Step 1 – Follow and complete steps 1 and 2 from the previous section
As one might assume, sending a bulk email in Outlook without showing addresses entails essentially the same steps we described in “How to send bulk emails from Outlook”, with a few minor differences.
So, as the first half of the process, repeat the following from the previous section:
- Put your contacts in a group
- Compose the email
Step 2 – Set the contact list as the email recipient in BCC
When sending a bulk email campaign in Outlook with the recipients exposed, we used the To field and pasted the name of our contact list there. Now, to actually hide the recipients, we’ll switch to using the BCC field.

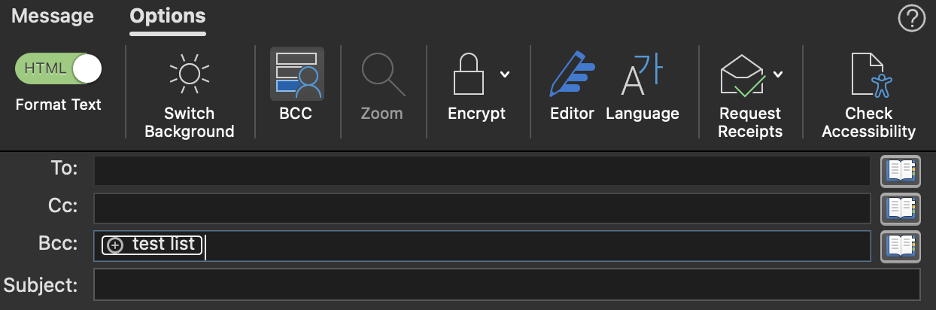
Note: Screenshot from Outlook for Mac
Step 3 – Follow and complete step 5 from the previous section
For the rest of the process, simply review the email and send it off as you would when using the TO field. After that, upon receiving your email, the recipients should be able to see everything as usual but not the whole contact list that received it.
How to send personalized bulk emails from Outlook
If you’ve ever dabbled in the world of bulk emails, you might have heard of the term mail merge. Mail merge is essentially the process of tailoring emails to their recipients by using data stored in a spreadsheet, database, and other types of structured files.
This same process can be used when you want to send personalized emails to multiple recipients from Outlook.
Let’s see exactly how!
Step 1 – Create a message draft
When using the mail merge feature, we won’t be drafting the message body in the built-in compose window of Outlook. Instead, we’ll do so in Microsoft Word.
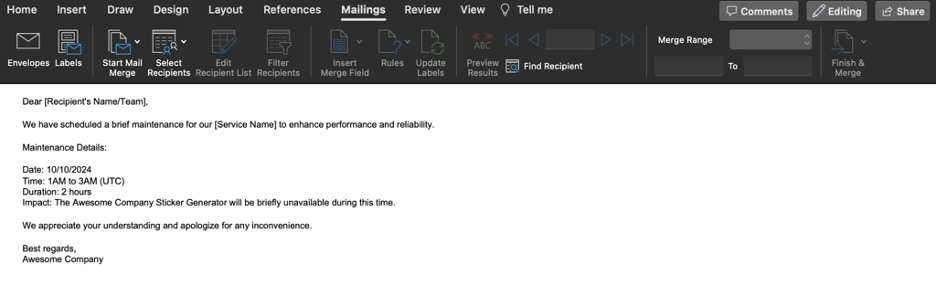
Here is the message body we’ll use as an example:
Dear [Recipient's Name/Team],

We have scheduled a brief maintenance for our [Service Name] to enhance performance and reliability.

Maintenance Details:

Date: 10/10/2024
Time: 1AM to 3AM (UTC)
Duration: 2 hours
Impact: The Awesome Company Sticker Generator will be briefly unavailable during this time.

We appreciate your understanding and apologize for any inconvenience.

Best regards,
Awesome Company
Also, when completing this step, feel free to use email templates in plain text format.
Step 2 – Start mail merge
When you’re happy with your message body, it’s time to navigate to the Mailings tab in Word and then to Start Mail Marge -> Email Messages.

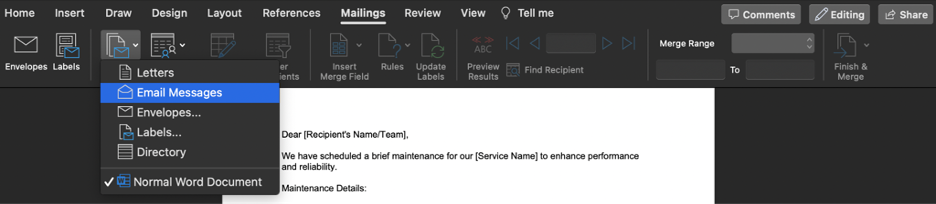
Doing this will change the layout slightly, and your screen should look as below:

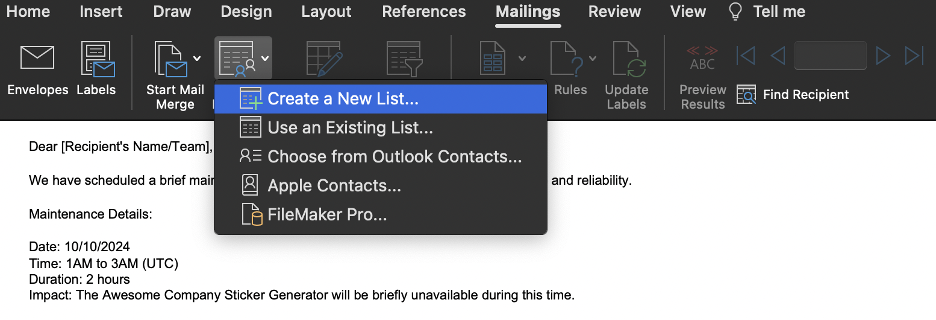
Step 2 – Define the recipients
Next, what you need to do is define the recipients of the bulk email campaign using the Select Recipients option in Word. This will present you with several options:

Step 3 – Add merge fields
This step is where you actually add the elements of personalization by placing merge fields – placeholders or variables used to personalize and customize email content for each recipient and recognizable by containing guillemets “«»” in Word.
The option to do so is also located in the Mailings tab under Insert Merge Field.

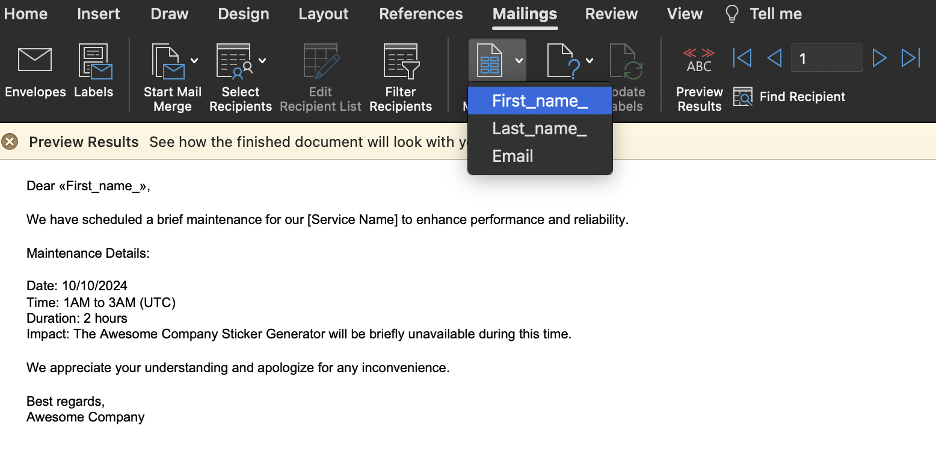
And the option to see how the final result will look is close by, named Preview Results.

Step 4 – Merge and send off the emails
Merge fields out of the way, and you’re now ready to send off your bulk email. Doing this is simple and entails clicking the Finish & Merge button and selecting the Merge to Email option.

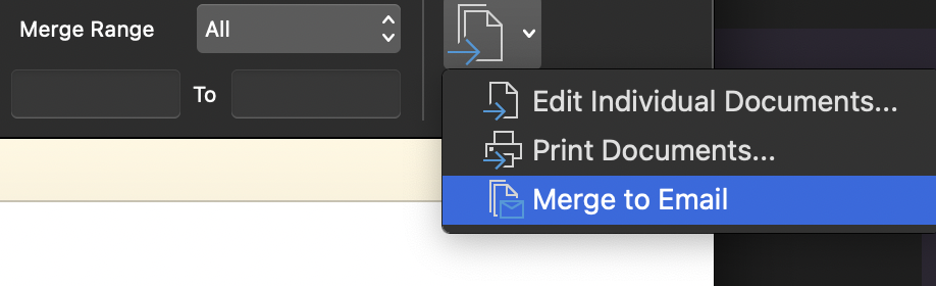
After that, you’ll be asked to define the To field, subject, and format of each email (plain text or HTML).

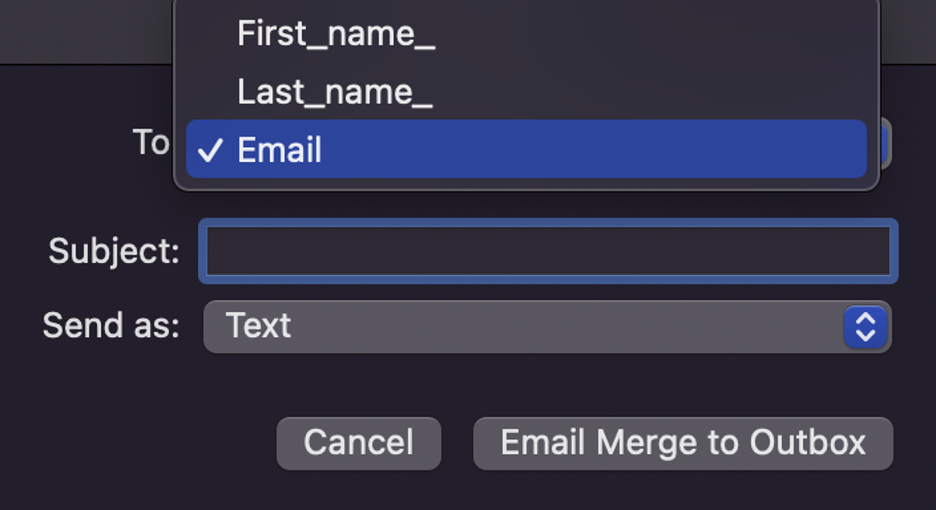
Clicking the Email Merge to Outbox button will initiate the email sending and get your personalized emails on the way to their recipients.
How to send bulk emails from Outlook using Excel
As mentioned earlier, spreadsheets and the mail merge option go hand in hand. So, let’s see what it looks like in practice to use the mail merge and Excel combination to send bulk emails in Outlook.
Step 1 – Get your spreadsheet ready
The basis for sending bulk emails from Excel will be, you guessed it, a spreadsheet with the contact information of your recipients as well as some of their personal data you might want to insert using merge fields.
The spreadsheet should contain properly named columns for each data type, as you’ll need these names later in the mail merge process.
Step 2 – Create a message draft
For the second step, drafting the message body, you won’t have to do anything different than what we described earlier. So simply write your email copy, and once you’re happy with it, proceed to the next step.
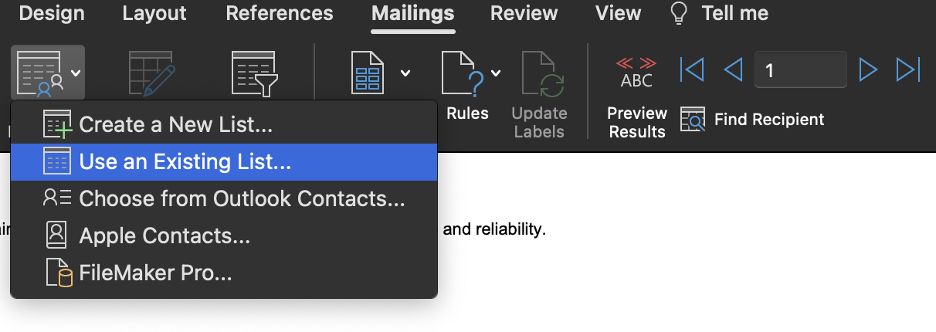
Step 3 – Connect the Excel spreadsheet and the Word document
The connection between the spreadsheet and the document created earlier is established by navigating to the Mailings tab in Word, clicking on Select recipients, and then on Use an existing list. This will allow you to select the spreadsheet or a .csv file as a data source.

Step 4 – Personalize the email with merge fields
Once you have the spreadsheet connected to the Word document, you can use the data it contains to personalize the email body. So, as described earlier, simply click on Insert Merge Field, place the merge fields where necessary, and preview the results.
Step 5 – Merge and send off the emails
The last step of the process is again one we’ve described before, so we won’t go into too many details again. We’ll just remind you to click the Finish & Merge button, select the Merge to Email option, and fill in any details the pop-up window asks you to – the To filed, subject, and format of each email – before hitting the Email Merge to Outbox button.
How to send bulk emails from Outlook using Excel and VBA
The fact that Excel is so versatile is evident even in the process of sending bulk emails, as doing so is also possible with the use of Visual Basic for Applications (VBA) code.
Here is what the process entails, assuming you have your contact list spreadsheet ready to go.
Step 1 – Open the VBA editor
To write the email-sending VBA code, you’ll need to open up the VBA editor. This can be done by navigating to the Developer tab and then clicking on Visual Basic.


Step 2 – Create a new module
With the editor open, proceed to create a module by clicking Insert -> Module. This should open up a dialog window where you can write your own code or copy and paste the example we provided.


The code below essentially loops through a list of recipients stored in an Excel sheet and sends each of them an email using Outlook.
Sub SendMassEmailsWithAttachments()
    Dim LastRow As Long
    Dim MailSubject As String
    Dim MailBody As String
    Dim RecipientEmail As String
    Dim RecipientName As String
    Dim AttachmentPath As String
    Dim EmailCount As Long
    Dim Result As String


    ' Determine the operating system
    Dim isMacOS As Boolean
    isMacOS = (Application.OperatingSystem Like "*Mac*")


    ' Get the common details from the second row (headers)
    With ThisWorkbook.Sheets("Sheet1")
        MailSubject = .Cells(2, 3).Value
        MailBody = .Cells(2, 4).Value
        AttachmentPath = .Cells(2, 5).Value
        LastRow = .Cells(.Rows.Count, "A").End(xlUp).Row
    End With


    ' Loop through each row in your Excel sheet, starting from the third row
    For Each cell In Sheets("Sheet1").Range("A3:A" & LastRow)
        RecipientName = cell.Offset(0, 1).Value
        RecipientEmail = cell.Value


        If isMacOS Then
            ' Use AppleScript for macOS
            Dim Parameters As String
            Parameters = RecipientEmail & "|" & MailSubject & "|" & MailBody & "|" & AttachmentPath
            Result = RunMacScript("SendOutlookEmail.scpt", "sendEmail", Parameters)


            If Result = "Done" Then
                EmailCount = EmailCount + 1
            End If
        Else
            ' Use Windows-based method
            Dim OutlookApp As Object
            Dim OutlookMail As Object
            Set OutlookApp = CreateObject("Outlook.Application")
            Set OutlookMail = OutlookApp.CreateItem(0)


            ' Fill in email details
            With OutlookMail
                .To = RecipientEmail
                .Subject = MailSubject
                .Body = MailBody
                If AttachmentPath <> "" Then
                    .Attachments.Add AttachmentPath
                End If
                .Send
            End With


            ' Release the email object and Outlook application object
            Set OutlookMail = Nothing
            Set OutlookApp = Nothing


            EmailCount = EmailCount + 1
        End If
    Next cell


    ' Display the final result message
    MsgBox "Done" & vbCrLf & EmailCount & " emails sent"
End Sub


Function RunMacScript(scriptName As String, handler As String, params As String) As String
    On Error Resume Next
    RunMacScript = AppleScriptTask(scriptName, handler, params)
    On Error GoTo 0
End Function
Extra step for MacOs
For macOS, you must either manually create a .scpt file or utilize the Script Editor to do so and paste the code below into the file.
The file should be placed in the directory ~/Library/Application Scripts/com.microsoft.Excel/.
Note: The code below assumes that the filename is SendOutlookEmail.scpt.
on sendEmail(inputParameters)
	set AppleScript's text item delimiters to "|"
	set parametersList to every text item of inputParameters

	set recipientEmail to item 1 of parametersList
	set mailSubject to item 2 of parametersList
	set mailBody to item 3 of parametersList
	set attachmentPath to item 4 of parametersList

	tell application "Microsoft Outlook"
		set newMessage to make new outgoing message
		set subject of newMessage to mailSubject
		set content of newMessage to mailBody
		make new to recipient at newMessage with properties {email address:{address:recipientEmail}}

		if attachmentPath is not "" then
			tell newMessage to make new attachment with properties {file:attachmentPath as POSIX file}
		end if

		send newMessage
	end tell
	return "Done"
end sendEmail
Step 3 – Run the code
To see how functional your VBA code is, you can run it in the code editor by clicking the ▶️ button.
If all looks good, save the spreadsheet as a macro-enabled one and close the editor.
Step 4 – Automate the sending process
If opening the editor and running the code as described above would be a hassle for you every time you want to send emails in bulk, you can somewhat implement automation by connecting your VBA macro to a command send button.
The option to do this is located in the Developer tab.

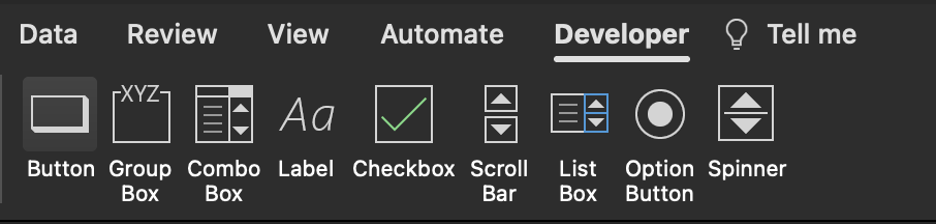
Once you drag a button onto the spreadsheet, you will be asked to assign a macro to it, but this can also be done by right-clicking on the button and using the Assign Macro option.


Lastly, just save the spreadsheet, reopen it, and the button should be working as intended.
For an in-depth tutorial on how to send emails from Excel, be sure to check out this video created by Mailtrap:
![Excel VBA [Email Scripts] - Tutorial by Mailtrap](https://i.ytimg.com/vi/m2m1p0aihXE/hqdefault.jpg)
How to send bulk emails with different attachments from Outlook
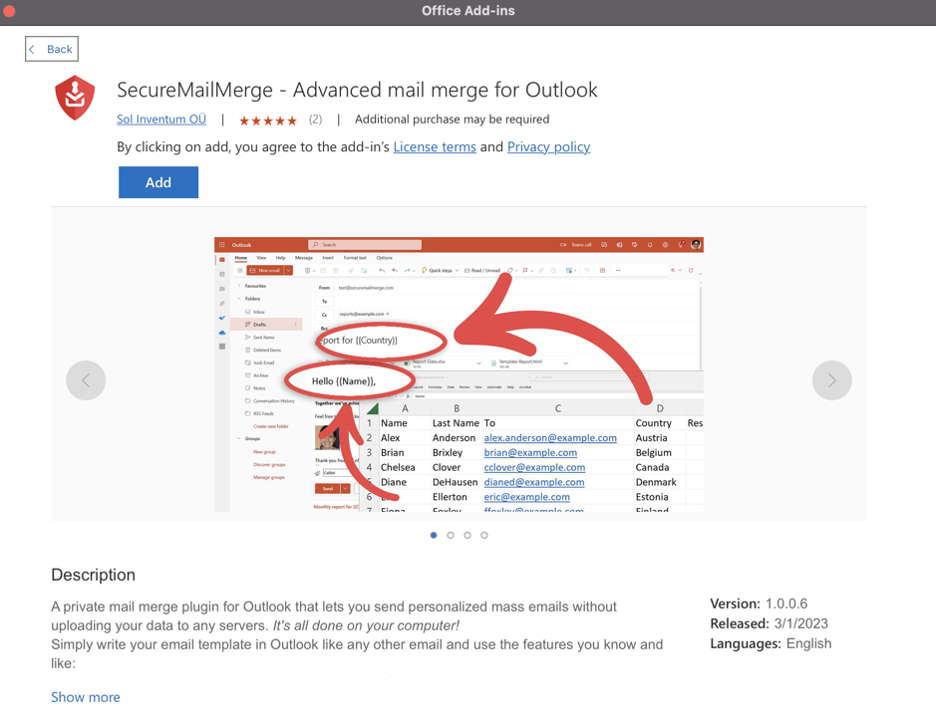
Personalizing using merge fields is one thing, but sending personalized attachments is a whole other ordeal and thus requires a special approach. Also, as Outlook is quite limited in this aspect, you’ll need a plugin to make it happen.
The plugin name is Secure Mail Merge and can be installed using the Get add-ins option in Outlook.

Step 1 – Get your spreadsheet ready
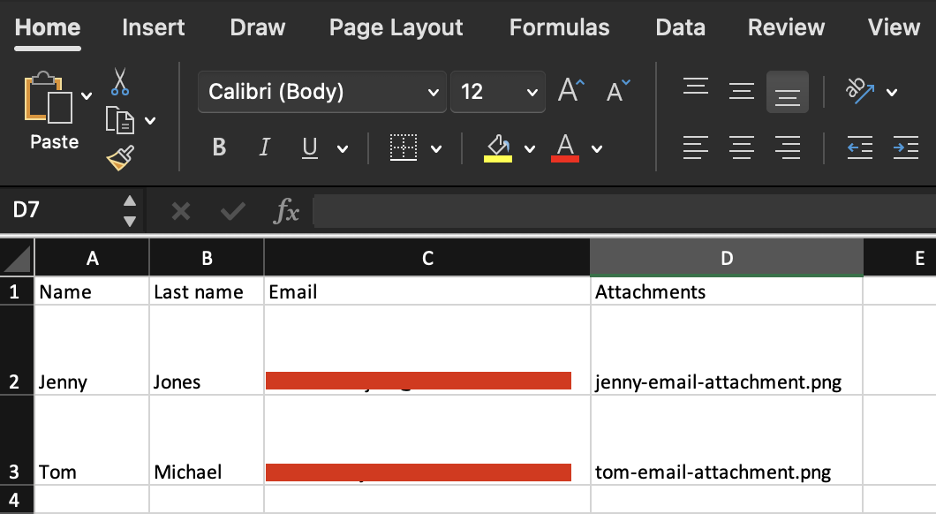
As was the case thus far, to send emails with different attachments from Outlook, you will need to create a spreadsheet containing recipient contact and basic information. Within the spreadsheet, you will need to have a column dedicated to attachments where you will write attachment file names.
Note: Make sure that the column containing email addresses is named To, as the plugin will be looking for it.

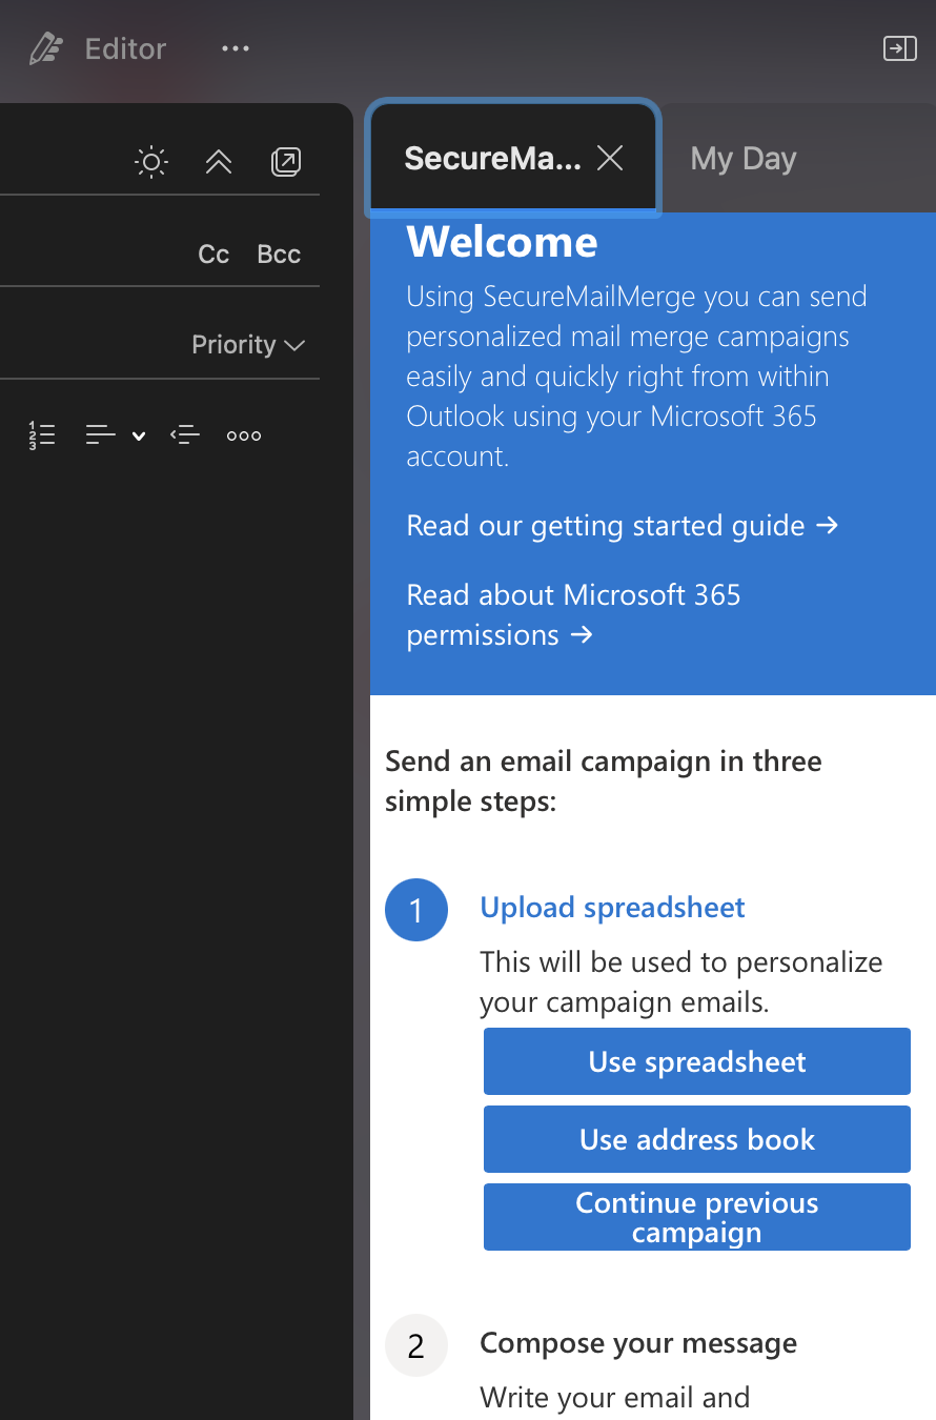
Step 2 – Launch the Secure Mail Merge plugin
In your Outlook dashboard, when you go to compose a new email, there should be an option for launching the Secure Mail Merge plugin. Once that is done, a popup window on the right-hand side of the dashboard should appear with instructions on how to send a personalized message mail merge campaign.

Step 3 – Connect the plugin and the spreadsheet containing the attachments
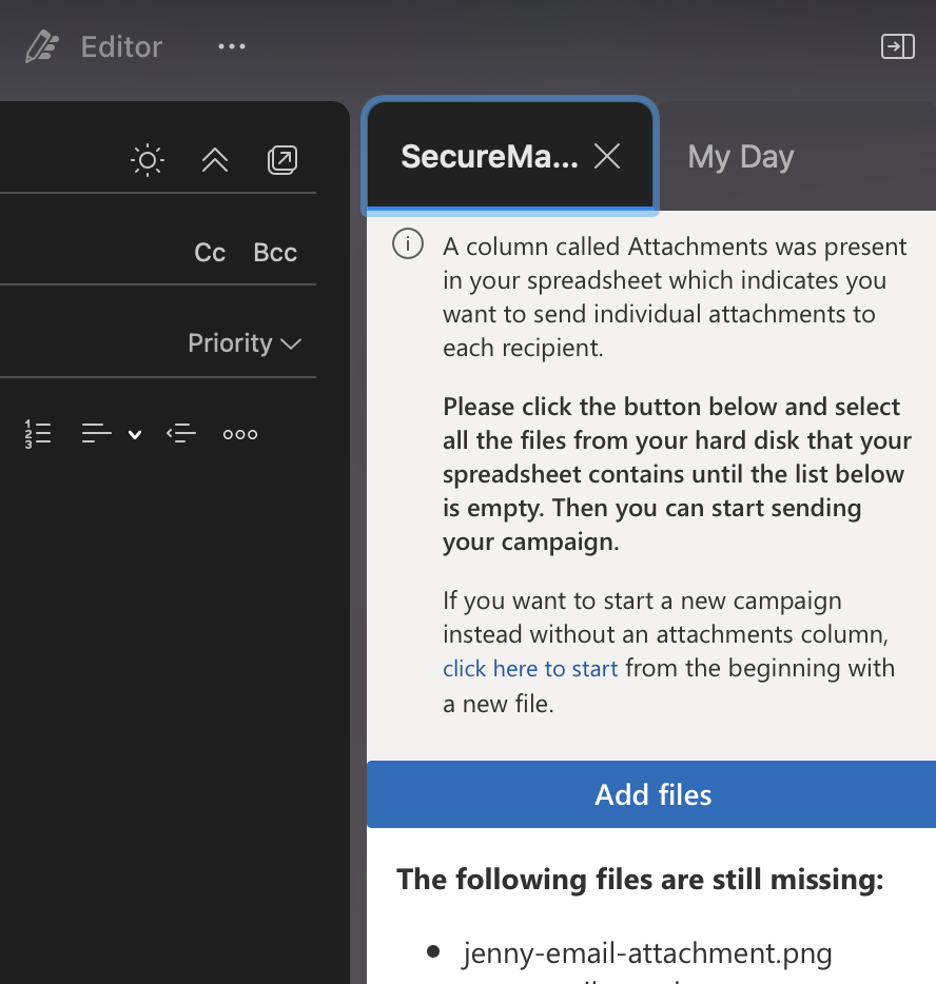
The Secure Mail Merge plugin will ask you to upload your spreadsheet as one of the first steps so it can grab both the data and the attachments from it.
Then, once it recognizes that your spreadsheet has an Attachments column, it will ask you to upload the documents mentioned in said column.

Step 4 – Compose the email and personalize the copy
With this plugin, you will also be able to personalize the copy by using “personalization tokens”, which bear the names of the spreadsheet columns and can be added to the email body or email subject line.

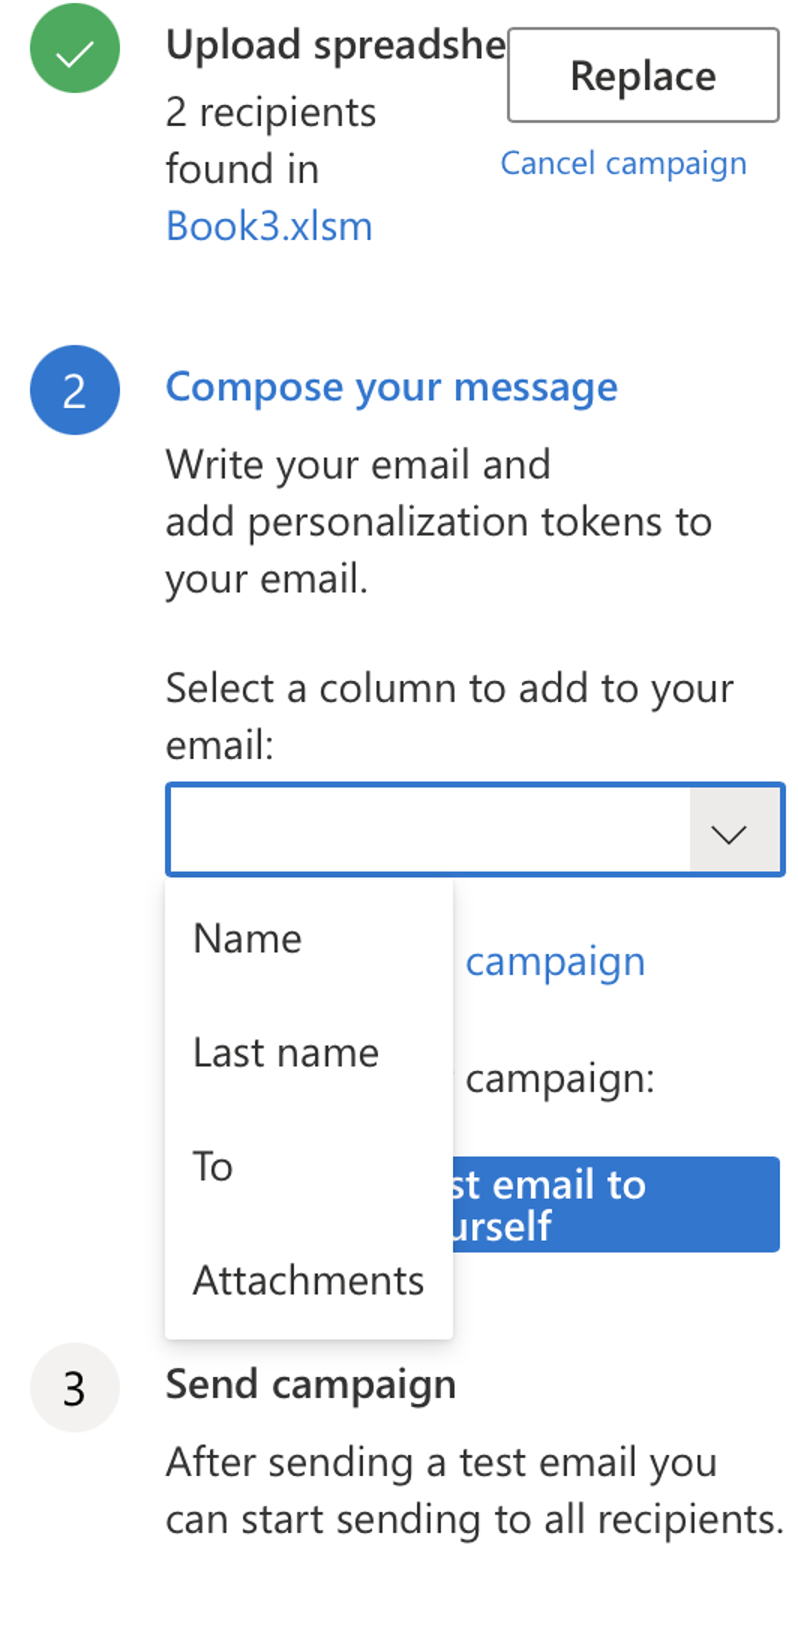
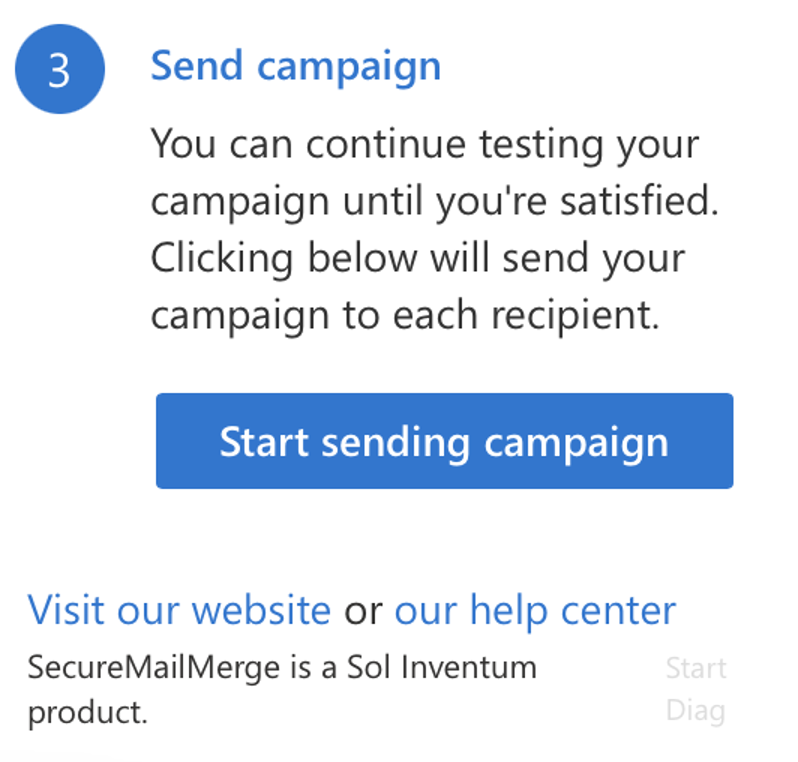
Step 5 – Test and send off the emails
The Secure Mail Merge plugin will provide you with a testing option within the plugin pop-up window, which you can use to send a test email to yourself.
After you’ve done that and think your bulk campaign is ready to reach recipients, you can click on the Start sending campaign button to finalize the process.

Possible limitations when sending bulk emails from Outlook
After covering all the possible ways of bulk emailing from Outlook, we understand that you might be very eager to try it. But before you do, there are some limitations you should be aware of:
- Number of recipients per email limit – Regardless of the Outlook version you are using, you will have certain limitations on the number of email recipients you can send an email to. This limit is typically around 500 but can vary from version to version.
- Number of recipients per day limit – When it comes to the number of recipients, limits are not only imposed per email. Instead, there are also daily recipient limits that can’t exceed 5,000 or 1,000 if the recipients are of the”non-relationship” type, meaning you’ve never sent an email to them before.
- Attachment size limit – The attachments that you send with your emails in Outlook need to fall under a certain size limit. For a single attachment file, this limit is 34 MB. But, if you go the OneDrive file share route, your files can be up to 2GB in size.
- Attachment type restrictions – Although you do have flexibility in terms of attachment types you can add to your emails, there are still some you should avoid, such as executable files, compressed archives with executable archives, script files, macro-enabled Office docs, encrypted/password-protected archives, etc.
Along with the mentioned limitations, there are some not-so-obvious drawbacks you need to be aware of:
- Lack of email list management – Despite its huge popularity as an email client, Outlook does not provide email list management, which you can use to organize and segment your email contact lists. For this, you’ll need a specialized tool that enables email list management and segmentation based on parameters such as demographics, engagement, etc.
- Lack of email design options – For those of you who want something more than just plain-text emails, Outlook might not be the best option as it lacks the design features necessary for adding high-quality visuals, advanced and interactive elements, and so on frequently seen in modern bulk email campaigns.
- Lack of personalization features – Throughout this tutorial, we’ve mentioned personalization using merge fields, which, although useful, is the more limited personalization method. For any advanced personalization, Outlook will most likely not be enough as it doesn’t enable adding dynamic content like personalized product recommendations, for example.
- Lack of automated tracking – Once your emails have been sent, you will most likely want to know how they are performing in terms of deliveries, bounces, opens, clicks, and other metrics. Unfortunately, in Outlook, features that would enable you to receive such information are not present.
- Lack of automated follow-ups – For some bulk campaigns, following up will be a requirement, and to complete such a task automatically, the use of specialized software will be necessary as Outlook supports only manual follow-ups.
- Lack of an opt-out mechanism – Providing the option to opt out/unsubscribe from receiving further communications from your business is a legal requirement. In addition, managing opt-out/unsubscribe requests swiftly is also important but is unfortunately not what Outlook enables, thus leaving you no option but to handle things manually.
Is there an alternative?
So you’ve tried bulk email sending with Outlook, and it just didn’t work for you or your email marketing strategy. Or maybe the limitations and drawbacks we listed above simply convinced you that another tool might be a better option.
Regardless of your reasoning why Outlook might not be your bulk emailing tool of choice, finding an alternative will be necessary.
The available alternatives can be put into two categories:
- Email service providers
- Email marketing services/platforms
For both, you have plenty to choose from on the market, and all the options are designed to handle large-scale email campaigns, as well as provide lots of features such as an email builder, email contact list management, email deliverability management, reporting, personalization, and more.
Let’s explore some examples!
Bulk email stream feature:
Mailtrap’s Bulk Email Stream is a feature which you can use to send bulk emails at the price of transactional. What’s more, as the Mailtrap Email Delivery Platform supports marketing and transactional emails, you’ll be able to cover all your sending needs with one platform. And no, your deliverability won’t suffer as you will have separate sending streams.
Are there other benefits to Mailtrap’s Bulk Email Stream? Yes, plenty, including:
- Smooth and secure setup
- The option to choose between an email API and an SMTP service
- Actionable in-depth analytics,
- 30-day email logs
You can try out this feature today by signing up for a free Mailtrap account!
Email service providers:
- Brevo (previously Sendinblue)
- Amazon SES
- Mailchimp
- Mailjet
- Mailgun
- Postmark
- SMTP2GO
- Elastic Email
- SendPulse
- Mailmodo
Email marketing platforms:
- Mailchimp
- Constant Contact
- AWeber
- ConvertKit
- GetResponse
- ActiveCampaign
- HubSpot
- Brevo (previously Sendinblue)
Depending on the option you go for, you can expect to enjoy even very advanced features like those helping you ensure compliance with mass email sending rules and regulations, tracking performance (open rate, bounce rate, click-through rate, etc.), and so on. But do keep in mind that any Microsoft Outlook bulk/mass mailing alternative you go for should also have a short learning curve in order for you to get to the hang of how to send bulk emails in Outlook as soon as possible and a price that won’t break your budget while still giving you every functionality that you need.