


This guide delves into the intricacies of using Gmail SMTP server for your email needs, exploring its benefits, limitations, and how to configure it for optimal performance.

I’ll also talk about Mailtrap SMTP, a versatile alternative that offers robust email sending capabilities, ensuring your emails reach recipients’ inboxes by design.
Read on for the insights and step-by-step tutorials to master Gmail and Mailtrap SMTP.
What is a Gmail SMTP server?
To begin with, Simple Mail Transfer Protocol (SMTP) is the standard protocol for email communication across the internet. It is a major part of the email delivery process as it acts as a guide for mail servers to send, receive, and relay emails among senders and recipients. Simply, SMTP takes care of the “sending” part of the email journey.
If you’d like to know more, check out our blog post on SMTP Basics.
Now, the Gmail SMTP server is Google’s SMTP, which allows users and applications to send emails through their Gmail accounts. It’s a free service, designed to integrate with email clients (like Microsoft Outlook, Mozilla Thunderbird, or Apple Mail) and web applications, enabling them to use Gmail’s email infrastructure.

Server address: The Gmail SMTP server address is ‘smtp.gmail.com’. It’s the Gmail SMTP port your email client or application needs to connect to.
Port numbers:
- 587 (TLS): Recommended for securely sending emails. Requires the use of Transport Layer Security (TLS) encryption.
- 465 (SSL): Used for SMTP connections encrypted with Secure Sockets Layer (SSL). Note that this port is considered less modern than TLS but is still supported.
- 25: Typically used for SMTP without encryption (not recommended for secure email sending).
Use cases:
- [limited application] Sending transactional emails from web applications (e.g., order confirmations, password resets).
- Configuring email clients to send emails using a Gmail address.
- [limited application] Automating email notifications from servers or IoT devices.
- [limited application] Developing custom applications that require email-sending capabilities.
Explanation: Some use cases have a [limited application] label due to the throughput restrictions Google imposes, and that applies even if you use a business email. For example, you can send only about 150 emails per day on a private account, and that number caps at 2000 emails for a Workplace account.
Why should you use Gmail as an SMTP server?
Several advantages make Gmail’s SMTP server a compelling choice, particularly for small-scale applications. I’ll cover them in the sections below, however, it’s not a fit-all solution, which I’ll discuss in the “Gmail SMTP limitations” section.
Reliability and security
- High deliverability: Gmail’s infrastructure provides high deliverability rates. Emails sent through Gmail’s SMTP server are less likely to end up in spam folders, thanks to Google’s sophisticated algorithms and reputation management. But, the benefit isn’t exclusive to this email service and it also depends on your domain reputation.
- Robust security: Gmail provides good security features, including TLS encryption for emails in transit and automatic spam detection. Google’s advanced spam filter ensures that your communications are secure and trusted by recipients. Again, the trust aspect also has a lot to do with your domain and sender reputation.
- Consistent uptime: Google’s infrastructure is known for its reliability and uptime, minimizing the risk of email sending disruptions. This is important for time-sensitive communications and transactional emails.
Ease of integration with various platforms and email clients
- Wide compatibility: Gmail’s SMTP server can be easily configured with almost any email client or application, from desktop email clients like Outlook and Thunderbird to web-based platforms like WordPress.
- Straightforward configuration: Setting up Gmail SMTP involves simple steps, such as entering the server address, port number, and Gmail credentials. This simplicity speeds up the integration process, even for those with minimal technical expertise.
- Flexibility for developers: Gmail SMTP offers flexibility for custom applications, supporting standard SMTP connections. Even so, there are use cases where developers and project managers require further flexibility, particularly in the area of email throughput and deliverability analytics.
Benefits for developers and product managers
- Simplified email handling: By leveraging Gmail’s SMTP server, you can streamline email operations even if you have limited technical expertise. This includes automating notifications, sending transactional emails, and managing user communications.
- Reduced server management overhead: Using Gmail as your SMTP server eliminates the need for managing and maintaining your email server infrastructure. Yeah, it’s a cost and resource reduction, but you need to carefully weigh your needs especially if you expect your app or project to scale. If you’re in the growth stage easier and cheaper doesn’t necessarily mean better.
How to configure Gmail SMTP server settings
Configuring Gmail’s SMTP server settings allows you to send emails from your Gmail account through various email clients and web applications. This step-by-step guide will walk you through the process, ensuring secure and reliable email delivery.
Step 1: Enabling SMTP in Gmail settings
Before you can use Gmail’s SMTP server, you need to ensure that your Gmail account is set up to allow SMTP connections. Here’s how:
- Access your Google account settings: Log in to your Gmail account and navigate to your Google Account settings. You can find this by clicking on your profile picture in the top right corner and selecting “Manage your Google Account.”

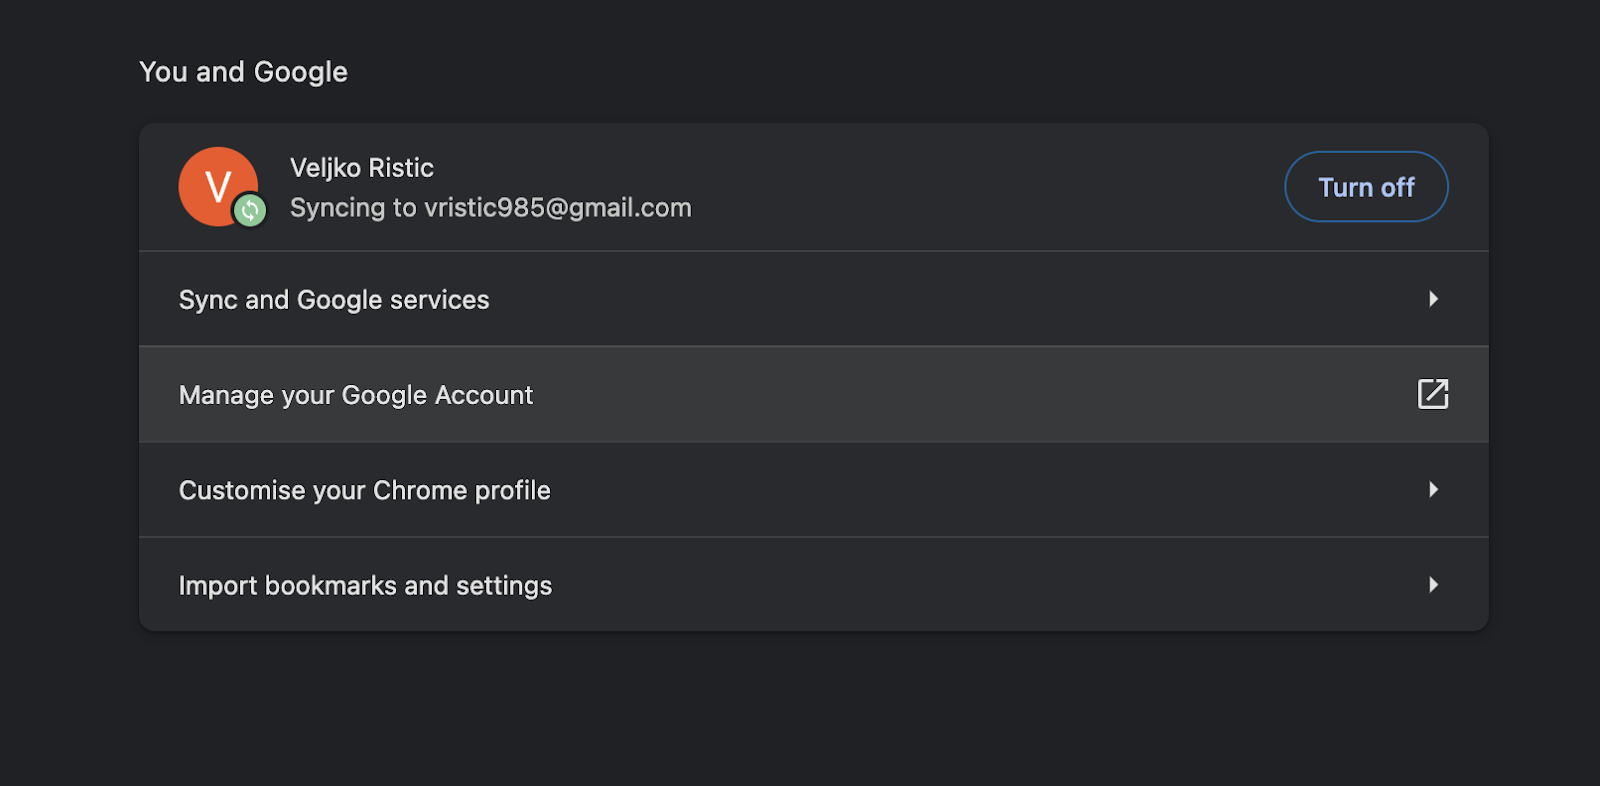
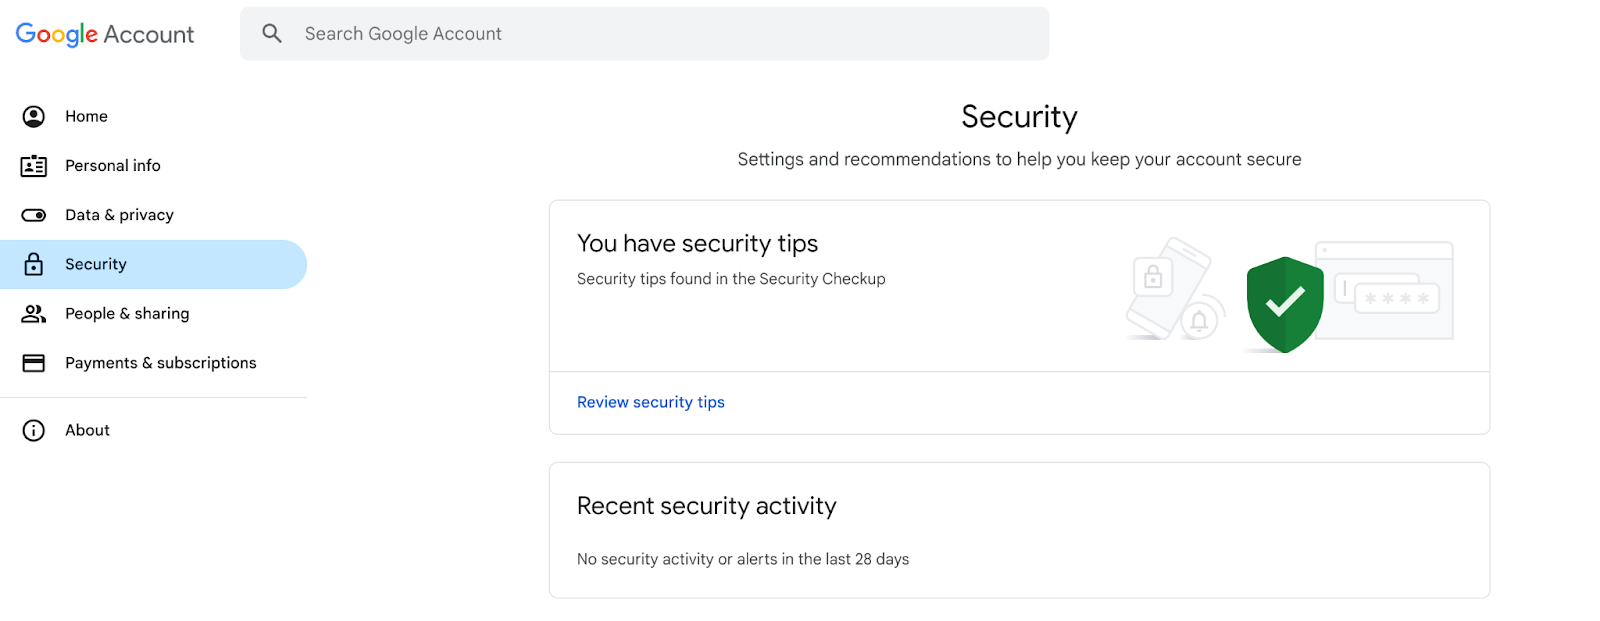
- Security settings: In the left sidebar, click on “Security.”

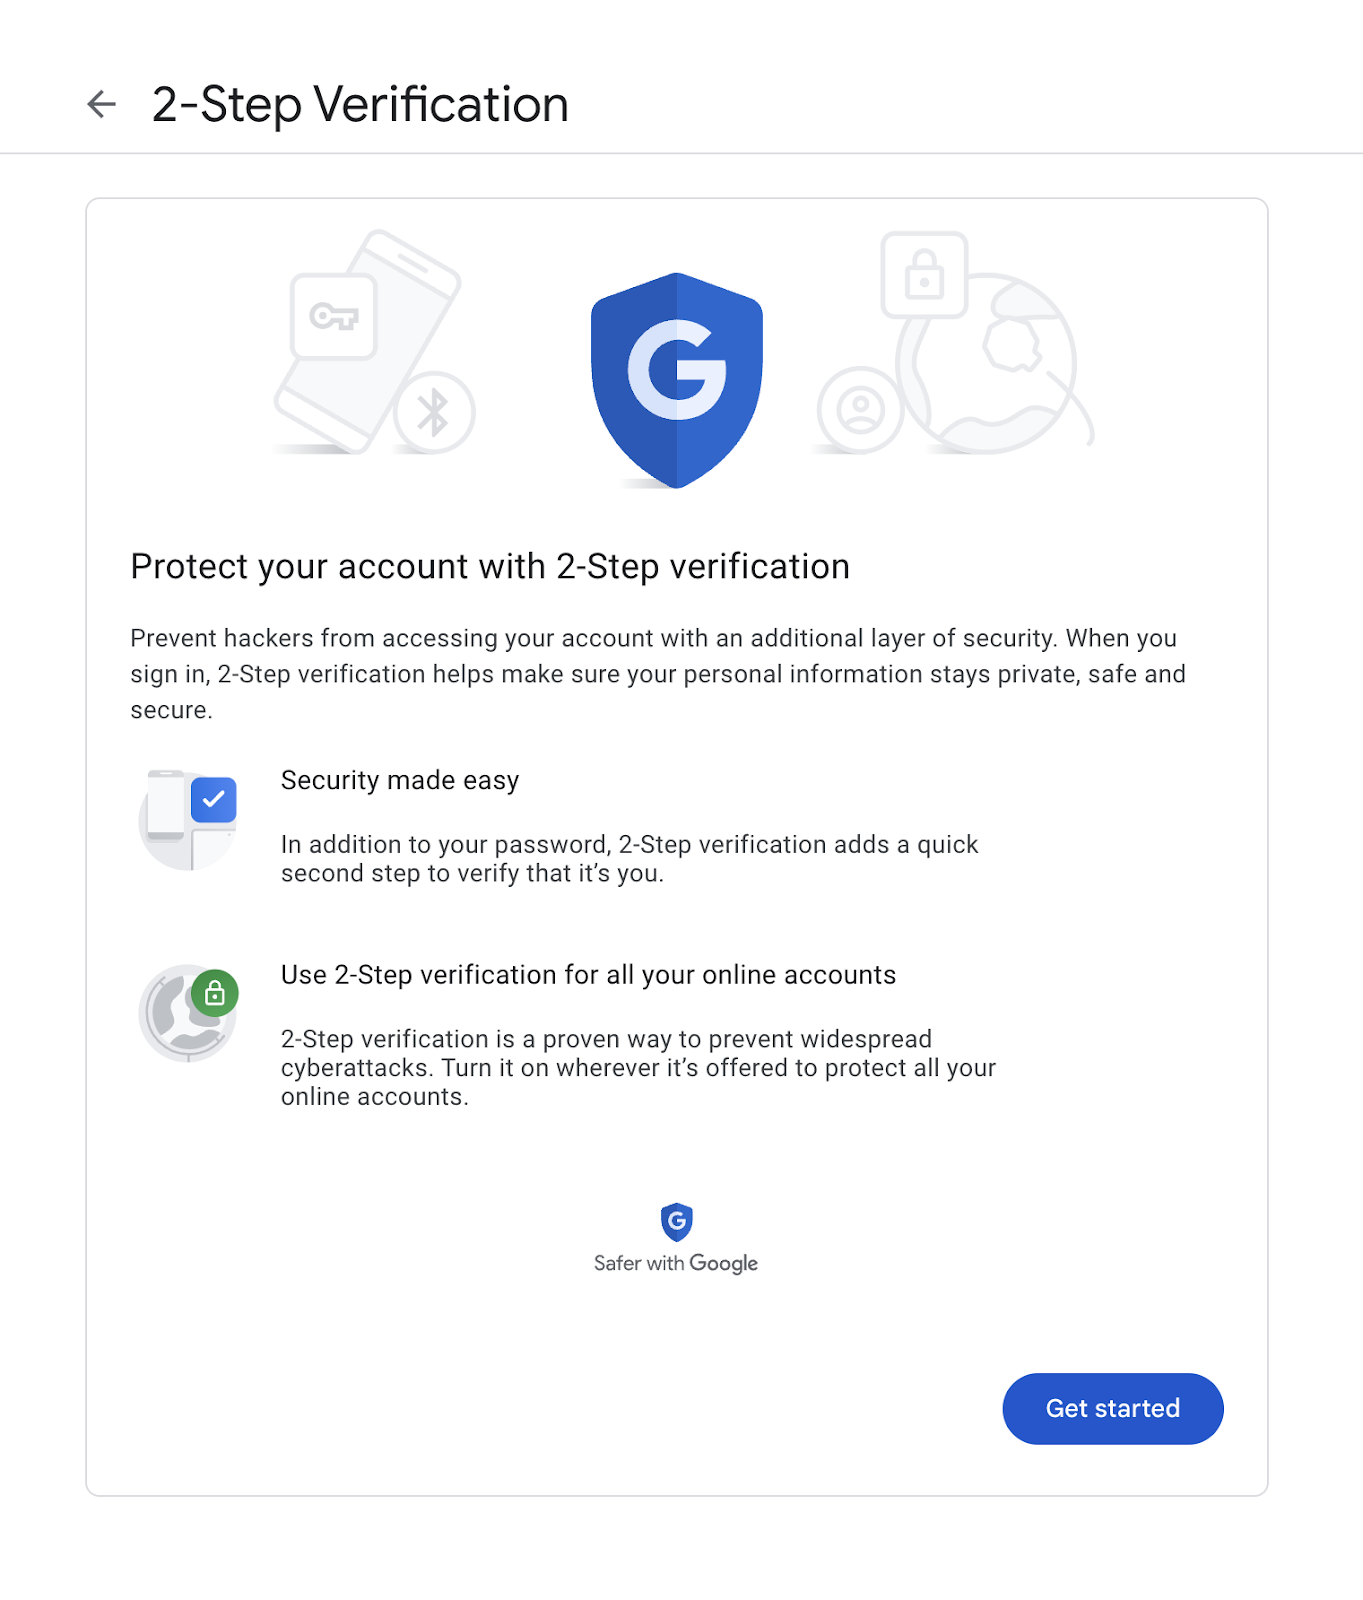
- Less secure app access: Scroll down to the “Less secure app access” section. Note: Google recommends using App Passwords, which is a more secure option, especially if you have 2-step Verification enabled. The “Less secure app access” option is not recommended and it won’t be supported by Google Workspace (former G Suite accounts) from fall 2024.
- Enable 2-Step verification: Before you can use App Passwords, you must enable 2-Step Verification. This adds an extra layer of security to your account by requiring a second form of verification when you sign in.

Step 2: Necessary information for SMTP configuration
To configure your email client or application to use Gmail’s SMTP server, you’ll need the following information:
- SMTP server address: smtp.gmail.com
- Port: 587 (for TLS) or 465 (for SSL)
- Authentication required: Yes
- Username: Your full Gmail address (including @gmail.com)
- Password: Your Gmail password (if you have 2-Step Verification enabled, use an App Password instead)
Example configuration: WordPress site
For a WordPress website, you can use a plugin like WP Mail SMTP to configure Gmail’s SMTP settings. We’ve already blogged in detail about it, and you can check the in-depth configuration tutorial here.
Anyway, I’ll give you a brief overview of the steps:
- Install WP Mail SMTP plugin: In your WordPress dashboard, go to Plugins > Add New and search for “WP Mail SMTP.” Install and activate the plugin.


- Configure SMTP settings: Navigate to WP Mail SMTP > Settings. Select “Gmail” as the mailer and enter the SMTP details as provided above.

- Authenticate with Google: Follow the plugin’s instructions to authenticate your website with your Google account. This typically involves creating credentials in the Google Cloud Console and entering them in the plugin settings.
How to configure Gmail POP3 settings?
To set things straight, POP3 isn’t directly related to SMTP. However, it’s very close by as a dedicated technology for receiving emails.
When you use SMTP, you might also need POP3 to receive emails and I’m covering it here, to give you the full picture. But if you need even more details check our article dedicated to POP3.
Anyway, configuring Gmail to use Post Office Protocol version 3 (POP3) allows you to download emails from your Gmail account to your local computer or device.
It’s useful as an email backup or if you need offline email access. Below, I’ll touch upon POP3 use cases, and tell you how to configure POP3 settings in Gmail, along with the differences between POP3 and Internet Message Access Protocol (IMAP).
Use cases:
- Downloading emails to a single computer for offline access.
- Reducing server storage by moving emails to local storage.
- Ensuring a backup of emails is stored locally.
Here’s the setup tutorial:
Step 1: Enable POP in Gmail settings
- Log in to Gmail: Open your web browser, go to Gmail, and log in with your credentials.
- Access settings: Click on the gear icon in the upper right corner and select “See all settings.”


- Go to the ‘Forwarding and POP/IMAP‘ tab: This tab is located at the top of the Settings page.

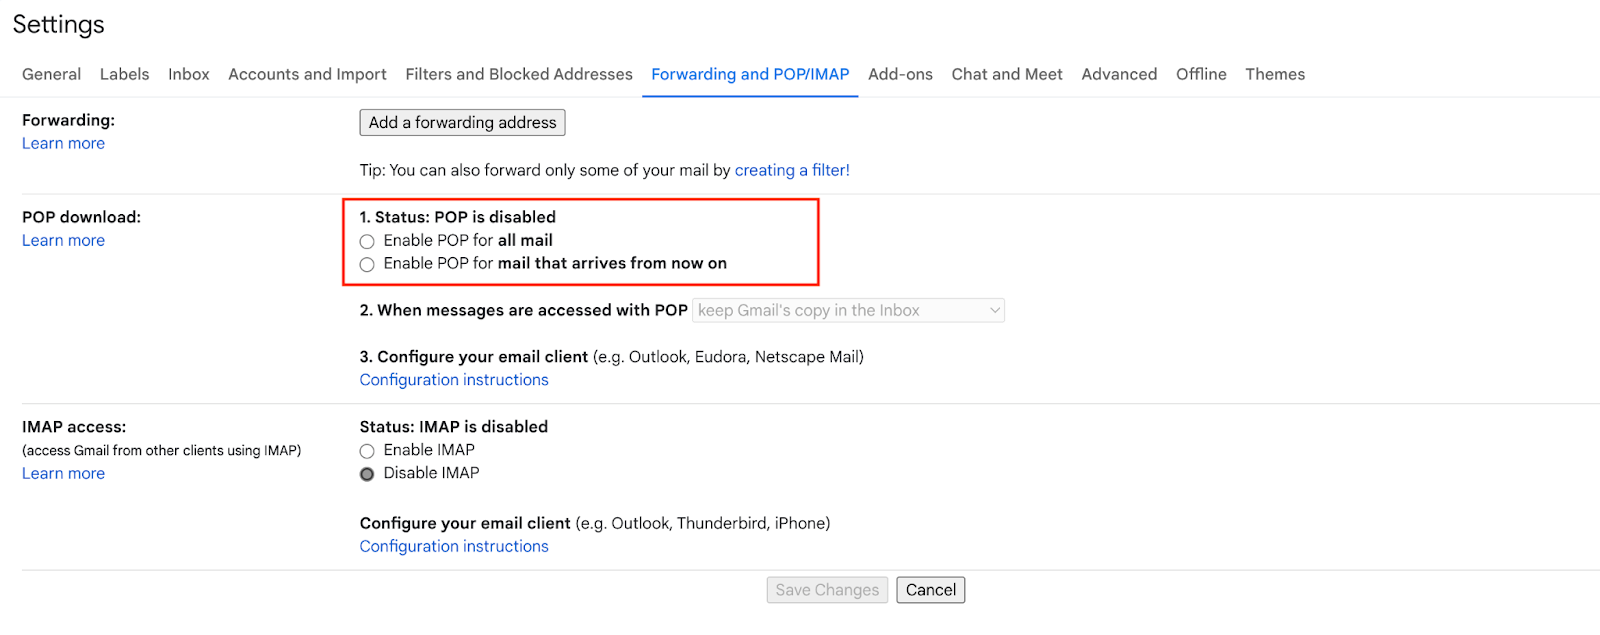
- Enable POP: In the “POP Download” section, select “Enable POP for all mail” or “Enable POP for mail that arrives from now on,” depending on your preference.
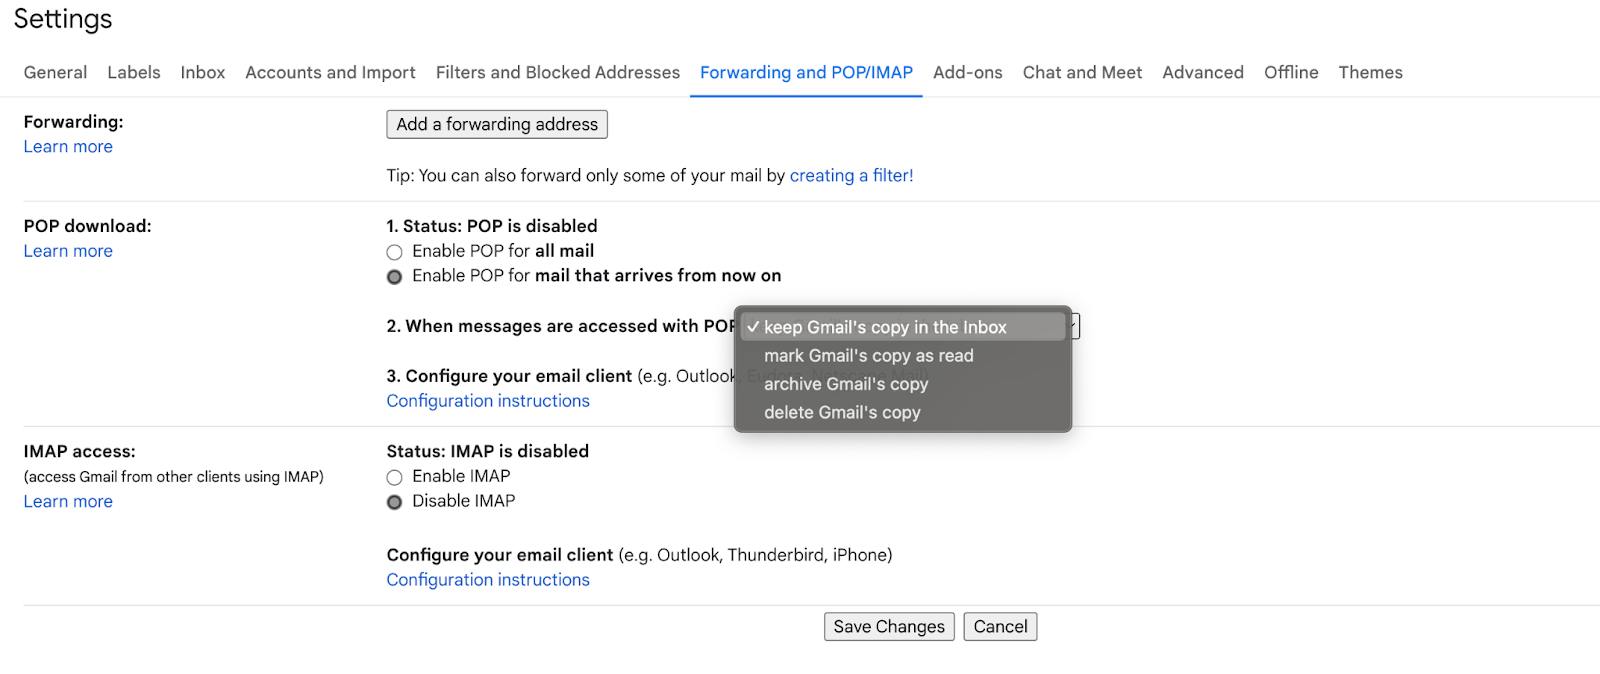
- Choose what to do after access: The drop-down options include keeping Gmail’s copy in the inbox, marking Gmail’s copy as read, archiving Gmail’s copy, or deleting Gmail’s copy.

Step 2: Configure your email client
To configure your email client for POP3, you will need the following information:
- POP server: pop.gmail.com
- Port: 995
- Require SSL: Yes
- Username: Your full Gmail address (including @gmail.com)
- Password: Your Gmail password (use an App Password if you have 2-Step Verification enabled)
Follow your email client’s instructions to add a new account, selecting POP3 as the account type and entering the above information.
Differences between POP3 and IMAP, and when to use each
POP3 and IMAP are both protocols used for email retrieval, but they serve different needs:

- POP3 downloads emails from the server for local storage, typically deleting them from the server afterward. It’s best used when you access your email from a single device and need offline access.
- IMAP, on the other hand, syncs emails between the server and your devices, keeping them available online and accessible from multiple devices. It’s ideal for users who check email on multiple devices and want to see the same inbox everywhere.
How to configure Gmail IMAP settings?
This section provides an overview of IMAP, its advantages over POP3, and detailed steps to enable and configure IMAP settings in Gmail.
To stress, similar to POP3, IMAP isn’t directly related to SMTP, but it’s a separate protocol that helps you retrieve and manage emails more efficiently. And again, if you use SMTP, you could need IMAP as well. Check our full article on IMAP.
Overview of IMAP and its advantages over POP3
As mentioned, IMAP is a protocol used for retrieving and storing email messages that allows you to access your email from any device connected to the internet.
Unlike POP3, which downloads emails to a single device and often deletes them from the server, IMAP synchronizes the email across all devices. This means that when you mark an email as read on one device, the change is reflected on all other devices.
Advantages of IMAP over POP3 include:
- Synchronization: IMAP keeps your email synchronized across all devices, ensuring that your inbox, sent items, and folders are the same everywhere.
- Server storage: Emails are stored on the server, so you can access them from anywhere without needing to transfer files between devices.
- Flexible management: You can organize your emails into folders, and these changes will be seen on any device you use to access your email.
Here are the step-by-step instructions for enabling and configuring IMAP settings in Gmail. The first three steps are the same as with POP3, though I repeated them for congruence.
Step 1: Enable IMAP in Gmail settings
- Log into Gmail: Open your web browser, navigate to Gmail, and sign in.
- Access settings: Click the gear icon in the upper right corner, then select “See all settings.”
- Forwarding and POP/IMAP tab: Navigate to the “Forwarding and POP/IMAP” tab at the top of the Settings page.


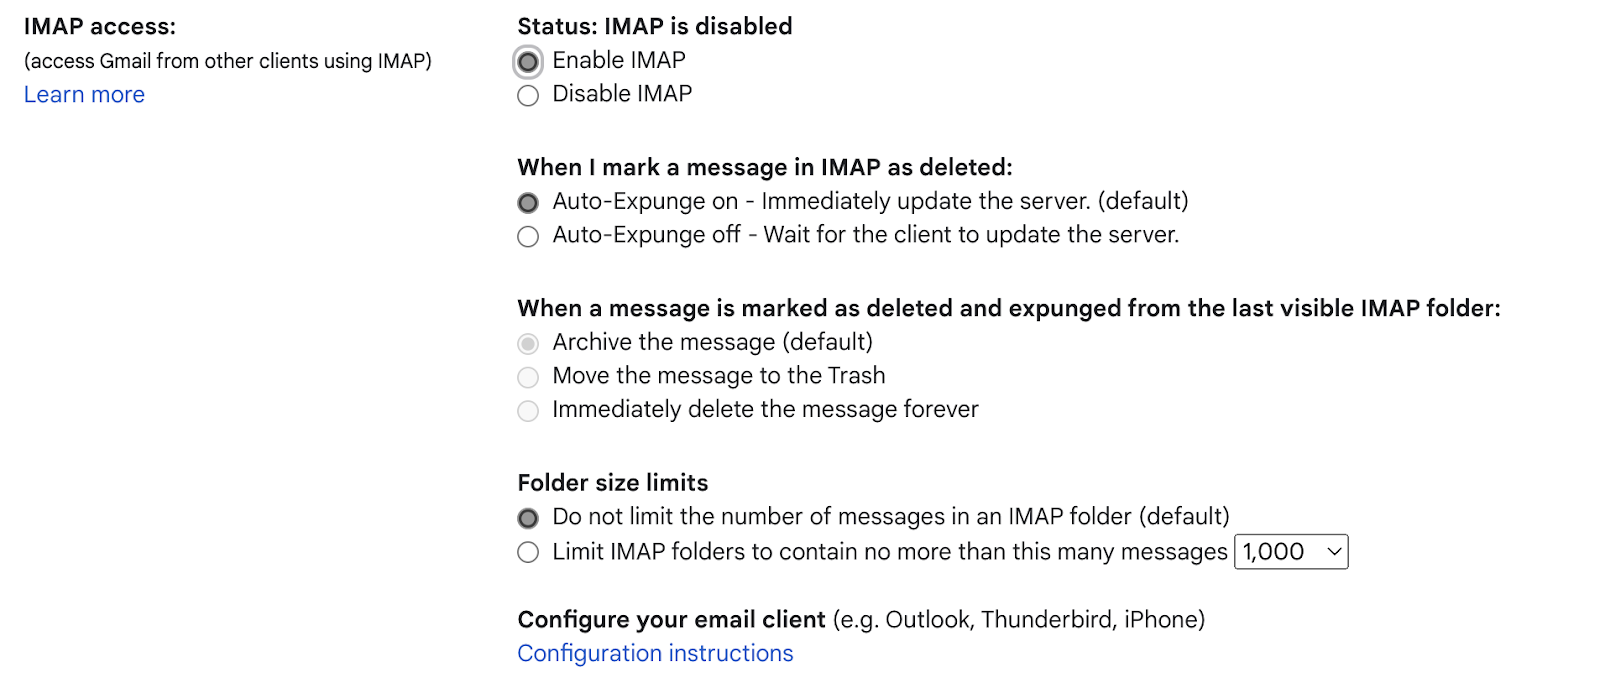
- Enable IMAP: In the “IMAP Access” section, select “Enable IMAP.” You can also adjust other settings here according to your preferences, such as when messages are expunged from the server.

Step 2: Configure Your Email Client
To set up your email client or app with Gmail’s IMAP settings, you’ll need the following information:
- IMAP server: imap.gmail.com
- Port: 993
- Require SSL: Yes, use SSL.
- Username: Your full Gmail address (including @gmail.com)
- Password: Your Gmail password. If you have 2-Step Verification enabled on your account, you’ll need to use an App Password.
Follow your email client’s add account process, select IMAP as the account type, and input the above information. Lastly, we already extensively blogged about IMAP, POP3 and their relation to SMTP, follow the link here to learn more.
Troubleshooting Gmail SMTP server configuration
Issues while configuring or using Gmail’s SMTP server aren’t uncommon, especially if you integrate the email functionality into applications or set up email clients.

Here, I categorized the common problems related to Gmail SMTP server configuration, along with their solutions.
Authentication errors
Symptoms:
- Authentication errors occur when your email client or application fails to log in to the Gmail SMTP server, often resulting in error messages about incorrect login details.
Solutions:
- Check credentials: Ensure you’re using the correct email address and Gmail SMTP password. If you have 2-step Verification enabled, you need to use an App Password instead of your regular Gmail password.
- Use app passwords: Generate and use an App Password for your application or email client. This goes double if you’re using 2-Step Verification. And it can be done from your Google Account’s security settings.
Connection timeouts
Symptoms:
- Connection timeouts can occur if your email client or application cannot establish a connection to the Gmail SMTP server within a certain timeframe.
Solutions:
- Check internet connection: Ensure your device has a stable internet connection.
- Verify SMTP settings: Double-check the SMTP server address (smtp.gmail.com), and port (587 for TLS, 465 for SSL), and ensure you’re using the correct encryption method for a secure connection.
- Firewall or antivirus: Ensure your firewall or antivirus software is not blocking the connection. You may need to create an exception for your email client or application. This may occur even with the enabled TLS/SSL for outgoing emails.
Symptoms:
- Even with the correct settings (everything I mentioned above checks out), you might face issues related to Google’s security measures, such as being unable to send emails through the SMTP server.
Solutions:
- Review security settings: Log into your Google Account, and/or email account, then review any security alerts or settings that might be preventing SMTP access.
- Confirm app passwords: If using App Passwords, ensure they are correctly generated and entered in your email client or application settings.
- Check for alerts: Google may send alerts to your email if it detects unusual activity, such as an attempt to connect to the SMTP server from a new location or device. You may need to confirm that this activity was legitimate.
How to verify SMTP settings and test email-sending functionality
Verifying SMTP Settings:
- Ensure you have the correct SMTP server address (smtp.gmail.com), port number (587 for TLS, 465 for SSL), and encryption method selected (TLS/SSL).
- Confirm your username (full Gmail address) and password (or App Password if using 2-Step Verification) are correctly entered.
Gmail SMTP limitations – when not to use the Gmail SMTP server
While Gmail’s SMTP server offers a convenient way to send emails for personal use and small-scale projects, there are scenarios where it might not be the best choice.
For example, you have an app or a website in the growth stage that needs to send a bunch of transactional emails daily – account or order confirmations, setup instructions, password changes/updates, etc. In that case, if the number of requests goes over 2K emails a day, you need a service that can support the volume and scale along with your business.
Mailtrap is one such service and I’ll cover it under the “Gmail SMTP alternative” section.
Daily sending limits and how they might affect project requirements
- Daily quota: Gmail imposes a daily sending limit to protect users from spam and abuse and to ensure quality service. For regular Gmail accounts, the limit is typically around 100-150 emails per day, while Google Workspace accounts might have higher limits (up to 2,000 emails per day).
- Impact on projects: These limits can significantly impact projects or applications that require sending a large volume of emails, such as marketing campaigns, transactional email notifications, or mass communication platforms. Once the limit is reached, Gmail will temporarily block you from sending emails from the associated domain name, potentially disrupting your service.
Situations where a dedicated SMTP server might be more appropriate
- High-volume sending: If your project requires sending emails at a volume that exceeds Gmail’s daily limits, a dedicated SMTP server or a professional email-sending service is necessary to handle the load without interruption.
- Customization and control: Dedicated SMTP servers offer more control over your email-sending environment, including custom configuration options, dedicated IP addresses, and the ability to manage your sender reputation more directly.
- Advanced monitoring and reporting: Professional SMTP services provide detailed analytics and reporting features, which are crucial for optimizing email campaigns, tracking deliverability issues, and understanding user engagement.
Compliance and privacy considerations
- Data protection laws: Depending on your location and the nature of your emails, you may be subject to data protection laws (such as GDPR in Europe) that impose specific requirements on how you handle personal data. Using Gmail’s SMTP server might not offer the level of compliance or data control needed for sensitive or regulated information.
- Privacy concerns: When sending emails through Gmail’s SMTP server, your emails are processed and stored by Google’s infrastructure, which might not be suitable for all types of communication, especially those involving confidential or proprietary information.
Note: Most of the above applies even if you’re using Gmail API and have OAuth enabled.
Gmail SMTP alternative – using Mailtrap Email API/SMTP
Mailtrap is an email-sending solution for developers with highly customizable API and industry best analytics.

We provide an SMTP [and API] service designed for reliable email delivery in production environments. This service is tailored to ensure that your emails reach their recipients just in time, with features aimed at improving deliverability, and facilitating email sending at scale.
Key features and benefits of using Mailtrap
- Reliable delivery: Mailtrap’s infrastructure is optimized for high deliverability, ensuring your emails land in the inbox, not the spam folder.
- Scalability: Whether you’re sending a few emails a day or millions, Mailtrap scales with your needs, offering a seamless experience without the need for managing email servers.
- Detailed analytics: Track your email performance with detailed analytics and helicopter-view dashboards. These include open rates, bounce rates, click-through rates, email categories, and more to continuously optimize your email strategy.
- Enhanced security: With Mailtrap, you get secure email-sending practices, including SSL/TLS encryption, ensuring your email communications are protected.
Basic setup guide for Mailtrap’s SMTP service
- Sign up for Mailtrap: Create an account on Mailtrap to get started.
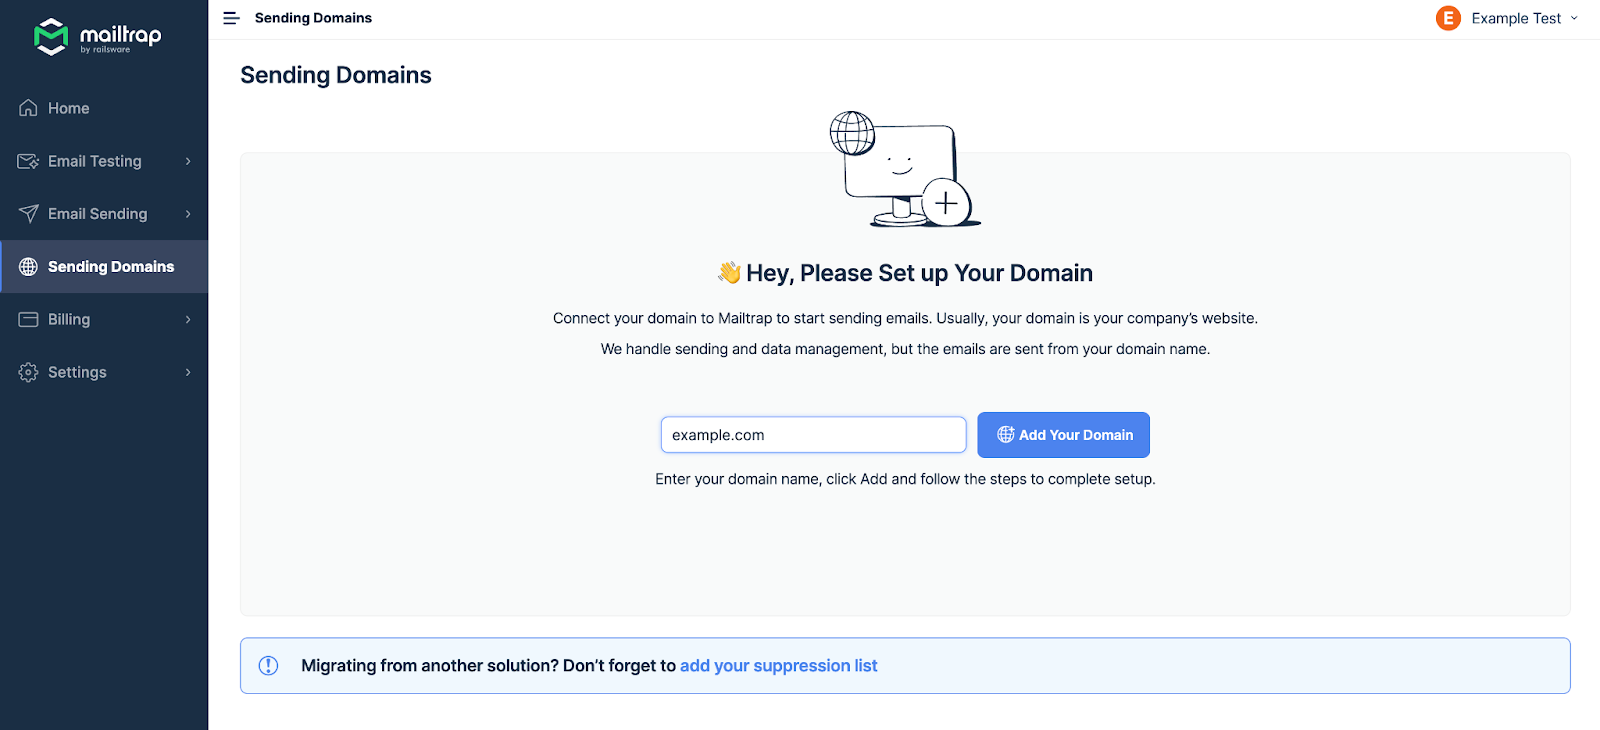
- Add a domain: Go to Sending Domains menu and add your domain.

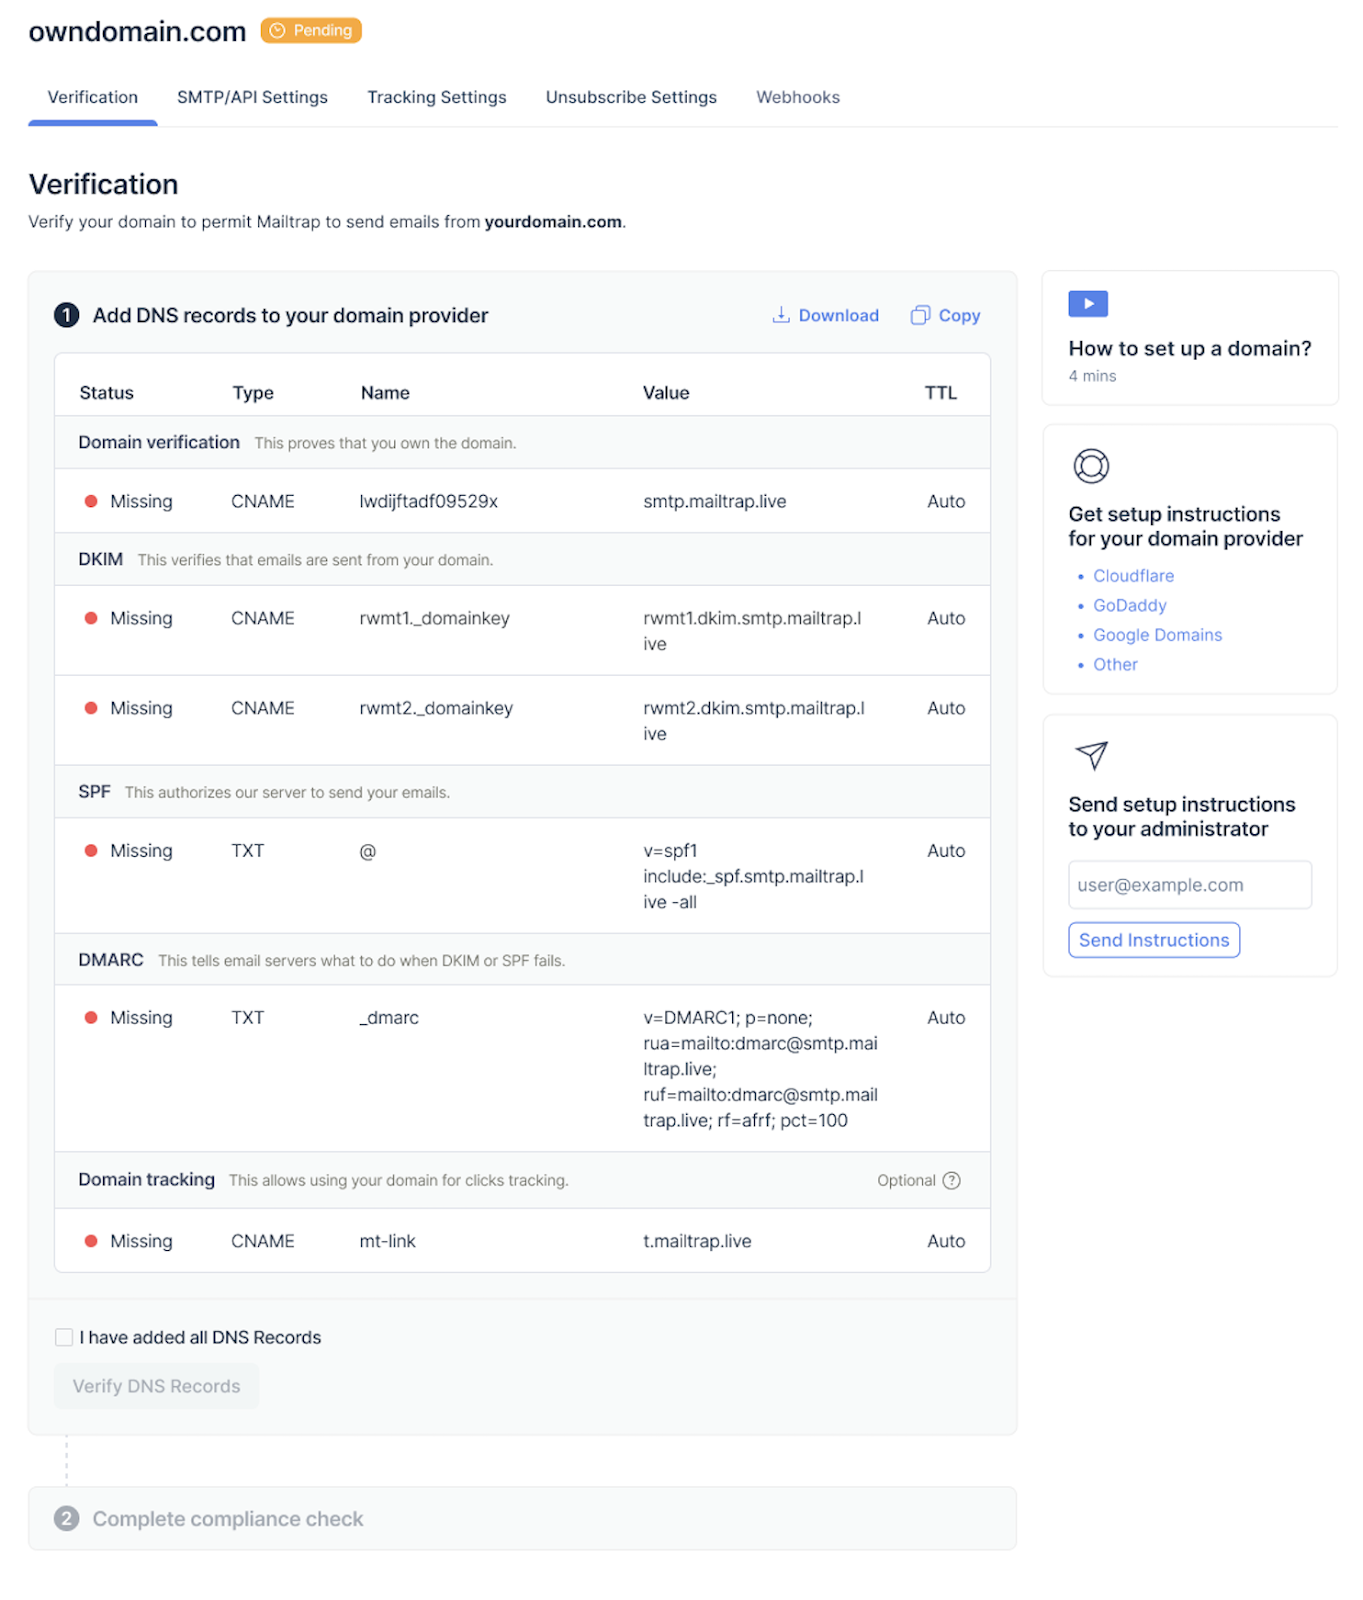
- Verify the domain: Add the DNS records provided by Mailtrap to your domain providers DNS to verify domain ownership. If you’re not doing verification yourself, send the setup instructions to your admin or dev.

- SMTP configuration: After your domain gets verified, click the SMTP/API Settings tab, and choose the SMTP Stream configuration based on your needs. (If you’re prompted to create an API token, proceed to do it.)

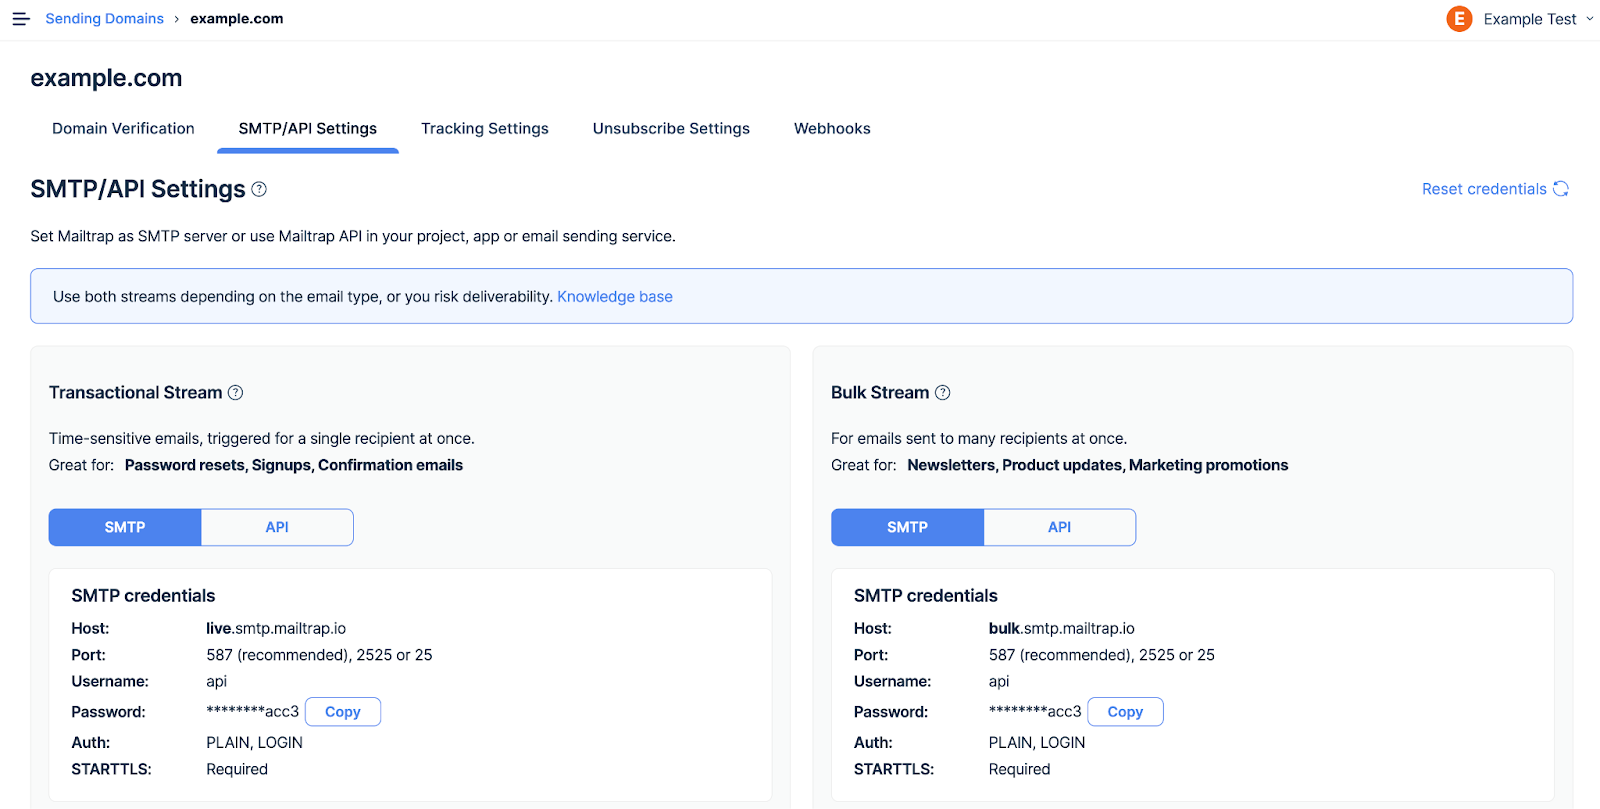
- Application integration: Use these SMTP settings for the stream you chose to configure the email-sending functionality within your application or email client. This involves specifying the SMTP server details (Host, Port, Username, Password, etc.) in your application’s email configuration section.
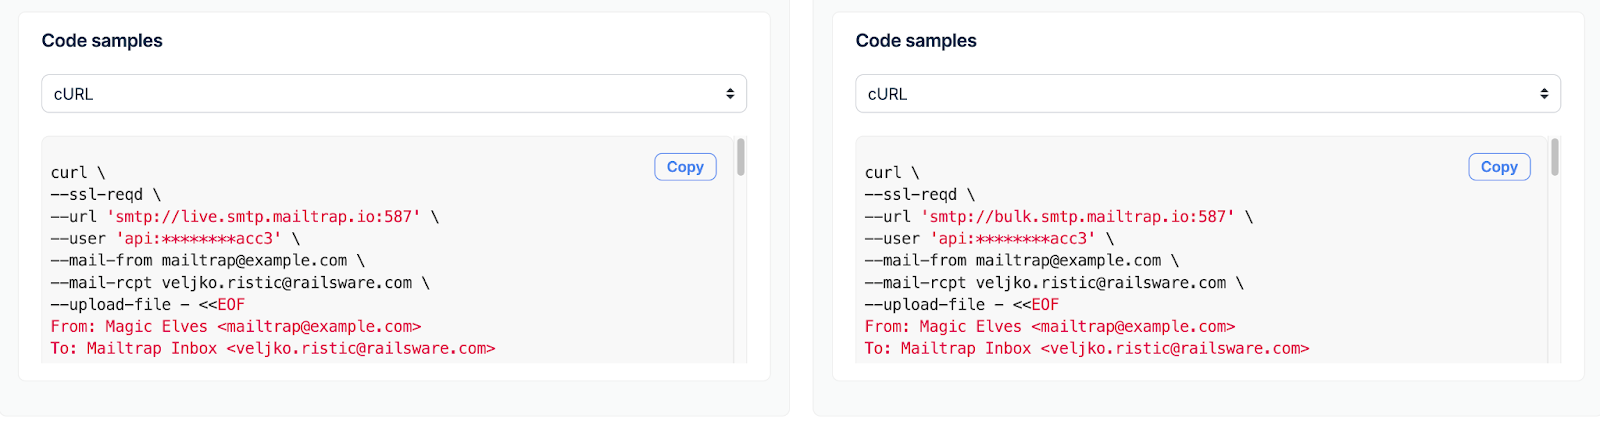
- Send an email: After configuration, send an email to verify that everything is set up correctly. There are 20+ ready-made code samples available.

Comparison with Gmail SMTP
- Volume and limits: Unlike Gmail, which imposes strict daily sending limits, Mailtrap offers scalable plans that accommodate a wide range of email volumes, from small batches to large-scale campaigns, without the risk of being blocked or throttled.
- Use case flexibility: Mailtrap is designed to handle production email-sending scenarios, providing a unified platform for all your email needs. This contrasts with Gmail’s primary focus on personal and business communication.
- Advanced features: Mailtrap offers features tailored for developers and businesses, such as detailed analytics, which are not as readily available or as comprehensive with Gmail’s SMTP service.
Need more Gmail alternatives? Check out our dedicated video:

SMTP to the rescue
The journey through the realms of Gmail SMTP server and Mailtrap’s email-sending capabilities illuminates the path for developers and product managers seeking efficiency and reliability in their email communications.
Gmail offers a familiar, robust foundation for those just beginning to navigate the complexities of email sending. Meanwhile, Mailtrap stands as a beacon for those requiring a more nuanced approach.