



While Salesforce’s testing capabilities are sufficient for running small deliverability tests or previewing your emails, they may not be enough for inspecting and debugging emails in detail. Plus, some methods may bear the risk of spamming contacts with test emails.
Mailtrap Email Sandbox solves this. It captures what Salesforce sends instead of delivering it, so you can open a message and inspect it before anyone receives one.
There is now a managed package for connecting the two, so this is shorter than it used to be: you no longer copy SMTP credentials by hand or set up the relay yourself, because the package manages that side of it. Below we cover the setup once, then work through testing deliverability, text and HTML templates, email alerts, and bulk sending.
What is Mailtrap Email Sandbox?
Mailtrap Email Sandbox is a safe environment to inspect and debug emails in staging and development. It captures the email your application or org sends and holds it in a sandbox instead of delivering it to real recipients. With the Salesforce package you don’t wire that up yourself: you turn Testing Mode on, and outbound email from the org lands in your sandbox.
What you get on a captured message:
- Email Template Inspector to see the message as it was actually built;
- HTML Check for how it renders across email clients, with unsupported markup flagged;
- Deliverability Tests, including a spam score and blacklist checks;
- Email Headers and Bcc for the technical detail behind a delivery;
- Bounce Emulator and Load Testing for behaviour you cannot reproduce with real sends;
- Multiple sandboxes, so different projects and stages stay separate.
When should you use Mailtrap Email Sandbox?
There are several use cases where you should opt for the Email Sandbox. Let’s quickly discuss each of them below.
Avoiding spamming users with test emails
You can easily avoid annoying your recipients by using Mailtrap Email Sandbox. It puts a barrier between Salesforce and your contacts, so every test email ends up in a Mailtrap sandbox instead.


Testing email format and content
With HTML Check, you can inspect the HTML and CSS in your templates for different email clients. You’ll see a detailed chart with problematic lines of code marked in red. Each problematic element has a description of the support level for each client.


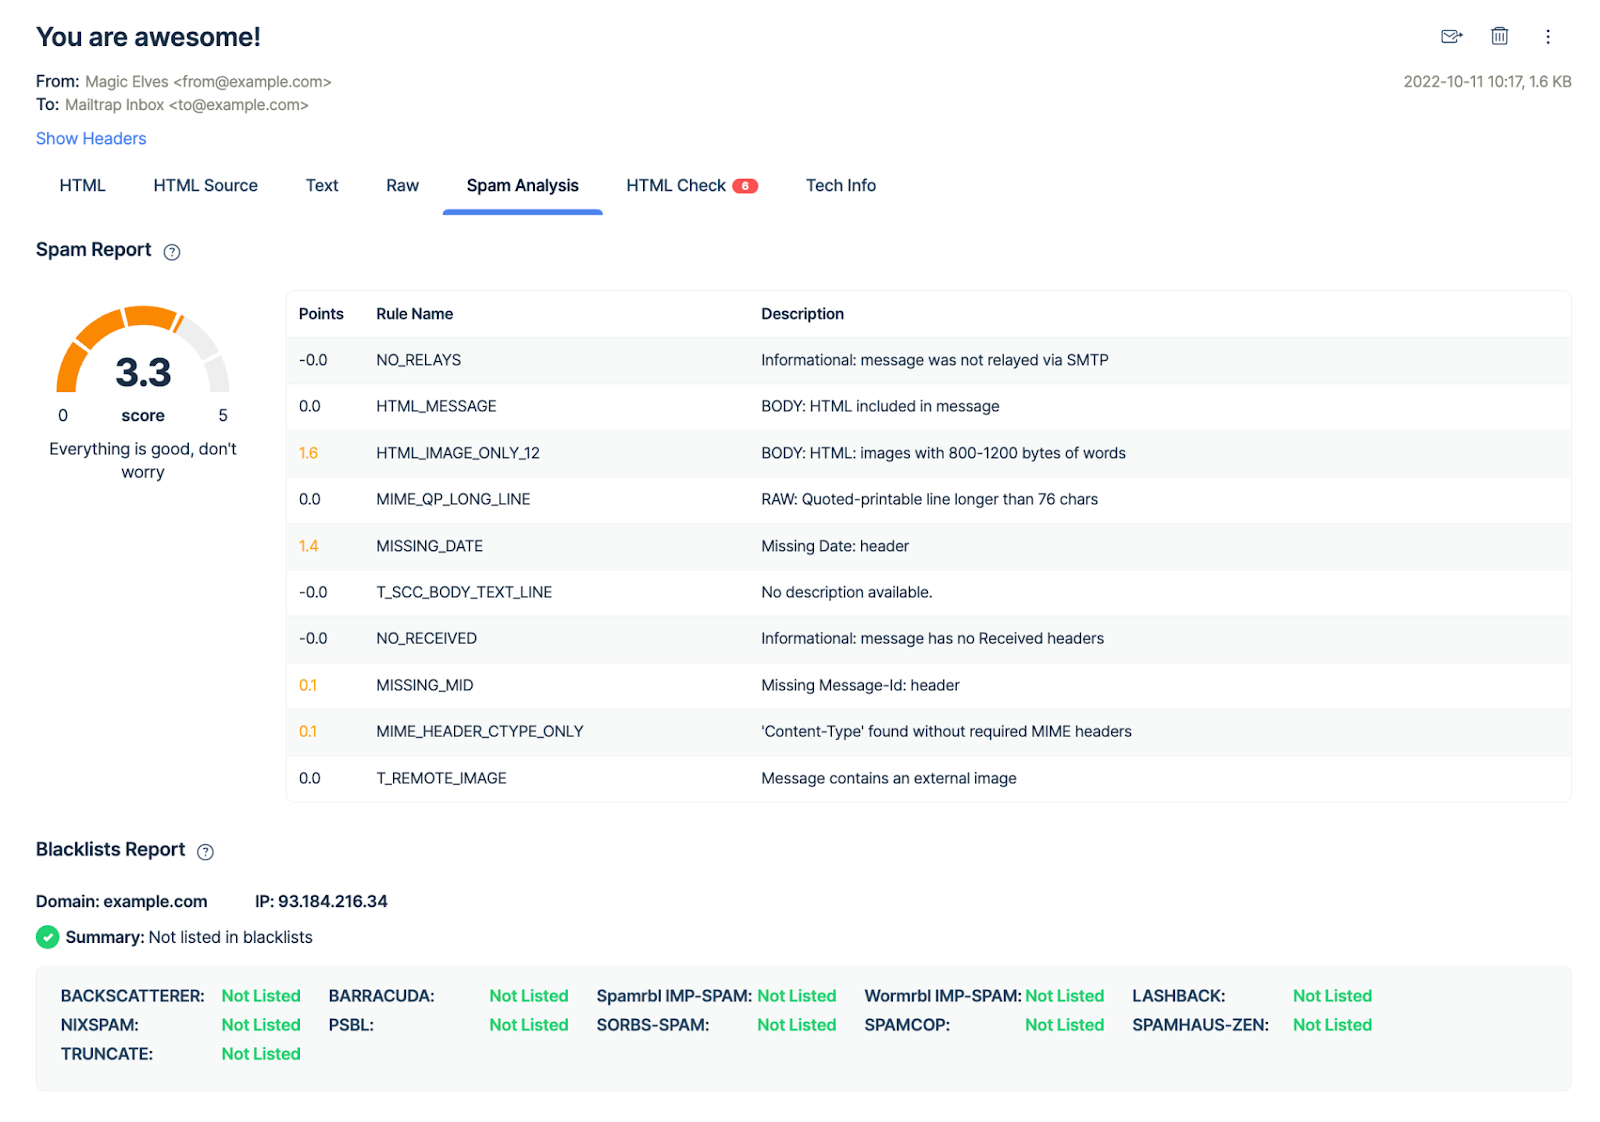
On top of that, Mailtrap Email Sandbox runs Deliverability Tests, which include a spam score.
The feature is particularly important for your deliverability and sender reputation. Why? The score gives you a clear indication if mailbox providers may automatically label your email template as spam. Plus, you get to see if your domain or IP appear in any of the blacklists.
That way, you’ll get the chance to make the emails less spammy in staging and protect your sender reputation in production.

Keeping all test emails in one place
Mailtrap Email Sandbox captures all your outgoing Salesforce emails and keeps them organized in different sandboxes for various projects and testing stages.
Testing without touching your sending setup
Testing Mode is a toggle. While it is on, outbound email from the org is captured; turn it off and Salesforce sends exactly as it did before. You don’t reconfigure a relay or swap credentials to test, and there is nothing to undo afterwards.
So, Mailtrap Email Sandbox and Salesforce work well together for in-depth testing and debugging.
Connecting Mailtrap Email Sandbox to Salesforce
This used to be an eight step job with SMTP credentials copied by hand into a Salesforce email relay. It is now a managed package. Mailtrap’s Email Sandbox for Salesforce setup guide is the canonical reference and covers the same ground screen by screen, so use it as you go and treat the outline below as the map.
- Install Mailtrap Email Sandbox for Salesforce from the AppExchange listing.
- Assign the MailTrap Admin permission set to the admin who will configure the app.
- Create the Named Credential the package needs, which has to be called MailTrap_To_SF. This is the longest part of the setup, and it is easy to misread: the credential points at your own Salesforce domain, not at Mailtrap. Your org is authorising itself, because Salesforce will not let the package change email settings any other way. Mailtrap does not come into it until the next step.
- Open the Mailtrap app from the App Launcher and connect your Mailtrap account with an API token. The token needs Viewer access on the account and Admin access on the sandboxes you want to route into — without sandbox Admin, the picker in the next step comes up empty and tells you nothing useful.
- In Account settings, choose which Mailtrap sandbox to route into, then turn Testing Mode on and confirm.
- Check it before you rely on it: open any Contact record and send an email to it. It should land in your Mailtrap sandbox rather than the contact’s inbox. Do this now, so that if something misbehaves later you already know the integration itself is sound.
That is the whole setup, and it is a one-time job for an admin. From here on, outbound email from the org goes to your Mailtrap sandbox instead of your Contacts and Leads, and every test below works without touching Salesforce email settings again.
Three things to know before you switch it on:
- Testing Mode is org wide. While it is on, every outbound email from that org goes to the Mailtrap sandbox, including email your colleagues send. Turn it on deliberately.
- Switching it off does not send on what was captured. Anything that was meant to be real has to be sent again after you switch off.
- It covers Sales Cloud, Service Cloud, Experience Cloud and platform email. That is everything in this article. It does not cover Marketing Cloud.
If you already send through Mailtrap Email API/SMTP, your relay configuration stays as it is. Just install the package into a Salesforce sandbox org first rather than straight into production.
Mailtrap Email Sandbox for Salesforce is free to use with the Mailtrap Free plan, which covers 50 test emails a month, one sandbox, and one email every 10 seconds. Multiple recipients on a single email are not supported on the free plan: if a message has several recipients, including anyone in CC or BCC, only the first of them receives it. Worth knowing before you test an Email Alert that notifies a group, because one message arriving looks like a failure when it isn’t.
Connecting Salesforce to a paid Mailtrap plan requires the paid add-on. Paid Email Sandbox starts at $17 a month, or $14 a month billed annually ($168 a year). Enabling the add-on is not self-service: the app points you to Mailtrap support, who enable the add-on for your account, after which the charge is applied automatically and prorated. One thing worth doing even if you are starting on the free plan — if you expect to upgrade later, follow the paid flow from the beginning so the add-on is attached to your account and billing is right when you do.
How to test email deliverability
With Testing Mode on, let’s send a test email with Apex and confirm it arrives in your Mailtrap sandbox. For more details on sending emails with Apex, check out this blog post.
In your Salesforce account, navigate to Setup and type Apex Classes in a quick find box.

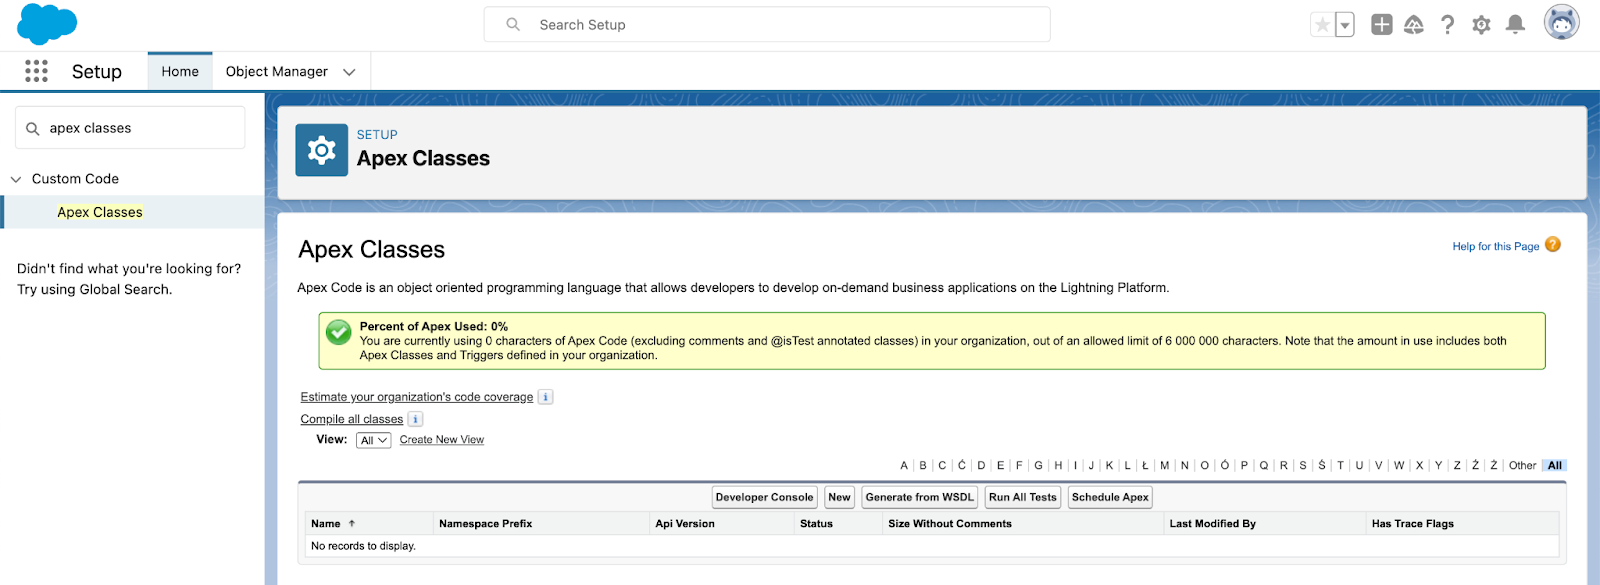
Click New to create a new Apex class that will send a simple email. Paste the following snippet and press Save.
Don’t forget to substitute recipient@example.com and no-reply@example.com with actual email addresses.
public class SendSingleEmail {
    public void sendSingleEmailMethod(){

        Messaging.reserveSingleEmailCapacity(2);
        Messaging.SingleEmailMessage mymail = new Messaging.SingleEmailMessage();

        // Ensure that addresses are correctly formatted and matching case
        String[] toAddresses = new String[] {'recipient@example.com'};

        mymail.setToAddresses(toAddresses);
        mymail.setReplyTo('no-reply@example.com');
        mymail.setSenderDisplayName('Salesforce Support');
        mymail.setSubject('Test Email ');
        mymail.setPlainTextBody('This is the first test email sent from Salesforce with Mailtrap Email Sandbox');
        mymail.setHtmlBody('<p>This is the first test email sent from Salesforce with Mailtrap Email Sandbox</p>');

        Messaging.sendEmail(new Messaging.SingleEmailMessage[] { mymail });
    }
}
Go back to the Apex classes page, click Developer Console, and open the class we just created. Under debug, choose Open Execute Anonymous Window.


Type the following line of code and click Execute.
sendSingleEmail obj = new sendSingleEmail();
obj.sendSingleEmailMethod();
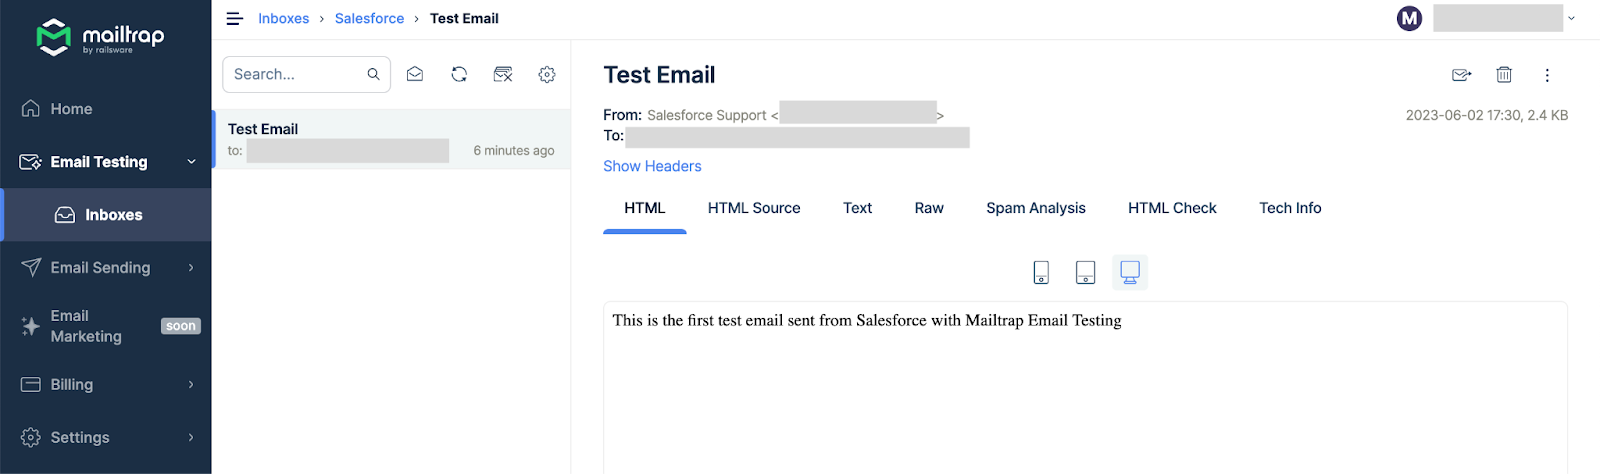
Under logs, a success message will appear. Head to your Email Sandbox and you’ll see the test email there. This confirms that Salesforce deliverability doesn’t have any issues.

How to test email templates
Testing email templates is quite easy in Salesforce. And since Testing Mode is already on, we just need to take a couple of additional steps. To make our tests interesting and use the full capabilities of Mailtrap Email Sandbox, let’s send text and HTML templates separately.
Testing text templates
We’ll create a sample text template in Salesforce.
- Go to Setup → Email → Classic Email Templates and click New Template.

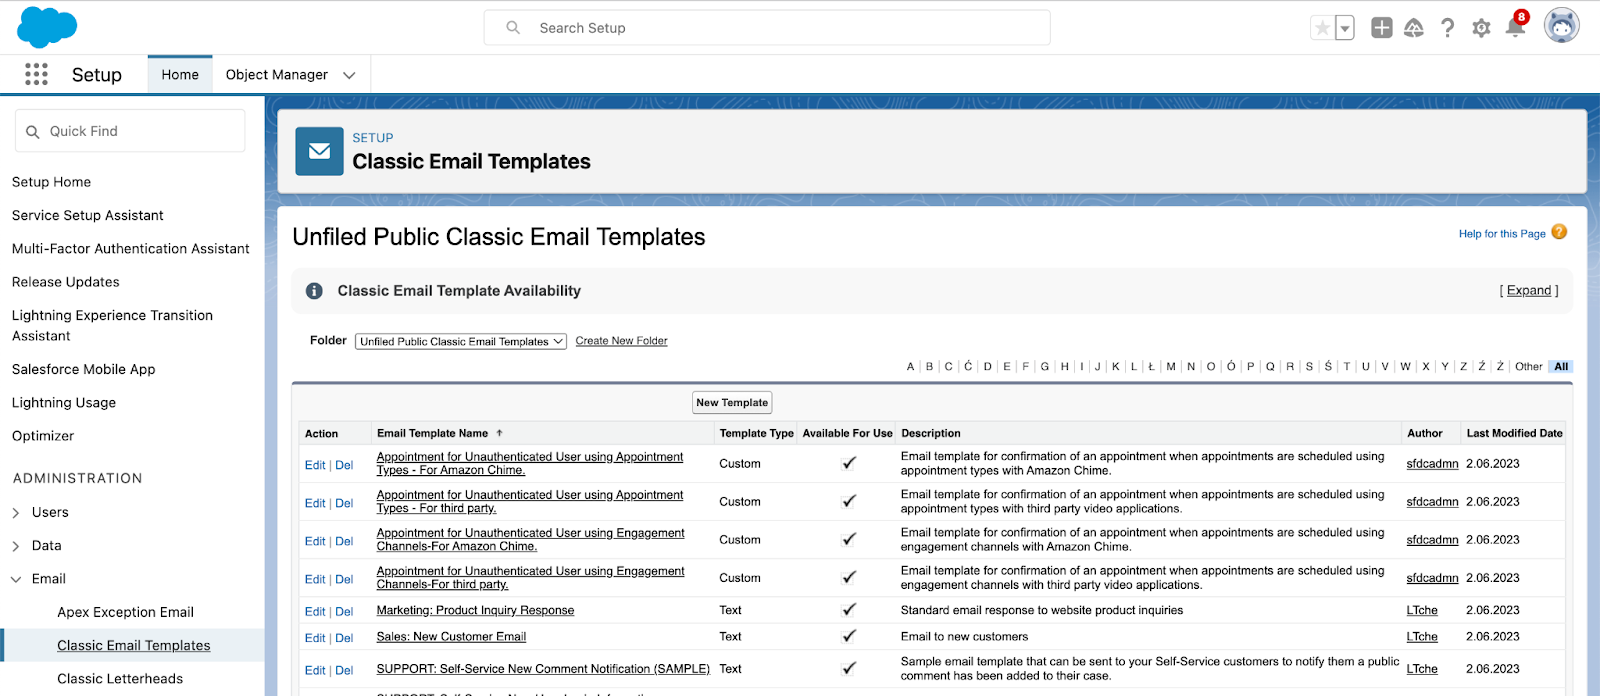
- Select Text as the template type and press Next.


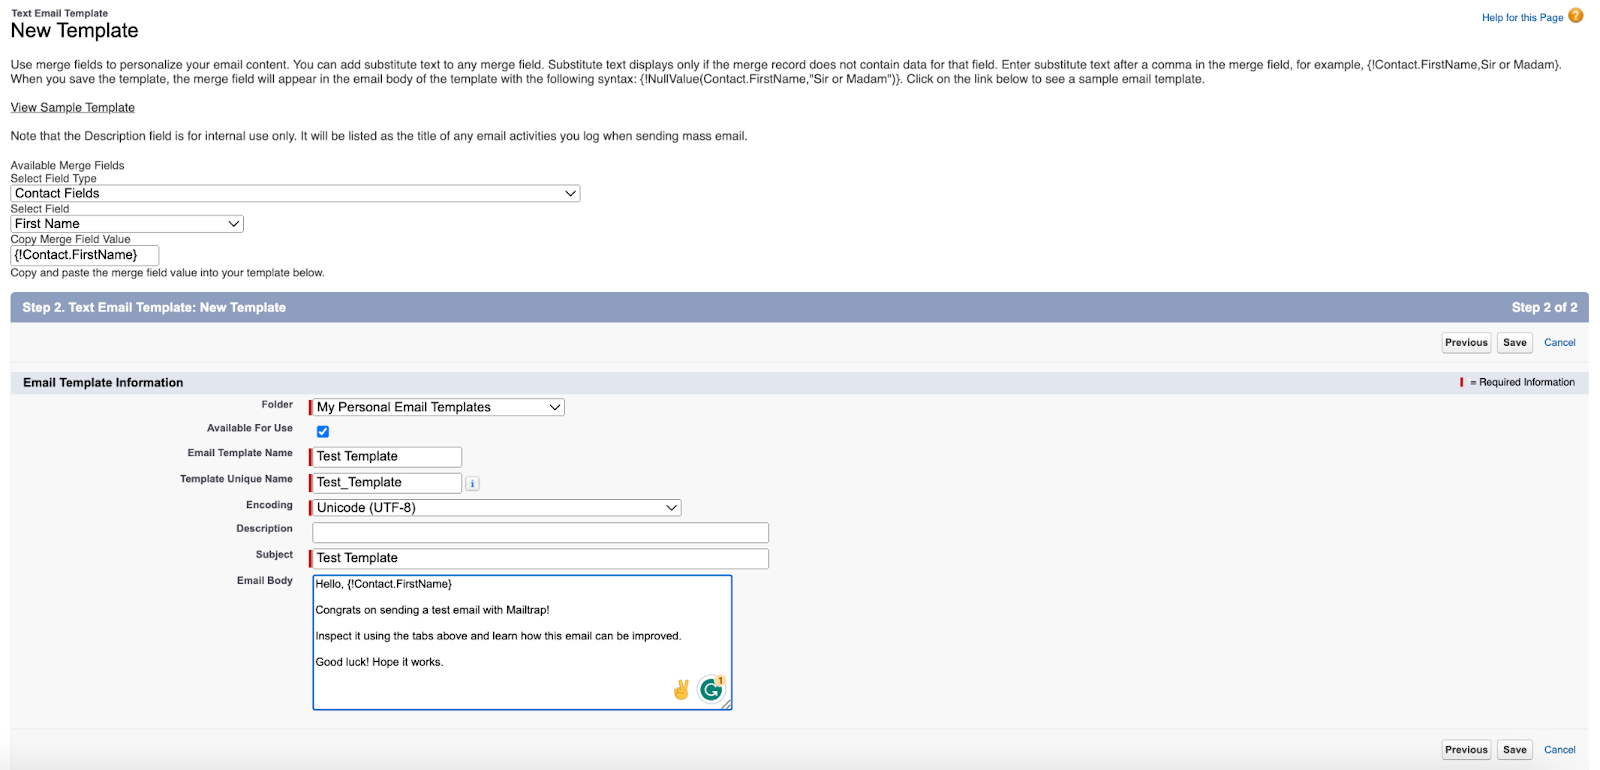
- Configure the desired merged fields. For this example, we chose Contact Fields as the field type and the First Name as the field. Then, choose the folder in which the template will be saved, mark the checkbox next to Available For Use, name the template, and enter the subject line and body text. Don’t forget to insert the auto-generated merge field. Save the template.

- Click Send Test and Verify Merge Fields.

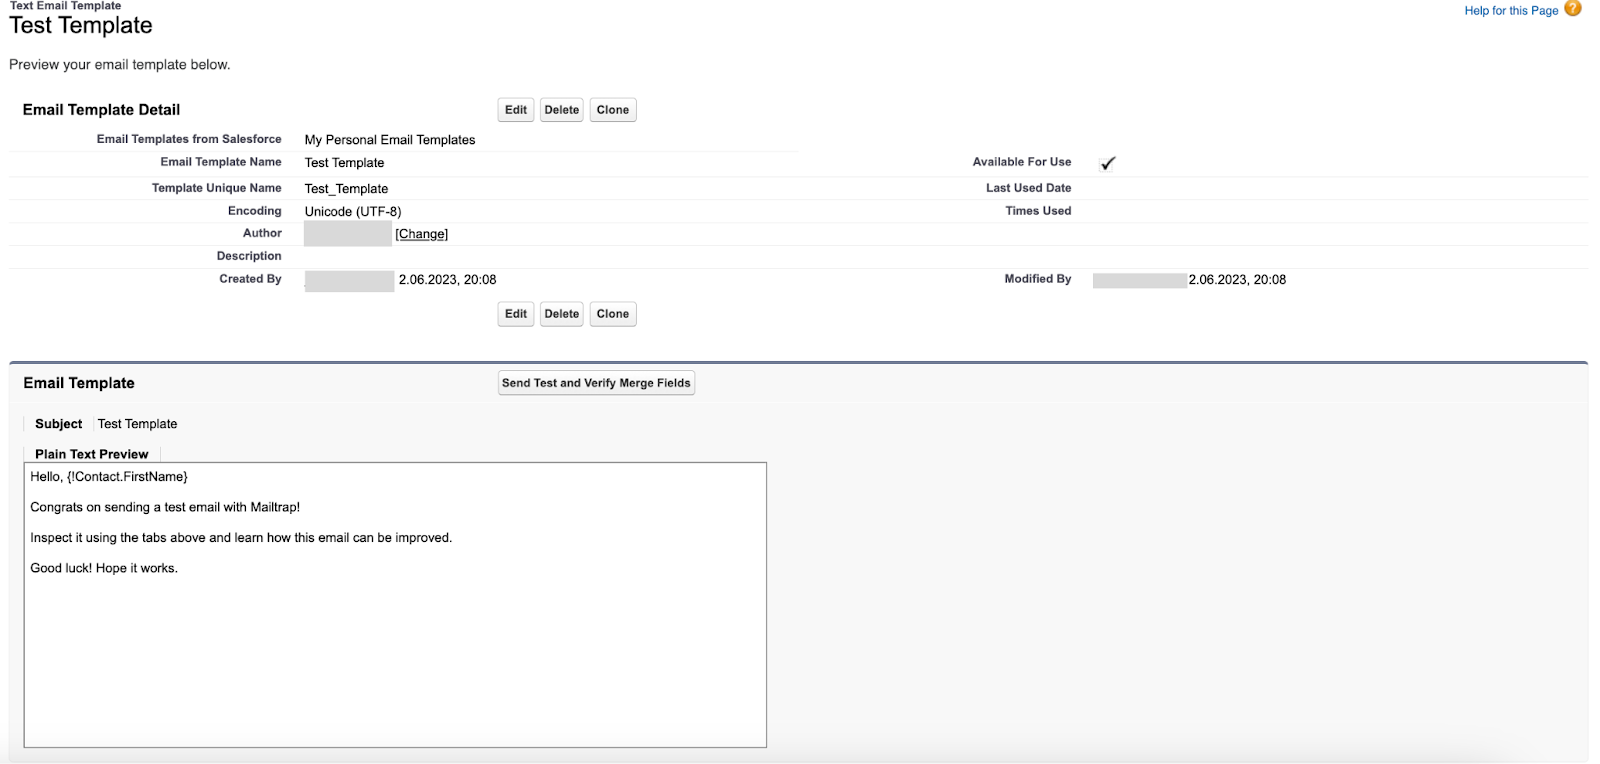
- In the pop-up window, choose the contact you want to test the template for. Tick Send email preview to and enter your email address.


- Click OK. Now check your Mailtrap sandbox. The test template will be right there. You won’t find it in your real inbox, because it never left Mailtrap.


Testing HTML templates
Just like in the previous example, we should start by creating a template, but instead of text, let’s select Custom (without using Classic Letterhead). Click Next.

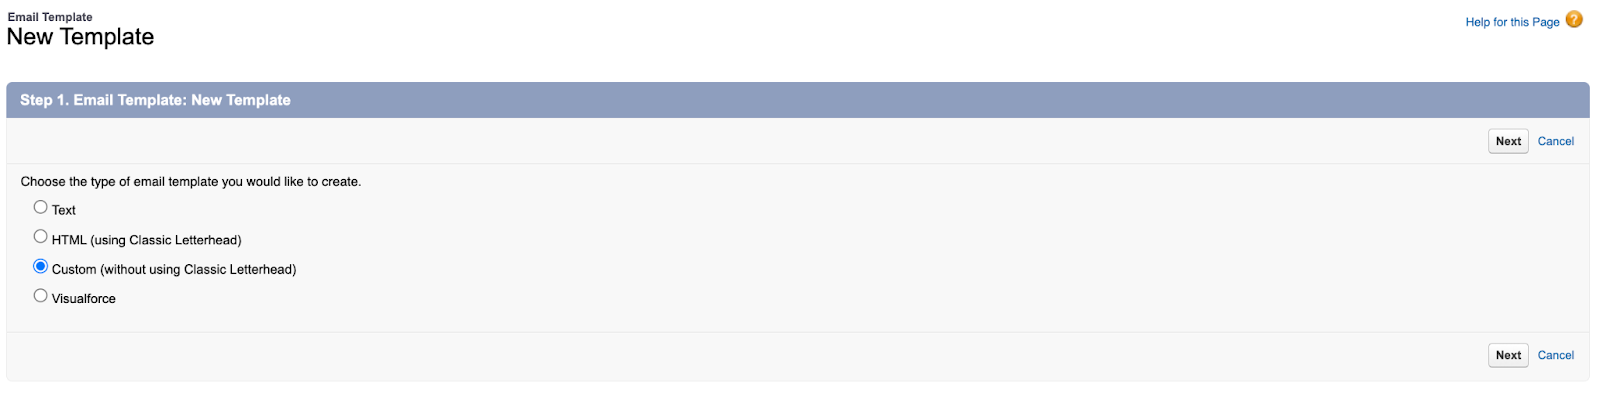
Select the folder, make the template available for use, give it a unique name, and set the subject. The Encoding should be set to Unicode (UTF-8) as per HTML specifications.


In the next step, we can add an HTML body. This time we’ll skip the merge field and concentrate on testing the HTML content.


Then we need to configure the text version of the email. That way, the body text of the email will still be visible even if the email client doesn’t render the HTML properly. Click Save.

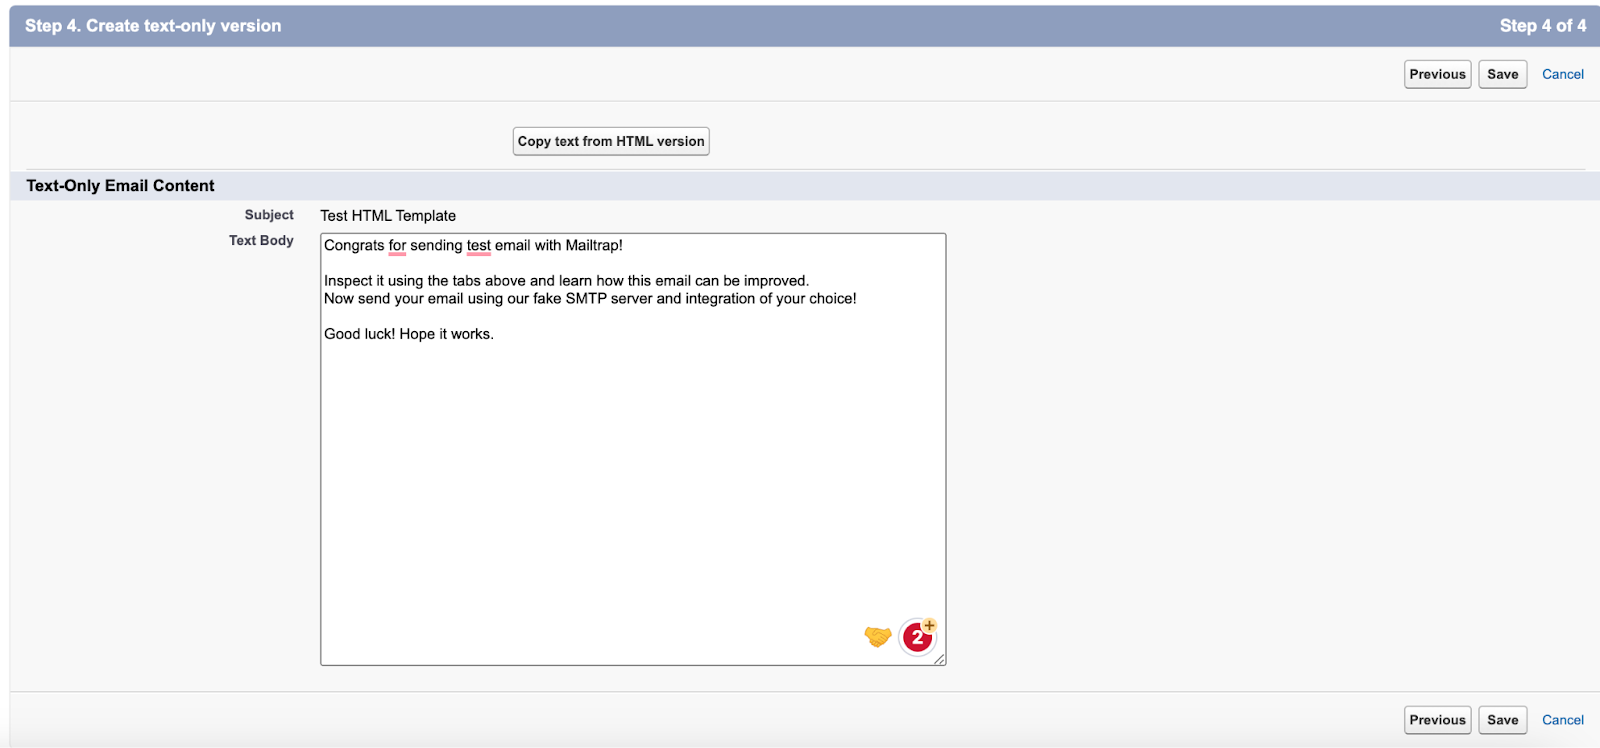
You will see the preview of the email. Let’s send it as we did before and inspect it in our Mailtrap sandbox.
- Start by checking the email preview in different devices. You can check mobile, tablet, and desktop views.


- Then let’s move to the HTML Source tab. There, you’ll see all the problematic elements marked with a red exclamation icon.

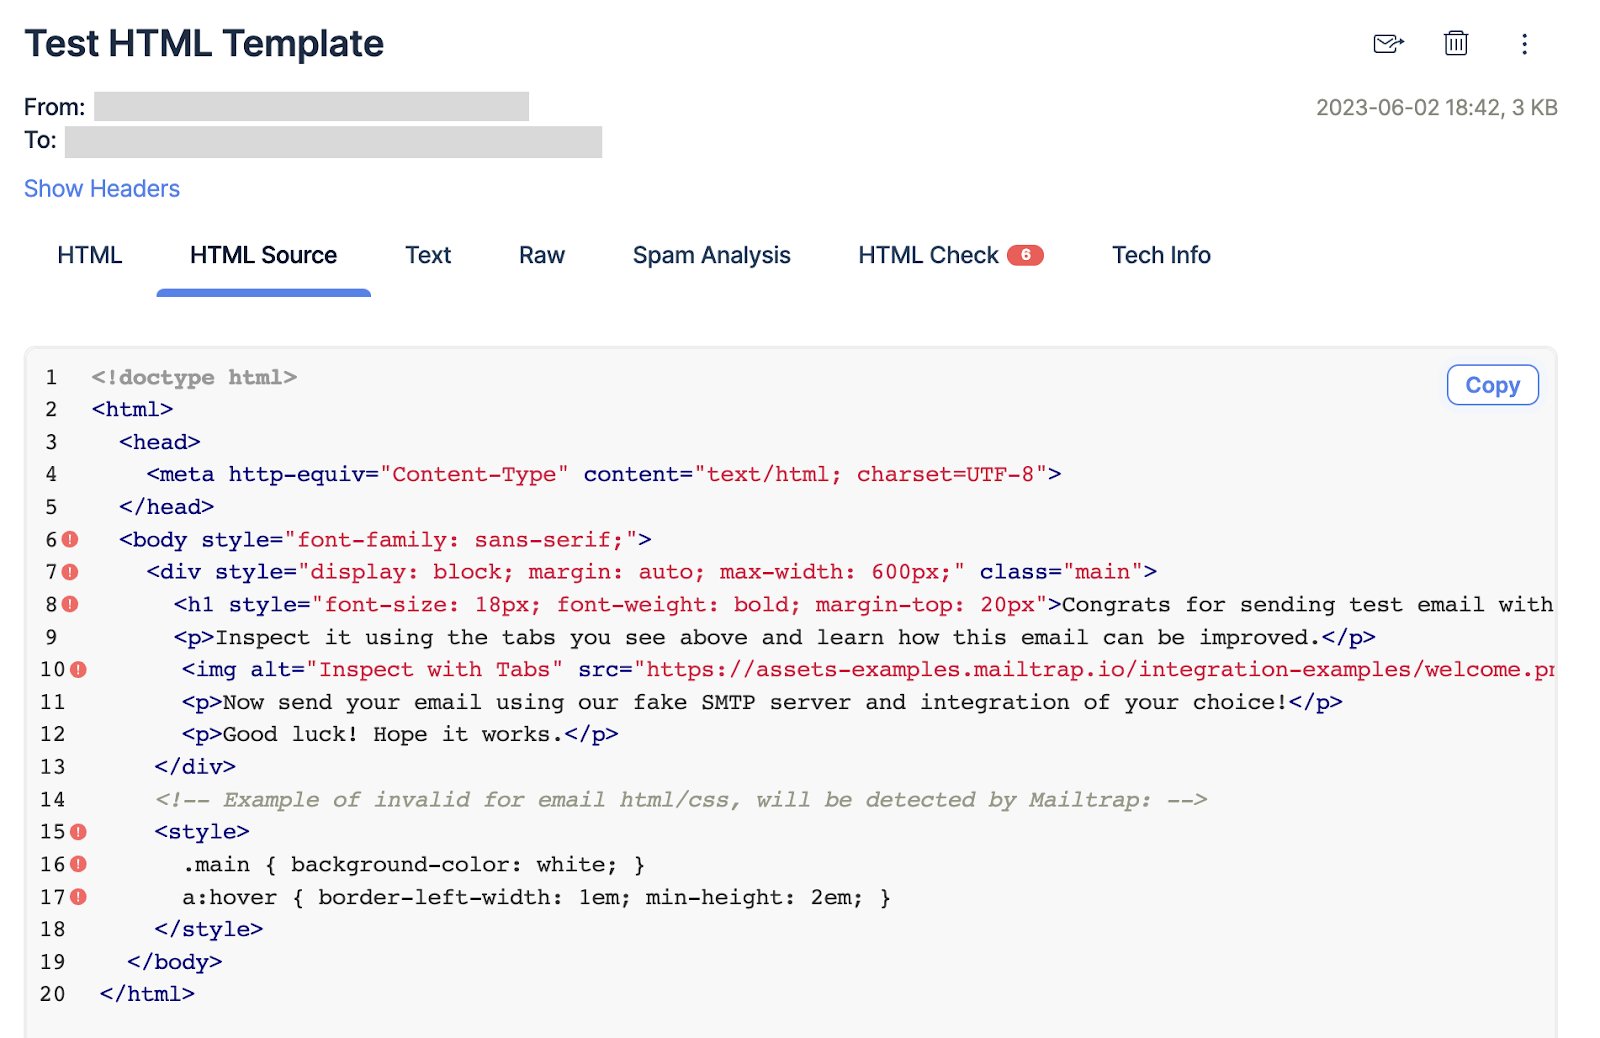
- Go to the HTML Check tab to inspect client support in more detail. Here, you can filter results by a specific client/device or view the overall HTML support percentage. Check out our knowledge base article to learn how HTML check works and how to interpret data.


After analyzing the HTML check results, you can adjust the code and correct/remove elements that might stop your Salesforce emails from rendering in your contacts’ inboxes.
How to test email alerts
With Mailtrap, you can test any type of Salesforce email alert. The following sections detail all the steps, but we’ll start by creating an alert first.
- Search for Email Alerts, then click the New Email Alert button.


- Fill out the fields based on your testing needs and click Save. Keep in mind that the fields labeled red are mandatory. Also, we used an exemplary object and email template, so you may need to change that based on your testing needs.


Testing Email Alerts
An Email Alert can be sent via Workflow Rules, Process Builder, or Flow. One thing to know before you pick: Salesforce ended support for Workflow Rules and Process Builder on 31 December 2025. Existing rules and processes still run, and you can still activate, deactivate and edit them, but they receive no support or bug fixes, and Salesforce’s guidance is to build new automations in Flow Builder.
So the Flow walkthrough comes first, and it is the one to follow if you are setting this up fresh. The Workflow Rules and Process Builder steps are kept after it for orgs that still run them, since those are exactly the automations most worth testing before they misfire.
Create a simple flow
- Navigate to Flows and click the New Flow button.

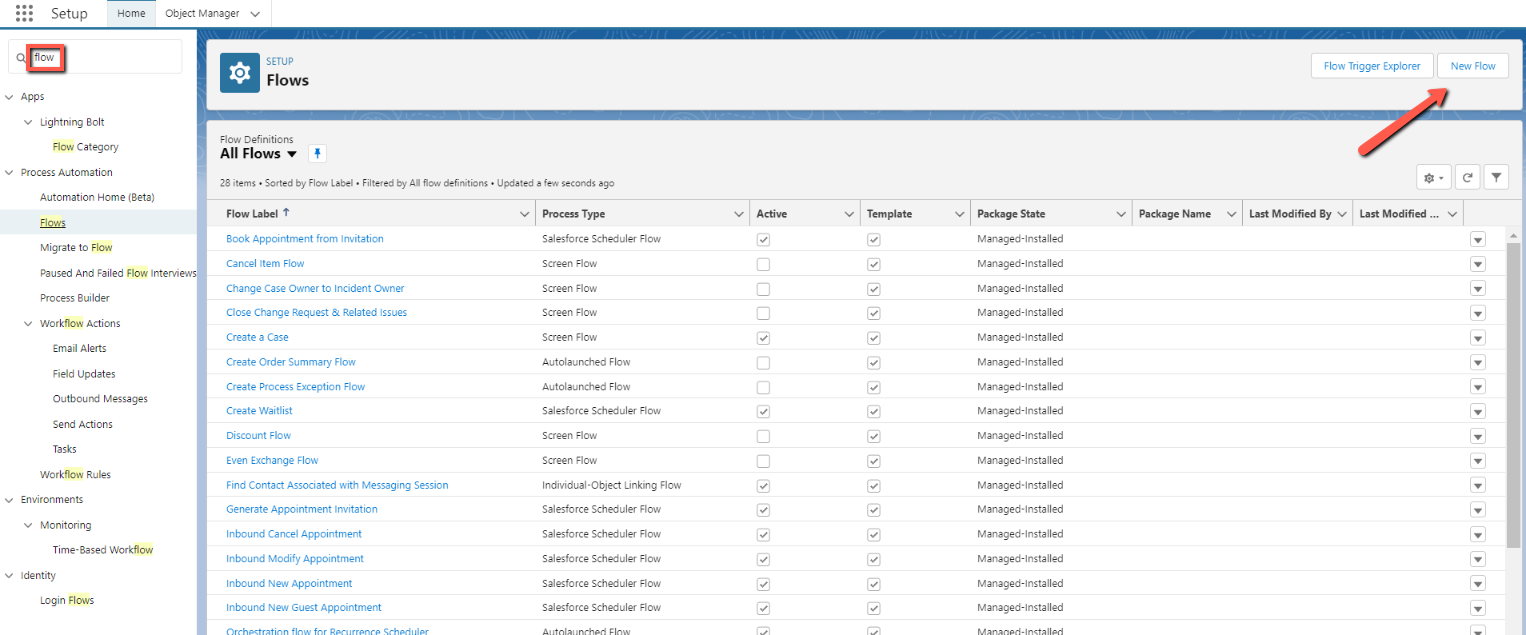
- Select Record-Triggered Flow and click the Create button.


- Configure Start as per your testing needs and click the Done button. Note that you should keep the Configure Trigger option as A record is created or updated.


- Click the white dot to add a new element.

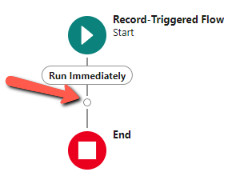
- Under Shortcuts choose Send Email Alert.


- Fill out the fields to label and describe the action, then hit the Done button.


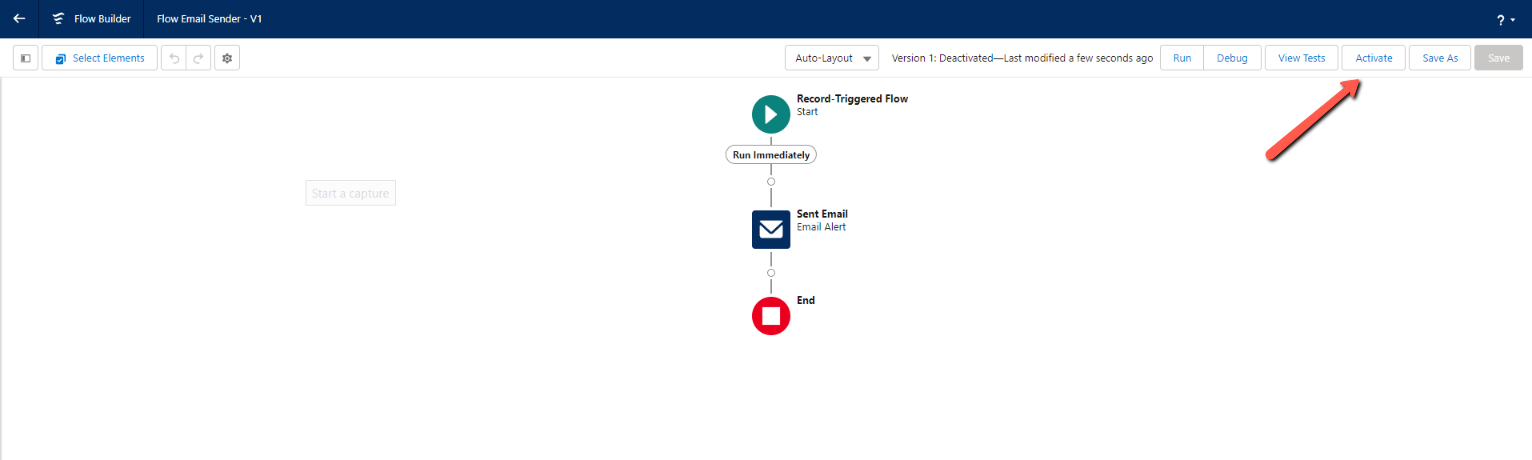
- Save the Flow.


- Activate the Flow.

Test the Flow Email Alert
Tip: If the same org also has Workflow Rules or Process Builder active on the Contact object, deactivate them before creating a new contact. Otherwise they will fire on the same criteria and you will get more than one email.
- Go to the Contact tab and create a new contact.


- Open your Mailtrap sandbox and confirm the email arrived.

Legacy: orgs still running Workflow Rules or Process Builder
Both are out of support, so don’t build anything new on them. The walkthroughs below are here because an automation nobody maintains is precisely the one worth testing before it misfires.
Create a simple Workflow rule
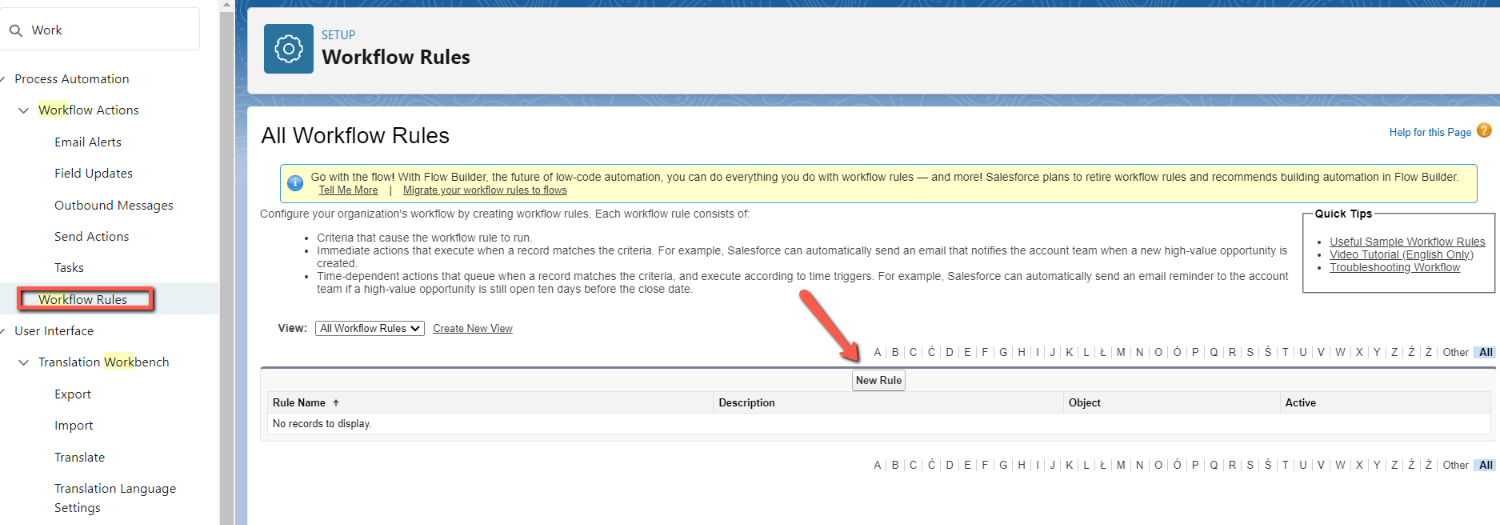
- Navigate to the Workflow Rules and click the New Rule button.

- Select Contact as the object.


- Under Evaluation Criteria, choose created, and every time it’s added. Then, in Rule Criteria, choose Contact Email under Fields, set the Operator to not equal to, and the Value as null. Lastly, click the Save & Next button.


- Thereon, click the Add Workflow Action button and select Existing Action.

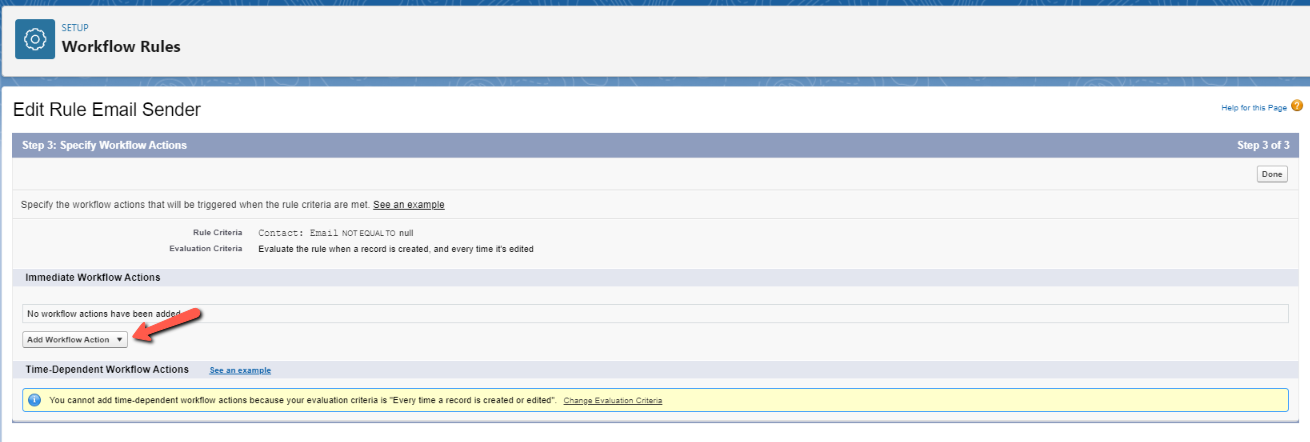
- Choose the email alert that you previously created and click the Save button.


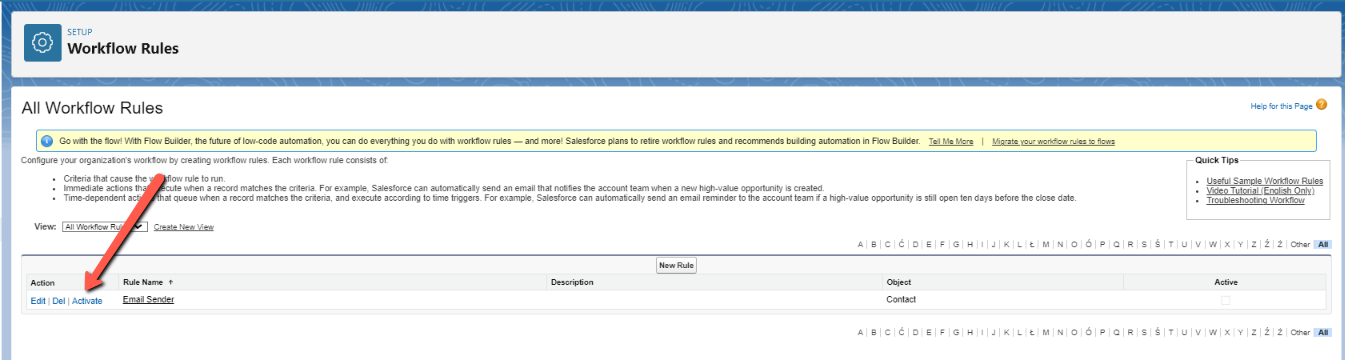
- Go to the Workflow Rules one more time and activate the process.

Test the Workflow Rule Email Alert
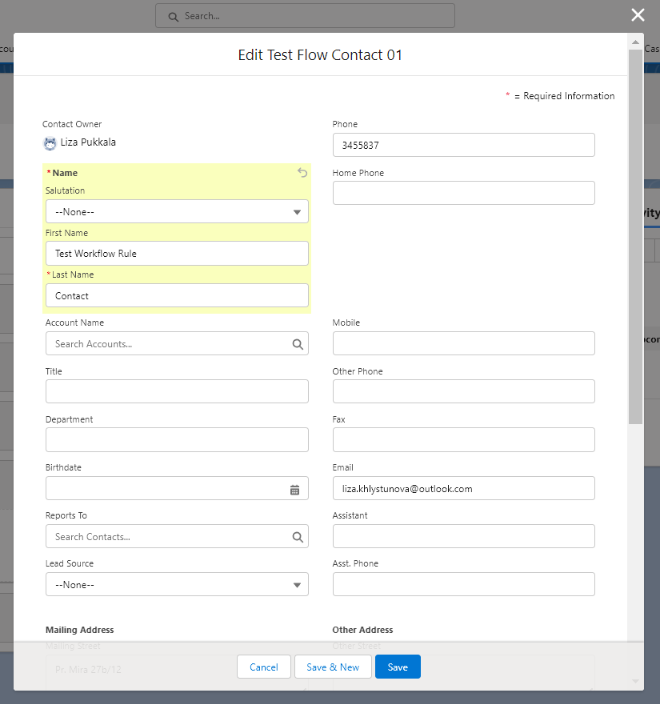
- Go to any contact record and edit any field. The workflow rule should send an email alert when a contact record is created or edited. Then, click the Save button.

- Open your Mailtrap sandbox and confirm the email arrived.

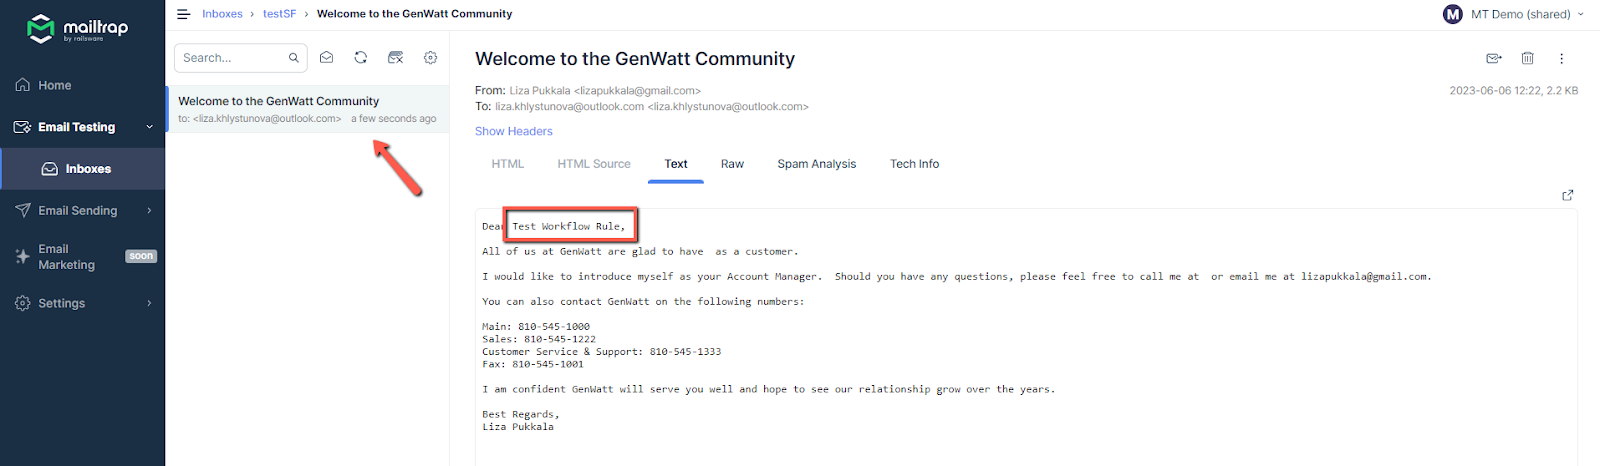
Create a simple Process Builder
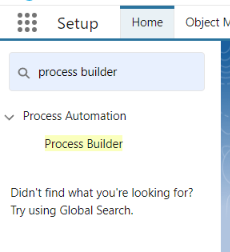
- Navigate to the Process Builder, then click New.

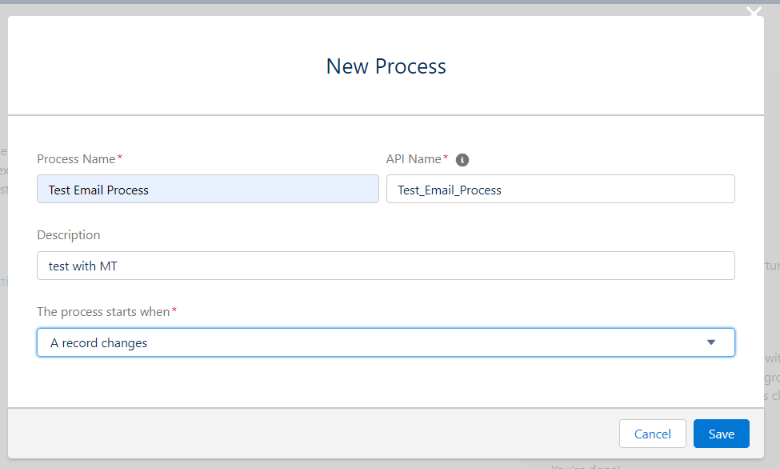
- Fill out the fields based on your testing needs, and click the Save button.
Tip: Make the Process, API name, and Description congruent for easier reference. Keep the variable under The process starts when at A record changes.

- Choose the Contact object and in the Start the process field select only when a record is created option, then click the Save button.

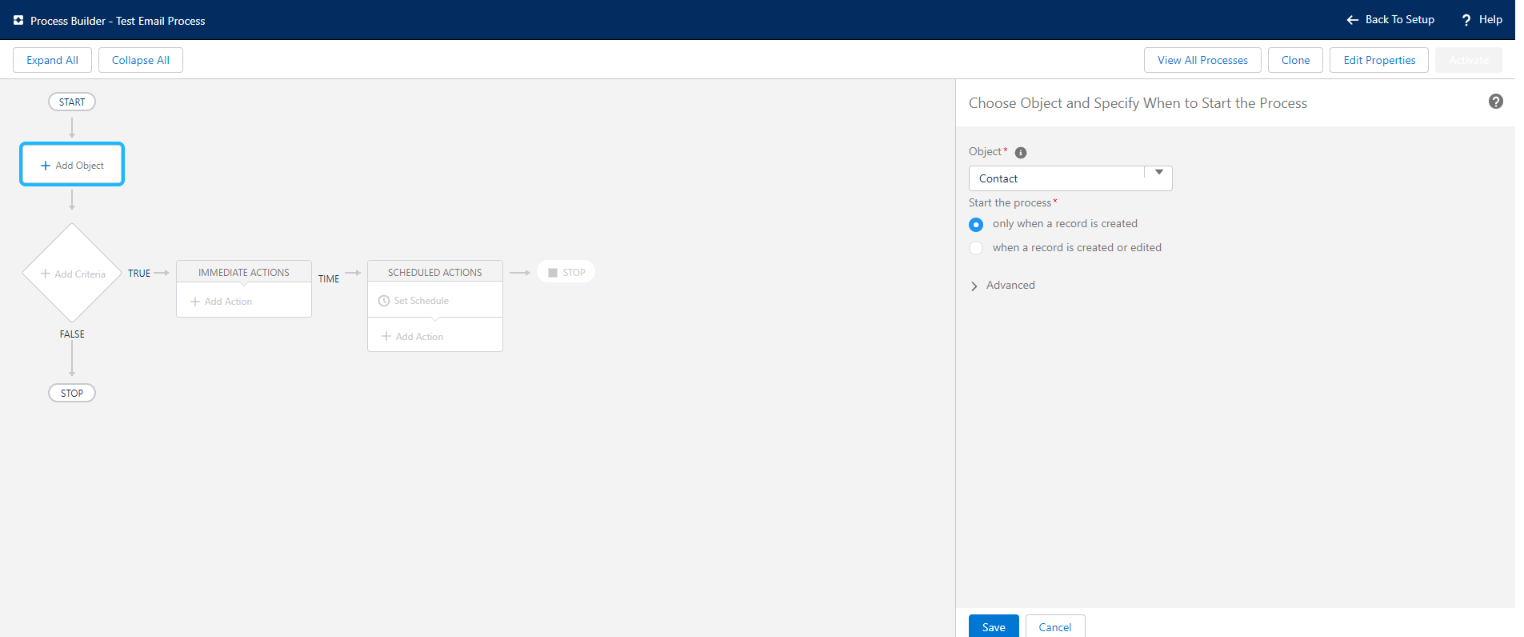
- Add Criteria based on your testing needs – we built the Process based on the example used in this article.

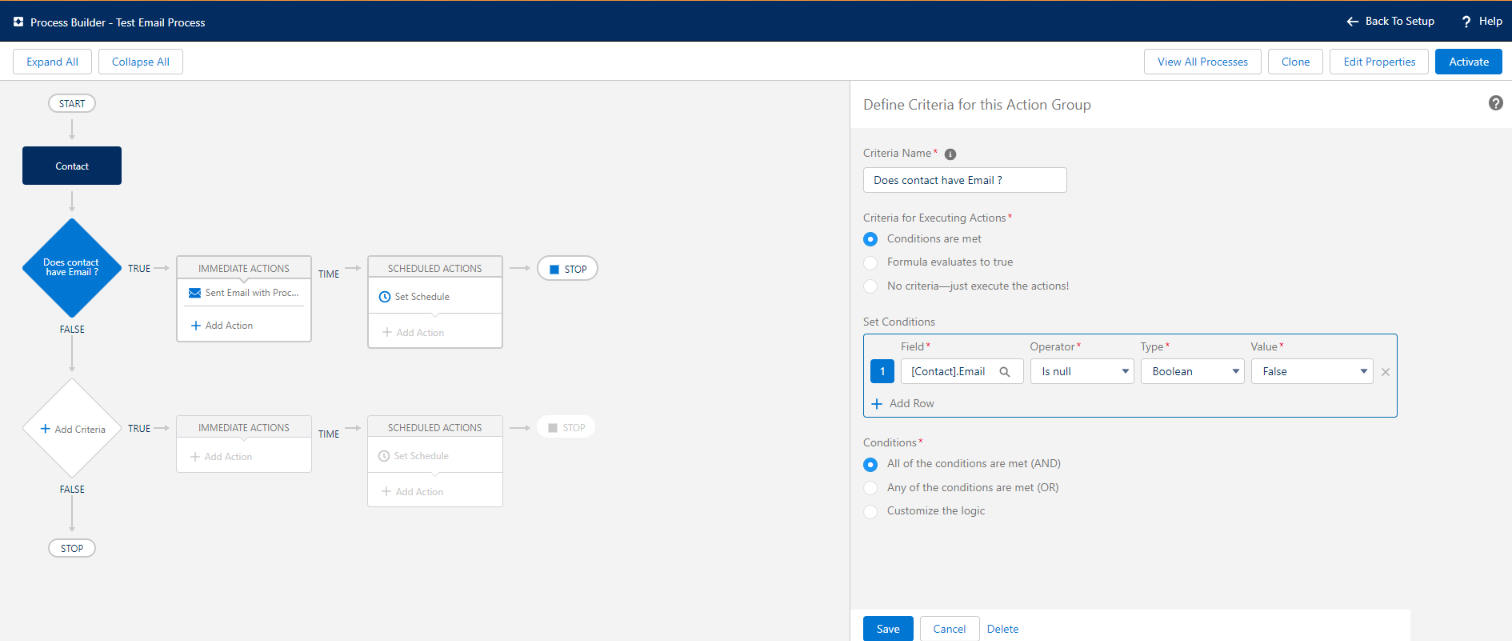
- Click the IMMEDIATE_ACTIONS tile, and under the Action Type choose Email Alerts, then select the email alert created in the previous steps, and click the Save button.


- Activate the Process Builder.

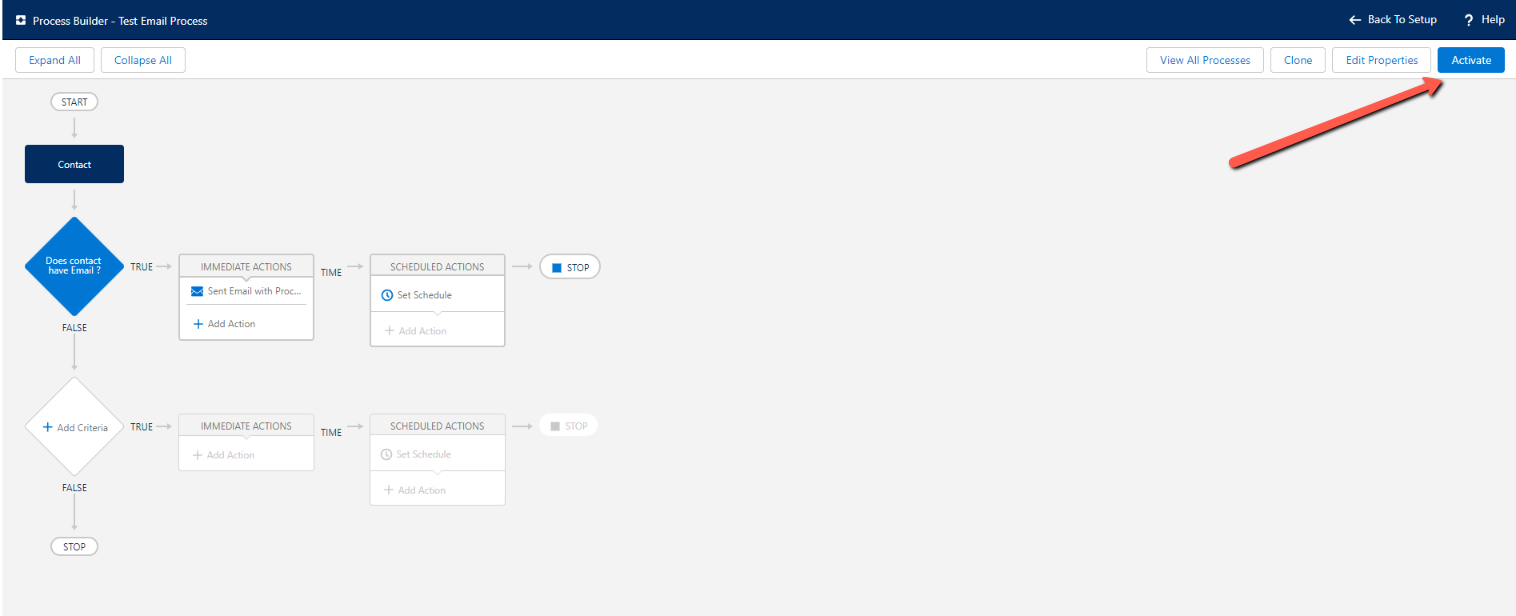
Test the Process Builder Email Alerts
Tip: If you want to get an email only from the Process Builder, deactivate Workflow rules before creating a new contact. Otherwise, the Workflow rule will be executed too as this rule also meets the criteria.
- Go to the Contact tab and create a new contact.

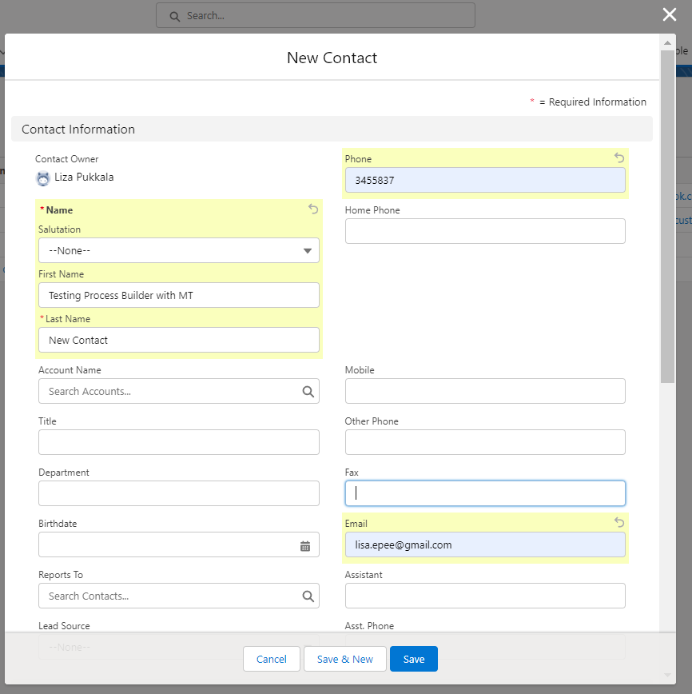
- Open your Mailtrap sandbox and confirm the email arrived.


How to test bulk email handling
With the help of Email Sandbox, you can test bulk email handling in Salesforce. This test will validate the Apex limits and check if your bulk emails are getting delivered properly.
Just like with the previous tests, this assumes Testing Mode is on.
Before you run this on a free plan: the Mailtrap Free plan gives you 50 test emails a month, one sandbox that holds 10 emails at a time, and one email every 10 seconds. Multiple recipients on a single email are not supported. So a ten-contact batch takes about a minute and a half to arrive and fills the sandbox exactly, and anything larger starts evicting its own earliest messages. Size the batch accordingly, or run this on a paid plan.
The first step is to create a sufficient amount of contact data by importing data with a Data Import Wizard or adding a couple of sample contacts manually. For the latter, press on the application icon and choose Marketing.


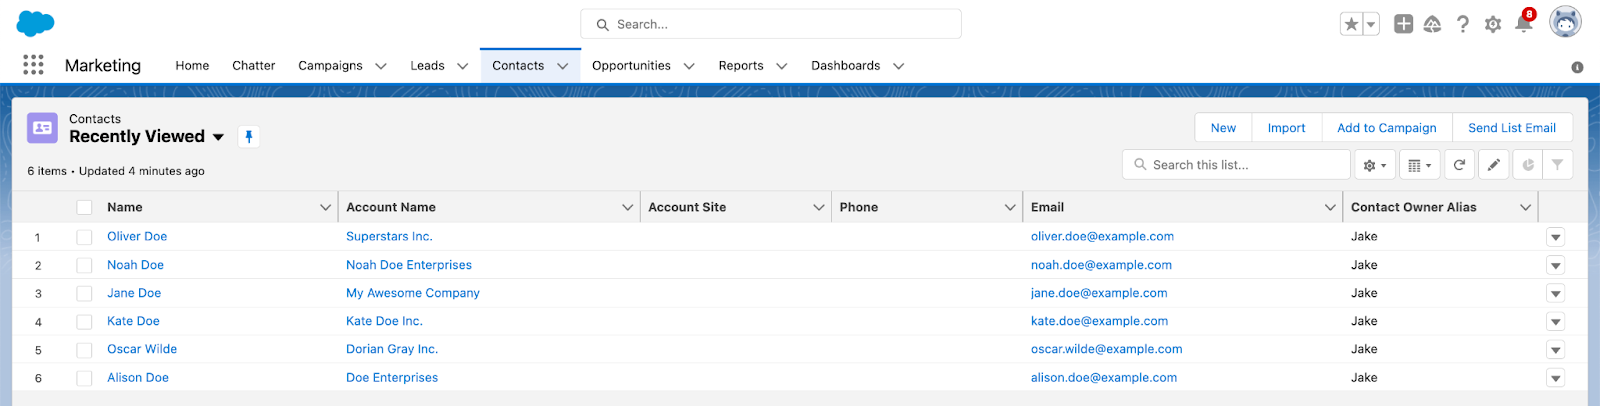
Under the Contacts tab, click New. Enter the name of the contact, create a new account to associate with the contact, and enter the email address. Save the settings and repeat the process for any other contact you want to add.


Once you’re done, your contacts list should look something like this:

Next, create a sample template, open it and note the template’s ID. It’s located in the URL and starts with 00X.


At this point, we can start writing an Apex Class.
Add a new class in Apex classes with the following script:
public class BulkEmailHandler {
    public static void sendBulkEmail(List<Id> contactIds) {
        Messaging.reserveMassEmailCapacity(contactIds.size());

        Messaging.MassEmailMessage mail = new Messaging.MassEmailMessage();

        mail.setTargetObjectIds(contactIds);
        mail.setTemplateId('your_template_id'); // replace 'your_template_id' with the actual ID of your email template
        mail.setSaveAsActivity(false);

        Messaging.sendEmail(new Messaging.MassEmailMessage[] { mail });
    }
}
This piece of code requires contact IDs. So, to run the script, we should ask Apex to grab contact IDs first and then send an email. Open the developer console and in the Open Execute Anonymous Window, add the following lines:
List<Contact> contacts = [SELECT Id FROM Contact LIMIT 10];
List<Id> contactIds = new List<Id>();
for (Contact c : contacts) {
    contactIds.add(c.Id);
}
BulkEmailHandler.sendBulkEmail(contactIds);
Press Execute. In a few seconds, the emails will appear in your Mailtrap sandbox, indicating that your Salesforce platform can successfully send bulk emails.

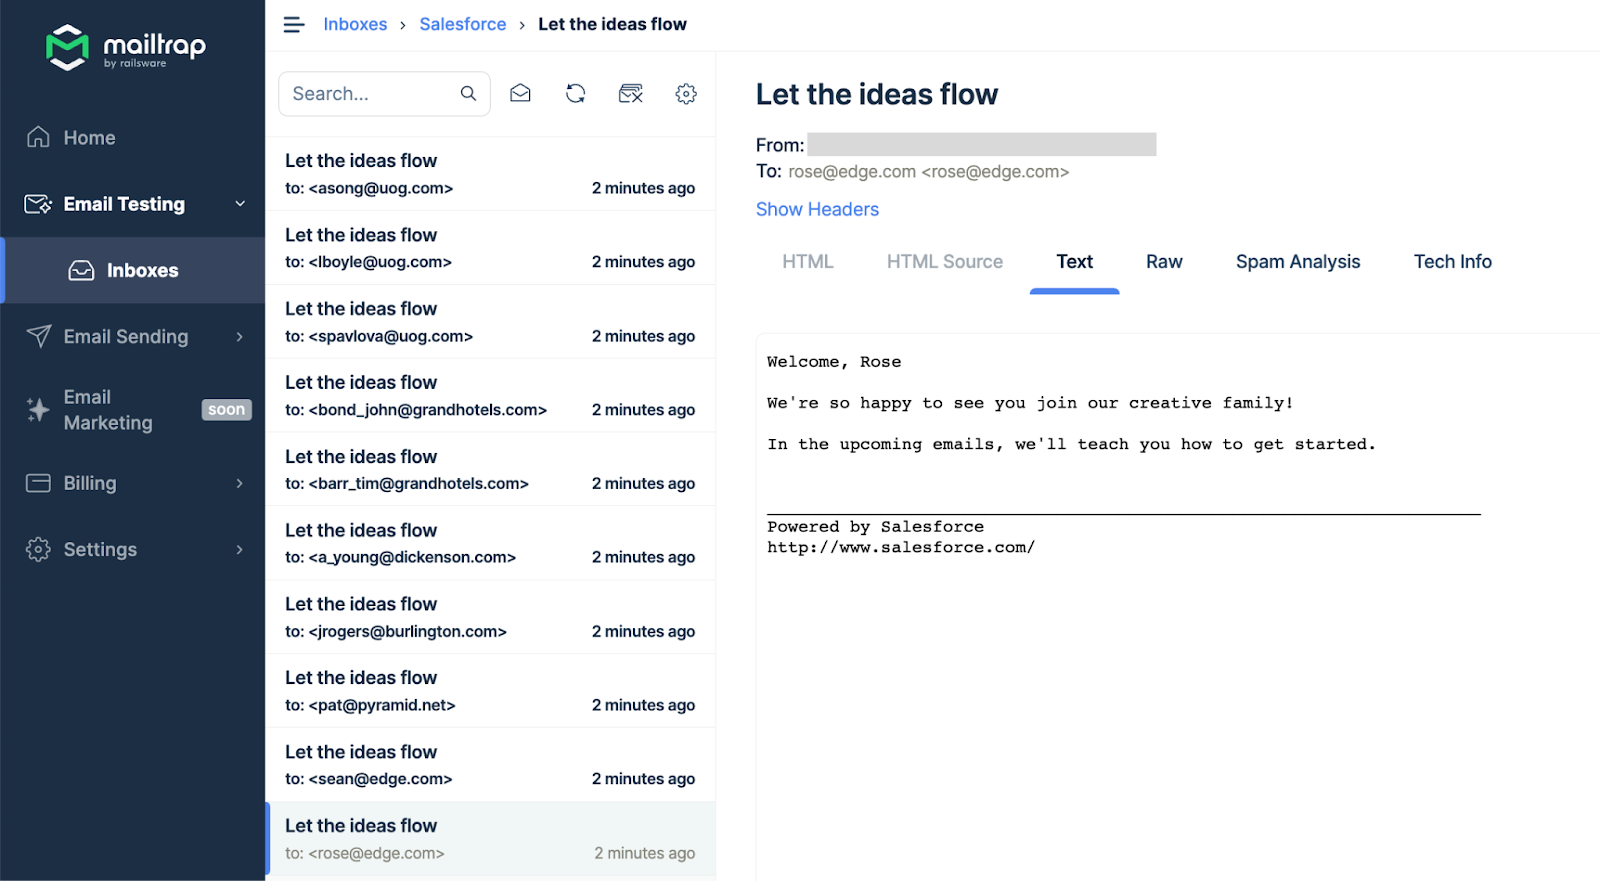
Note: The code piece above sends an email to 10 contacts, as set by the LIMIT in the query. Raise the limit in the SOQL query if you need more. Depending on your Salesforce org type and package, your daily email sending volume may also be capped.
Wrapping up
This wraps up our tutorial on testing emails in Salesforce with Mailtrap Email Sandbox. Now you can successfully inspect and debug email deliverability, text and HTML templates, and bulk email handling.
Don’t forget to organize your work by creating different projects and sandboxes. That will simplify the testing process and keep your data in one place.
If you also need to send from Salesforce rather than only test, see our guide to sending email in Salesforce, or read more about what Mailtrap does.