


Scaling issues, poor deliverability, rising costs, missing features, slow support — there are just a few reasons to switch your email service provider. If your current ESP makes you jump the hook every time you need to scale your sending or keep emails out of spam folders, this step-by-step guide will help you plan and execute your migration smoothly.
ESP migration: a checklist
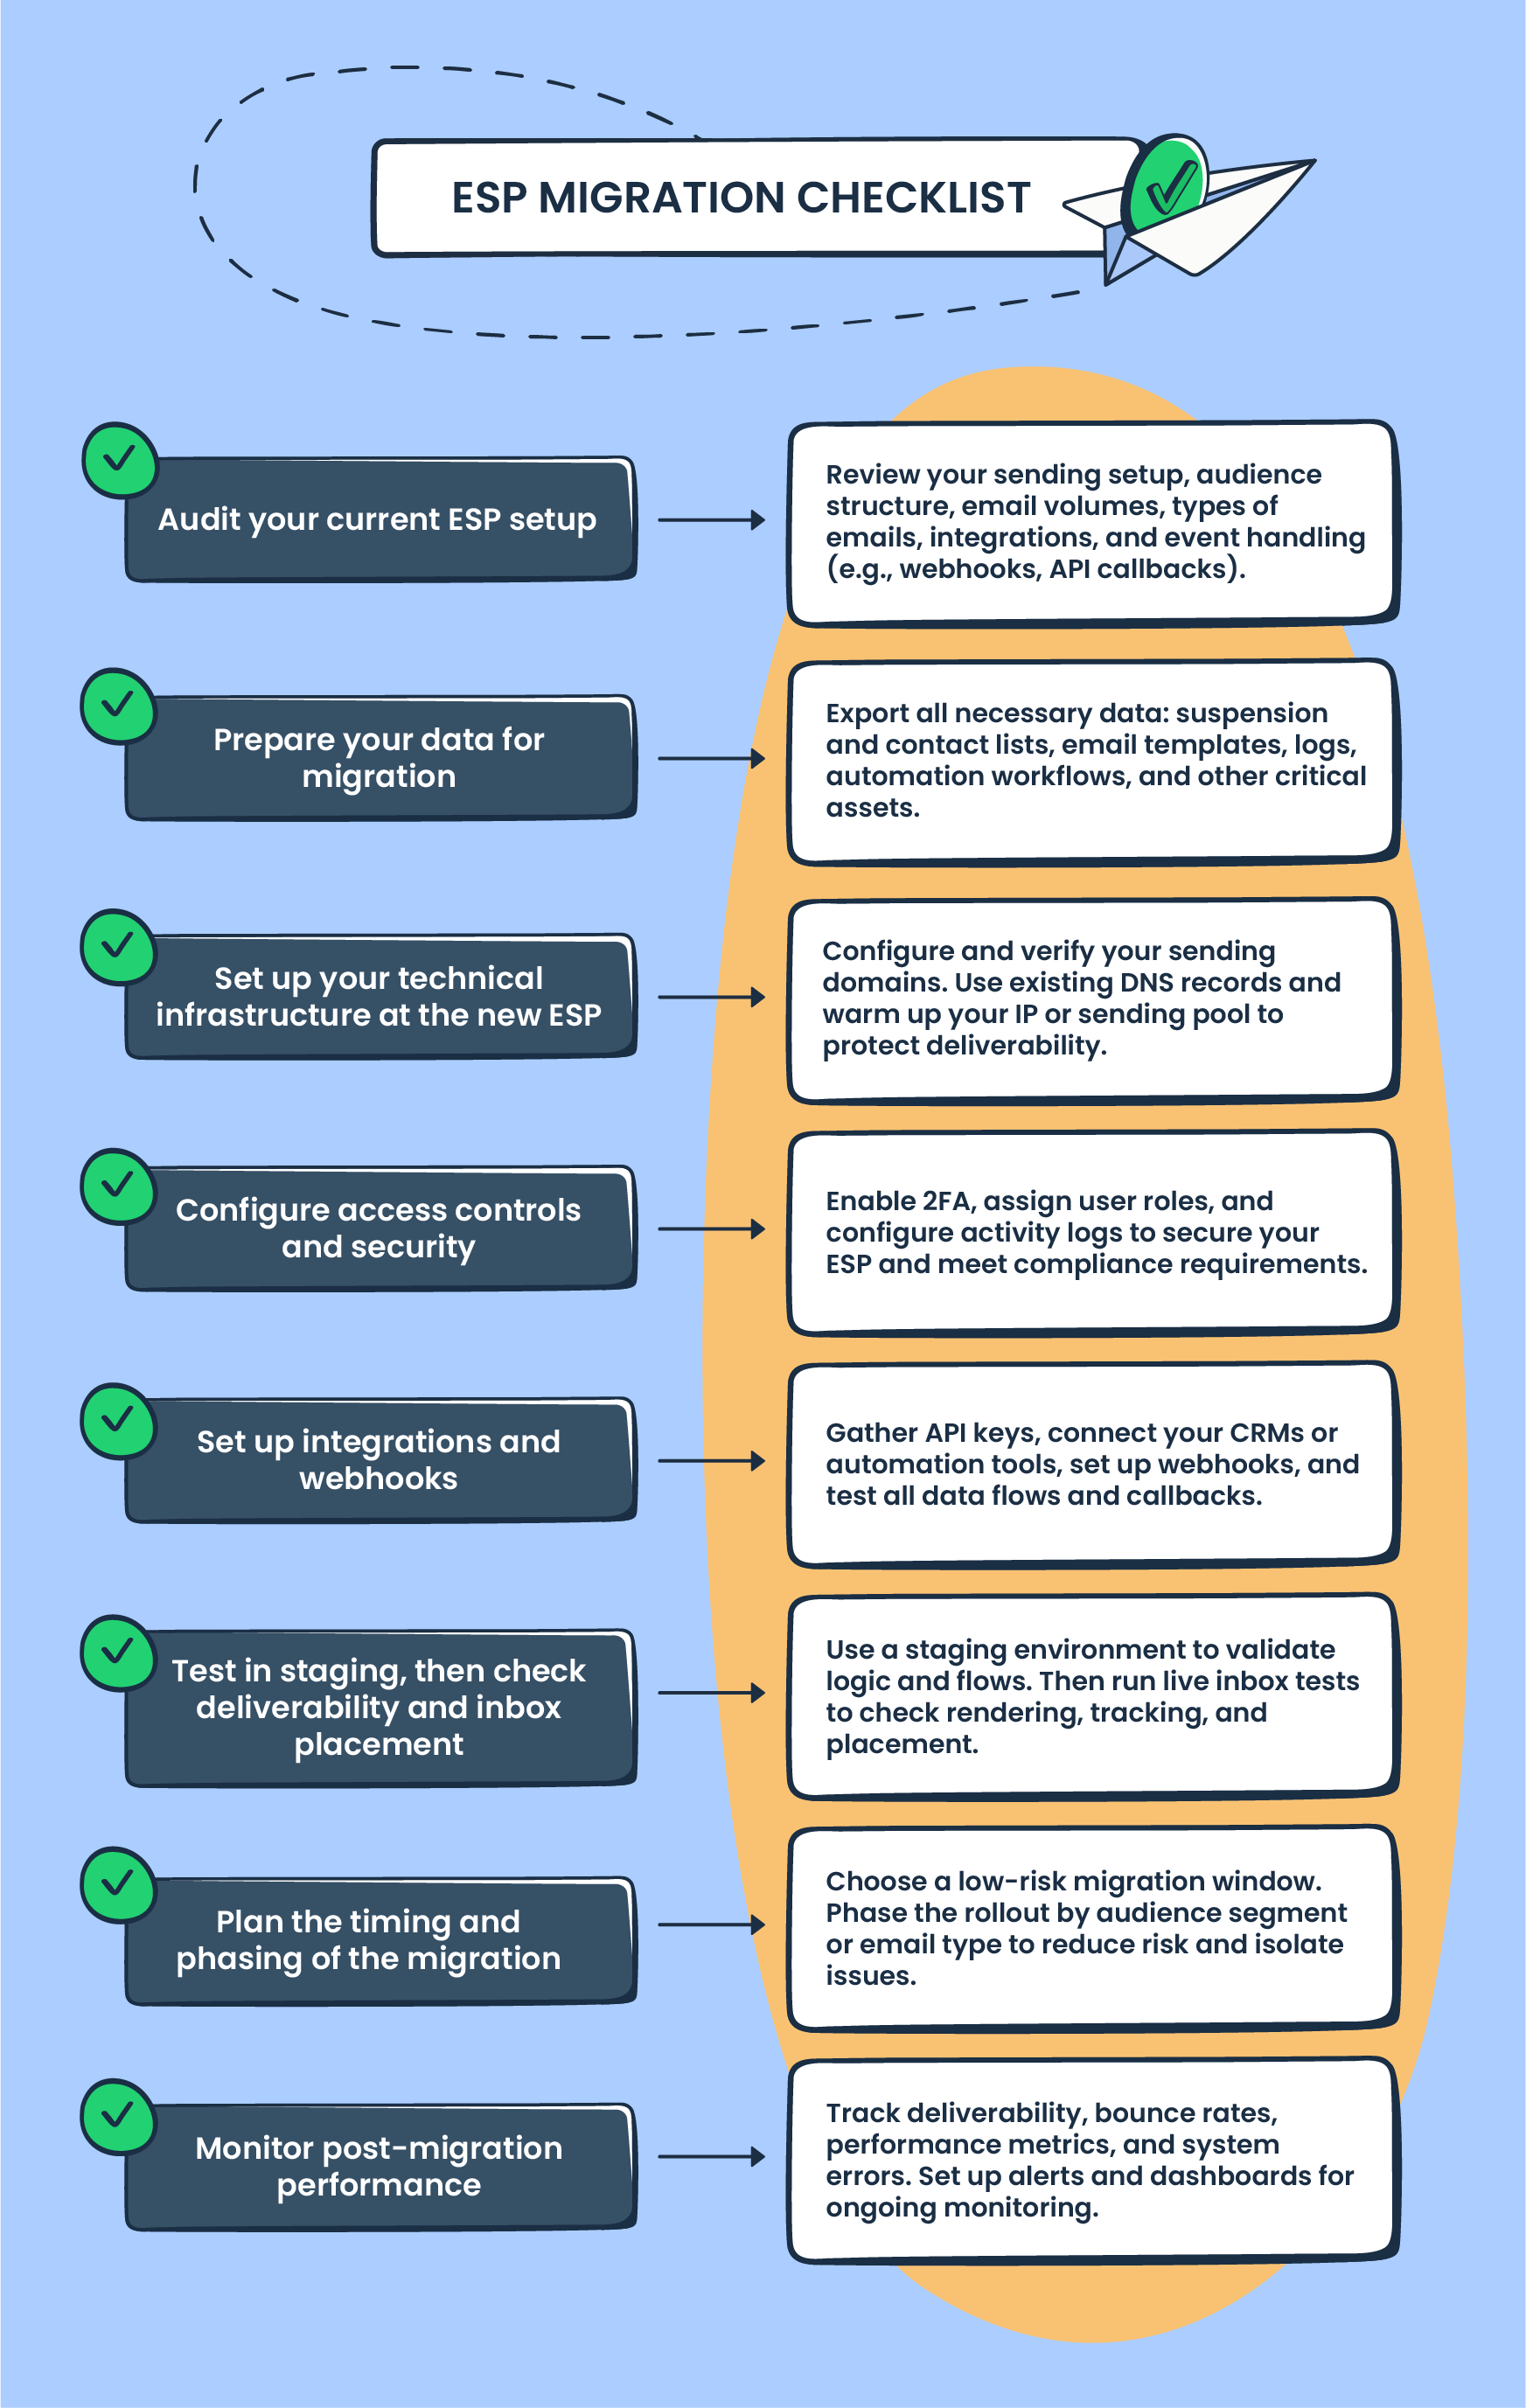
Before we dive into technical and not only details, here’s a quick checklist you can use to plan your ESP migration:
Audit your current ESP setup:
- Review sending setup, email volumes, audience structure, and email types.
- Map out all integrations, webhooks, and API callbacks.
Prepare your data for migration
- Export suspension and contact lists, templates, logs, automation workflows, and custom fields.
- Document DNS records (SPF, DKIM, DMARC) and subscription forms.
Set up your technical infrastructure at the new ESP
- Add and verify your sending domains.
- Configure SPF, DKIM, and DMARC records.
- Warm up your IP or domain gradually if needed.
Configure access controls and security
- Enable two-factor authentication (2FA) for all users.
- Assign role-based permissions to control access to key areas.
- Enable and review activity logs for auditability.
Set up integrations and webhooks
- Gather new API tokens and update connection settings in your systems.
- Reconnect CRMs, automation platforms, and other tools.
- Set up and test webhooks to handle engagement events in real time.
Test in staging, then check deliverability and inbox placement
- Run test sends in a staging environment to validate sending logic and system behavior.
- Use tools like Mailtrap Email Sandbox to inspect messages and debug flows.
- Send live tests to real inboxes to check rendering, tracking, and placement.
Plan the timing and phasing of the migration
- Choose a migration window with lower sending activity.
- Migrate in phases — by email type or audience segment.
- Communicate the plan across dev, marketing, and support teams.
Monitor post-migration performance
- Track bounce rates, inbox placement, and key engagement metrics.
- Set up dashboards and alerts to catch anomalies early.
- Watch for deliverability issues and unsubscribes over time.

Now, let’s see how to change your email service provider step-by-step.
Step 1. Audit the current ESP setup
Yes, ESP migration is a big deal, yet with a clear plan, you can change the provider without breaking operation, data losses, and deliverability drops.
By this point, I assume you’ve already done your homework and know exactly which ESP you want to migrate to. If not, it’s worth checking our guide on how to choose the email sending provider for your specific business needs, or check these articles:
- Best SMTP Provider: 7 Platforms Compared
- Find Out Which Mass Email Service Provider Is Right for You
- Free SMTP Server: 10 Providers Compared
- 7 Best SMTP Services for Email Marketing
Already know your hero? It’s time to analyze how your current setup works. The goal is to document what’s in place today, so you can plan the migration with fewer risks and no missed steps.
Look at:
- Audience management — how your lists and segments are organized.
- Sending volumes — number of emails sent monthly, sending scale and limits.
- Types of emails — marketing, transactional, triggered marketing, or bulk campaigns.
- Current deliverability and placement — deliverability rates, inbox placement stats.
- Integrations — CRMs, ecommerce platforms, CDPs, automation tools, custom APIs, anything connected to your ESP or triggering emails.
- Webhooks and API callbacks — check what events (bounces, opens, unsubscribes) are pushed to your system and how they’re processed downstream.
The gathered information will help you understand what will move, what might need reconfiguring, and what you’ll need to test after the migration.
Step 2. Export current data
After the audit, export the data you’ll need for the migration to make sure no valuable information gets lost during the switch.
Here’s what you need to export:
- Suspension list. Suspension lists include email addresses of unsubscribed recipients, those who bounced, or marked you as spam. You need to export this list and import it into your new ESP so you don’t accidentally email the wrong people. Otherwise, your deliverability rates and sender reputation will hurt.
- Contact lists. Download your email lists to quickly re-import them into the new ESP.
- Logs. Export campaign logs, deliverability reports, engagement stats, and bounce rates. These will be important for measuring performance after the migration.
- Templates. Export your templates in both raw HTML and your current ESP’s proprietary format (if applicable). Some platforms use custom variables or markup that will need to be adapted to the new ESP’s syntax.
- Email performance data. Export historical campaign performance data (open rates, click-through rates, conversions) for reference and consistency in reporting.
Additionally, you can also save:
- Automation workflows. Export or document triggered email workflows, automation sequences, and drip campaigns so you can reimplement them in the new ESP.
- Custom fields and tags. Save any custom fields or tags used for segmentation and personalization.
- Sending domain authentication. Document SPF, DKIM, and DMARC records to recreate proper email authentication in the new ESP.
- Subscription forms and landing pages. Export any subscription forms or landing pages that are integrated with your current ESP for re-implementation.
Step 3. Set up your technical infrastructure and warm up your domain
Now that you have your data ready, it’s time to configure the technical aspects of your new ESP.
If you’re migrating at a large scale, you can request migration support from your new email service provider to streamline the process and be sure all your specific requests and needs are taken into account. Mailtrap, for example, offers dedicated support for large-scale senders, helping you with the transition and smooth infrastructure setup.
With or without external help, focus on these key tasks:
- Configure sending domains. Start by adding and verifying your sending domains in the new ESP. Use the SPF, DKIM, and DMARC records you documented earlier to configure these in the new platform. This step will help keep your email deliverability rates safe during the migration.
- Validate your SPF record. After configuring your sending domains and updating your SPF record, use tools like the Mailtrap SPF Record Checker or Kitterman SPF Validator to make sure your domain is correctly authorized to send emails from the new ESP.
- Monitor DNS propagation. DNS changes can take anywhere from a few hours to 48 hours to fully propagate. During this time, some email services may still see your old records. Use tools like MXToolbox or DNSstuff to monitor the status of your DNS updates.
- Warm up your domain/IP. Many modern ESPs provide automatically warmed-up IPs, but if you’re managing your own dedicated IP, gradually warm it up by sending small batches of emails to highly engaged recipients. Slowly increase the volume over time to avoid spam filters and keep your reputation high.
- Review and adjust bounce handling settings. Test how the new ESP classifies and handles bounces. Check whether soft bounces are retried and how long suppression entries persist. These behaviors vary across platforms and can impact deliverability if left misaligned. Also, check how bounce data is exposed through webhooks or logs, especially if your system automatically updates contact statuses based on those events.
- Set up your tracking for deliverability and engagement. As you configure your domain and warm up your IP, set up the dashboards and reports in your new ESP to track deliverability, engagement, and sender reputation. This will give you a clear view of how things are going from day one.
Step 4. Configure 2FA and user access controls
Before you start sending emails, make sure your account is secure. Enable two-factor authentication for all users. This adds an extra layer of protection by requiring both a password and a secondary form of verification to log in.
Next, review permission levels within your new ESP. Many platforms support fine-grained roles that let you control access to key areas, like sending settings, contact lists, analytics, or billing. Assign roles based on team responsibilities to streamline workflows and reduce the risk of errors or data exposure.
Finally, set up activity logs to track user actions within the platform. These logs help you monitor who’s making changes, accessing sensitive information, or updating configurations. The feature helps you detect issues early or prove compliance with data regulations like GDPR checklist, APA, CCPA, and others.
Step 5. Upload your data and setup integrations
Take the contact lists, templates, and other important data you exported earlier and upload them into your new ESP. In some cases, your email templates may not import directly, and you might need to rebuild them using the new ESP’s tools.
Connect your tools and platforms, such as CRMs, marketing automation systems, or eCommerce platforms, to your new ESP. This helps keep your workflows running smoothly once you begin sending live emails. For smooth operations, you need to set up:
- SMTP Integration. Double-check that your SMTP credentials are correctly configured in the new ESP. Verify the host, port, username, and password to match the new ESP’s requirements for proper email delivery.
- API Integration. If you use an API for sending emails, update your API tokens and keys in the new ESP. Confirm that the API endpoints are correctly set up to prevent disruptions in your email flow.
If your new ESP uses webhooks for engagement tracking, set up and validate those endpoints early on. Webhooks are often used to push real-time events like bounces, unsubscribes, opens, or clicks to your system. Make sure your receiving endpoint is authenticated, can parse payloads correctly, and handles retries or malformed data. Run test events (if the ESP allows it) or simulate webhook calls locally to confirm that data is being received and processed as expected. This will help avoid missed events or broken reporting once you go live.
Step 6. Test the setting, email deliverability, and inbox placement
Start by simulating your real sending environment, run test calls through your API, trigger automated workflows, and validate integration points with your CRMs, databases, or backend logic. Focus on confirming that the right templates are pulled, variables are populated, and emails are successfully handed off to the ESP. If you use SMTP, double-check authentication and error handling. If you rely on an API, verify response codes, retry logic, and payload structures.
You can run these tests in a controlled environment using tools like Mailtrap Email Sandbox. It allows your dev team to confirm that sending logic works as expected, without worrying about inbox delivery or user-facing content just yet.
Once your system behaves as expected, move to testing email deliverability and inbox placement. Start with a small batch of live sends to different mailbox providers. Check how your emails render in real inboxes, verify that tracking links work, images load properly, and unsubscribe links are functional.
You can also use Mailtrap Email Sandbox for it. Sandbox functions as a fake SMTP server and allows you to inspect full email content and headers without sending anything to real recipients.
Then, use inbox placement tools to analyze where your emails land, inbox, spam, or promotions. This gives you early visibility into potential filtering issues and helps fine-tune your domain or IP warm-up process.
Step 7. Schedule the final transition
This step will help you check there’s minimal disruption to your ongoing operations. Here’s what to begin with:
- Define the migration window. Choose a time frame for the migration that works best for your team. Depending on the scale of your business, it’s best to pick a window when your email volume is lower or when you’re not running any critical campaigns.
- Break it into phases. Don’t migrate everything at once. If possible, break the migration into smaller phases. Start with a small segment of your audience or migrate by email types (e.g., transactional first, then marketing), test everything thoroughly, and gradually expand. This way, you can address any issues without impacting your entire user base.
- Communicate with your team. Make sure everyone involved in the migration is on the same page. Developers, marketers, and customer support teams should be aware of the plan and ready to react quickly if something goes wrong. Clear communication helps minimize downtime.
- Prepare for troubleshooting. While you’ll have done plenty of testing, be prepared to troubleshoot any issues that arise during the migration. Have a plan in place to monitor deliverability, inbox placement, and any technical errors. The faster you can identify and resolve an issue, the smoother your transition will be.
- Have a fallback plan. If something breaks during the cutover: an API fails, delivery drops, or emails start bouncing, you need a way to recover fast. This could mean pausing campaign sends, temporarily routing high-priority transactional traffic through your old ESP, or switching DNS records back until the issue is resolved. Fallback options help protect your customers from outages and give your team space to fix problems without panic.
Step 8. Monitor post-migration performance
Once your migration is complete and you’re live with your new ESP, you need to regularly monitor key metrics to make sure everything is functioning as expected. Keep a close eye on:
- Performance. Track open rates, click-through rates, and conversions. These are the signals that your emails are performing well in terms of engagement.
- Deliverability. Monitor inbox placement and bounce rates to check for any deliverability issues. Keep in mind that your new ESP might have different settings or infrastructure, so deliverability could vary compared to your previous provider. This is a normal part of the migration, and tracking these metrics will help you spot and address any changes.
- Errors. Monitor all types of email errors, including those in transactional, triggered, and marketing emails. Check for issues in reporting, API connections, or integrations that might impact email delivery or performance.
Set up automated alerts or dashboards to monitor spikes in errors, bounce rates, or delivery delays. The first few days after migration can show some changes, but you need to monitor for at least a couple of weeks to get a true sense of how things are settling.
Watch out for bounce rates and unsubscribes after migration, too. If these numbers start to go up, it could signal deliverability issues with your new ESP. Spotting and fixing them early helps support your critical business communications.
Wrapping up
If you’re not seeing the growth you need because your current provider can’t handle your increasing email volume or you’re facing constant issues with inbox placement, it’s time for a change. With the right planning and tools, you can switch providers smoothly, without major workflow interruptions or declining email delivery rates.
Considering Mailtrap as your next ESP? These detailed step-by-step migration guides for popular providers will be very helpful: