


“Personalization is key” – you’ve probably read this advice in every email marketing article online. But what those articles often forget to mention is how to implement personalization in the easiest way possible.
So, today, as a continuation of our mail merge series, I’ll run you through how to personalize using the mail merge Word technique, an effective solution for automating the creation of tailored documents.
Let’s get right to it!
What is mail merge in MS Word?
Mail merge in Microsoft Office Word, just like other types of mail merge, allows you to automate the process of inserting recipient-specific details into different types of Word documents.
So, regardless of whether you’re using the word processor to create thank you notes, invitations, newsletters, form letters, or some other type of communication, Word will allow you to personalize it at scale with things such as greeting lines, salutations, custom placeholders, and mail merge features.
Of course, for the mail merge, a data source such as a database, spreadsheet, or list is required, as well as placeholders to instruct the Word main document where the personalized information will go.
Here’s what the process should look like, step by step:
How to mail merge in Word
Step 1: Prepare your data
To start mail merge in Word, the first step is picking and preparing a data source.
Here, you have a plethora of options to choose from, and I’ll quickly go through all of them in just a second. But in essence, any database or address list that you can connect to Word will do just fine. And if you want to create a mail merge recipient list on the fly, that’s also a possibility, as you can simply type the new list out during the mail merge process.
Depending on the device you’re using to mail merge in Word, you’ll have different data sources at your disposal.
For Windows users, the data sources include:
- Excel spreadsheets
- Access databases
- Other database/data files accessed through the Data Connection Wizard
While people using macOS can go for:
- Excel spreadsheets
- Apple contact lists
- Outlook contact lists
- Text files
Of course, it’s important to note that no matter the data source you decide on, after you create or edit the recipient list, you’ll have to store it on your local computer, or a file share as storing files at an HTTP location isn’t supported by mail merge.
Step 2: Create your mail merge template in Word
In Word, a template serves as the mail merge foundation, where you insert placeholders for the personalized data fields, allowing you to customize each new document for each new recipient; to streamline this process end-to-end, you can integrate client-side Word document editing functionality.
For Windows and Mac users, the available types of documents are pretty much the same and include:
- Letters (Windows/macOS) – personalized letters where each recipient receives a unique version with their name and other details, and each individual letter prints on a separate sheet.
- Emails (Windows/macOS) – an email message where each recipient receives a personalized version directly in their inbox with their name as well as other details, and the email is sent directly from Word.
- Envelopes (Windows/macOS) – envelopes for printing with automatically inserted recipient names and addresses.
- Labels (Windows/macOS): – mailing labels, name tags, or product labels for printing.
- Directories (Windows only) – a document type that lists multiple records on a single page, such as a contact directory or catalog.
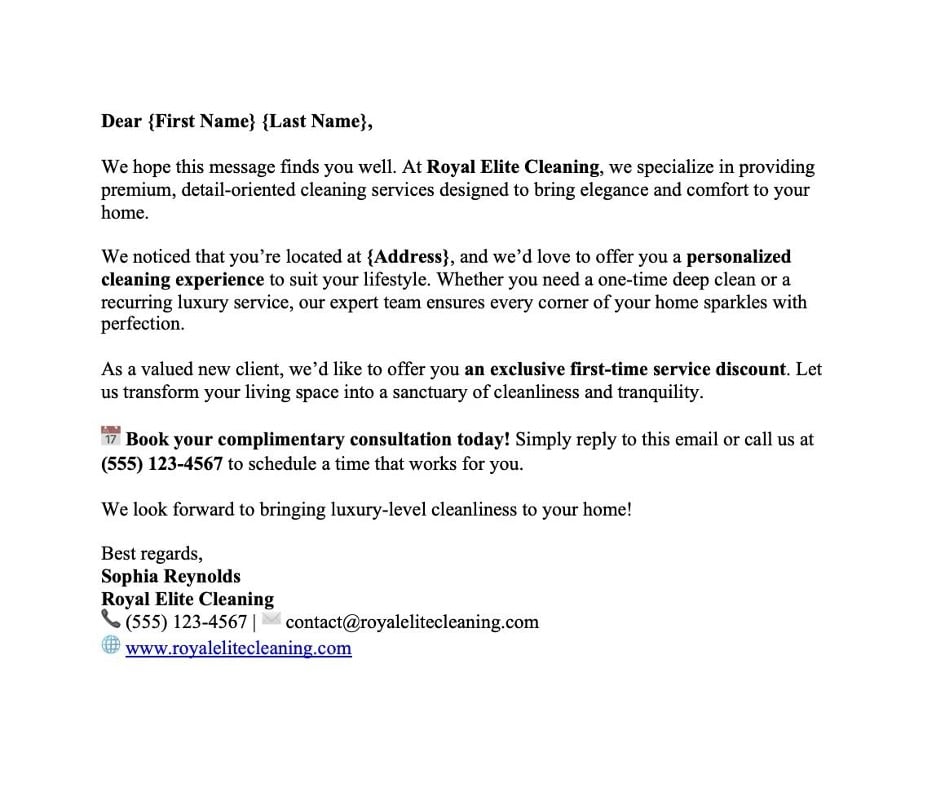
Here’s an example of what a mail merge email template document with placeholders should look like:

Step 3: Connect Word to your data source
Data source ready ✅
Mail merge document template created ✅
The next step is to start putting things together by linking the data to Word.
This step will vary based on the data source you’re using. So, let me quickly walk you through the basics of establishing a connection with different sources:
- Excel spreadsheet (Windows/macOS):
- In Word, go to Mailings > Select Recipients > Use an Existing List.
- Locate and select your Excel file.
- If prompted, choose the worksheet that contains your data.
- Access database:
- In Word, go to Mailings > Select Recipients > Use an Existing List.
- Select your MS Access database file (.accdb or .mdb).
- Pick the table or query that contains your data. Word will establish a connection automatically.
- Other database files:
- In Word, go to Mailings > Select Recipients > Use an Existing List.
- Click New Source to open the Data Connection Wizard.
- Choose the appropriate database type and follow the on-screen steps to establish the connection.
- Outlook contact list:
- In Word, go to Mailings > Select Recipients > Choose from Outlook Contacts.
- Select the contact folder that contains the recipients you want to use.
- Filter contacts if needed and confirm the selection.
- Apple contacts list (macOS):
- Export your Apple Contacts to an Excel or CSV file.
- In Word, go to Mailings > Select Recipients > Use an Existing List.
- Choose your exported file and ensure it maps correctly to the merge fields.
- Text files (CSV or TXT):
- In Word, go to Mailings > Select Recipients > Use an Existing List.
- Select your text file.
- If using a CSV, ensure the delimiter (comma or tab) matches the formatting of your file.
Step 4: Insert merge fields
If this article is your first encounter with the mail merge process, the term “merge fields” might sound a bit intimidating. And while merge fields are very important for creating personalized documents, they are quite simple.
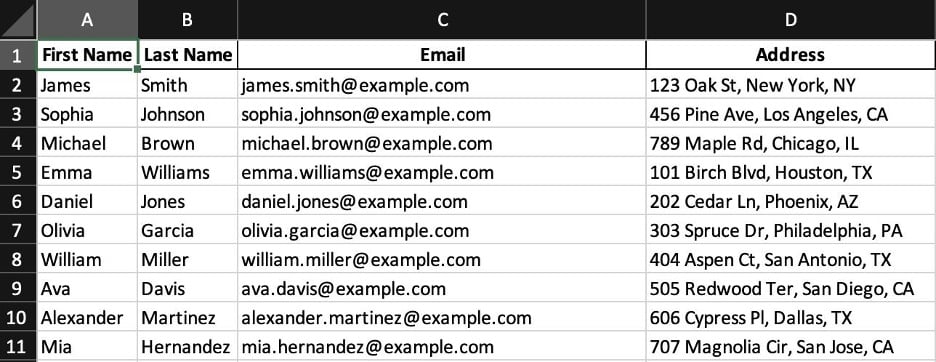
You see, each mail merge field corresponds to a column name in your data source, for example, First Name, Last Name, Email, or City, while the Address Block automatically formats full addresses by combining multiple fields. This way, Word ensures that personalized information can be correctly placed within your document template.
Here’s how you can insert merge fields based on different data sources:
- Excel spreadsheet (Windows/macOS):
- Click on the Mailings tab and select Insert Merge Field.
- A list of column headers from your Excel sheet will appear.
- Click on a field (e.g., First Name, Last Name) to insert it into your document.
- Repeat for all necessary fields, placing them where personalized data should appear.
- Access database:
- In the Mailings tab, click Insert Merge Field.
- Select fields from the table or query you connected earlier.
- Position them appropriately in your document for accurate personalization.
- Other database files:
- Click Insert Merge Field under the Mailings tab.
- Choose the relevant field names from the connected database.
- Arrange the fields within your template.
- Outlook contact list:
- Click Insert Merge Field in the Mailings tab.
- Select the fields (e.g., Name, Email, Company) from your Outlook contacts.
- Place them correctly within your document.
- Apple contacts list (macOS):
- If using an exported Apple Contacts file (converted to Excel or CSV), follow the Excel Spreadsheet steps.
- Ensure that fields like First Name and Email map correctly before inserting them.
- Text files (CSV or TXT):
- Click Insert Merge Field in the Mailings tab.
- Select fields from your CSV or text file, ensuring they match the placeholders in your document.
- Position the fields accordingly for proper formatting.
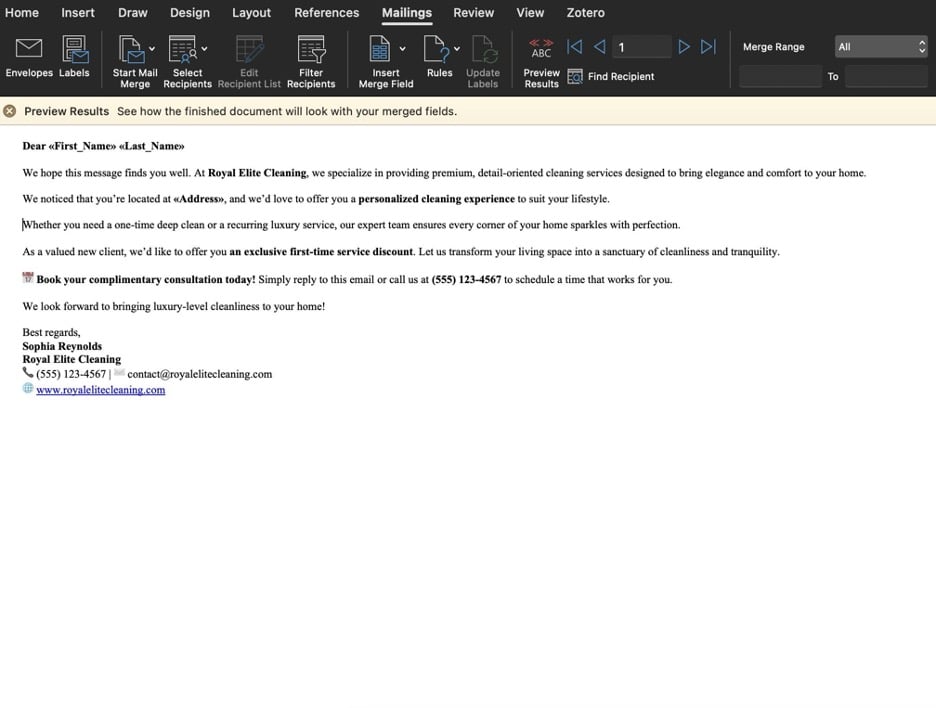
Here’s how my mail merge email template looks after inserting merge fields:

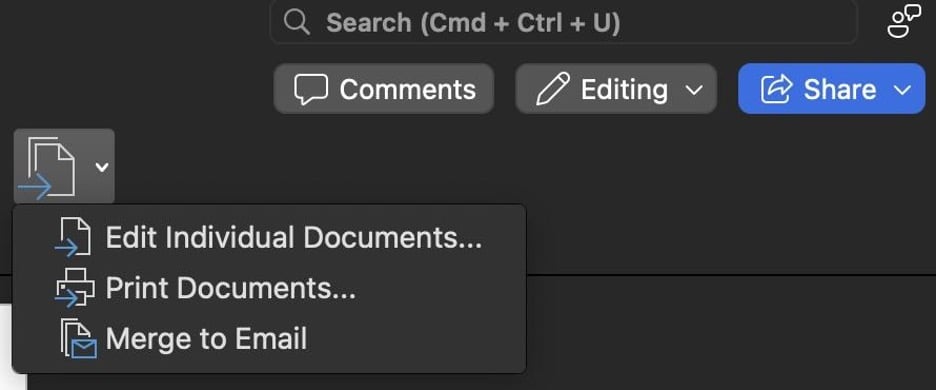
Step 5: Preview and complete the merge
Once you’ve completed all the previous steps and want to make sure the personalized data will appear correctly for the recipients, you can click on “Preview Results”.

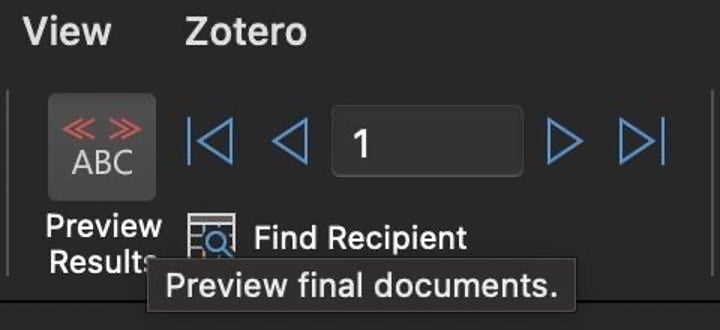
This will allow you to see how the merged data will appear in each document before finalizing.

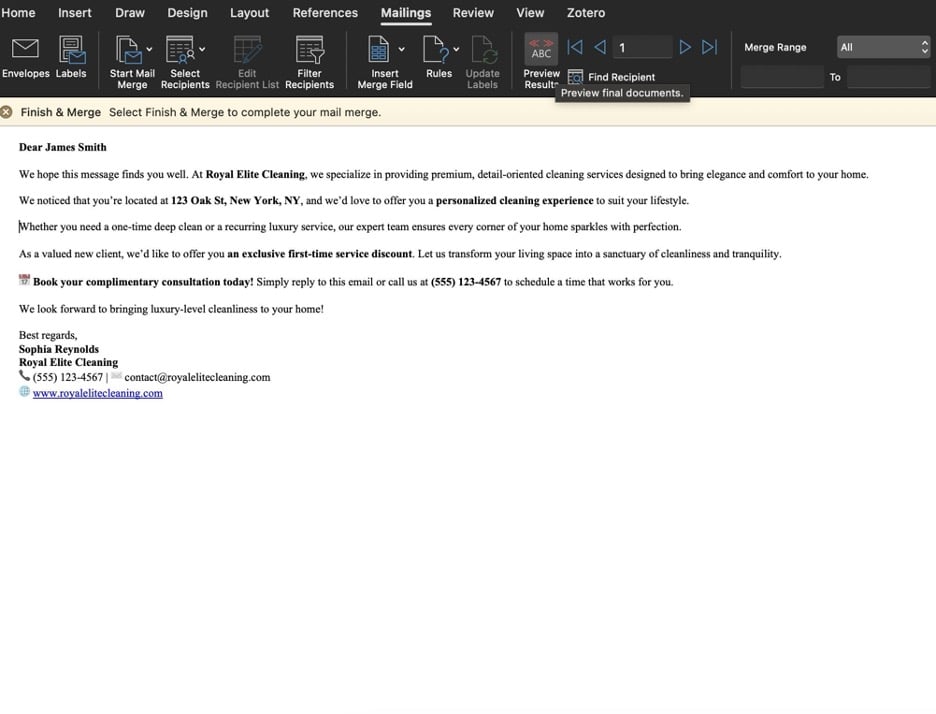
If you feel the need to make any adjustments, such as fixing formatting issues, correcting missing or incorrect merge fields, updating recipient details, or checking for unresolved placeholders, make sure to do so at this stage and again use the preview tool to recheck for additional fixes.
When you’re finally happy with the preview, click on “Finish & Merge” and then from the drop-down select one of the options – print, merge, or edit individual documents.

How to mail merge in Word using Excel
As Excel is the most popular and widely used spreadsheet tool, a lot of you reading this article will likely choose it as your mail merge data source.
So, to help you quickly grasp what the process of mail merging in Word using Excel will look like, here are the basics for each of the steps.
Step 1 – Prepare your Excel data
Since a properly populated data in Excel spreadsheet is essential for this variation of the mail merge process, the first step is, of course, preparing the data.
So, begin by opening Excel and creating a new spreadsheet or using an existing one. Then, assign clear labels to each column, such as “First Name” for column A and “Last Name” for column B, ensuring they match the mail merge field names in your current document template.

Next, enter recipient-specific details in the first sheet of the workbook, starting with the first row.
Remember, proper formatting is crucial, so emails, percentages, currencies, and postal codes should be correctly formatted to avoid errors. For numerical values, use the formatting tools in the Home tab.
Once your data is organized, save the file in .xlsx format with an appropriate name, store it locally, and close it before proceeding with the next mail merge step.
Step 2 – Open Microsoft Word and draft your document. Insert placeholders where you want personalized information to appear.
Step 3 – Go to the Mailings tab, click on “Select Recipients,” and choose “Use an Existing List.” Then, locate and select your Excel file.
Step 4 – Insert merge fields into your template corresponding to your Excel column headers.
Step 5 – Click “Preview Results” to check your expected results. Once satisfied, click “Finish & Merge” to generate your personalized documents.
If you’re interested in a more in-depth guide on mail merge in Excel we have very detailed article that will teach you the main steps along with how to automate mail merge, switch Excel for Google Sheets, and do much more.
A simpler approach to mail merge (without Word)
As I’ve shown you in this tutorial, mail merging in Word usually requires the usage of two tools – the word processor itself and something like a spreadsheet editor, database management system, or similar.
But what if I told you that you could ditch both and still create personalized emails? Yes, it’s true.
As an alternative, you could try Mailtrap – an email delivery platform designed to boost your revenue.
You see, with Mailtrap, you can easily send personalized marketing or bulk email campaigns while ensuring a high deliverability rate.
Here’s what mail merging with Mailtrap looks like:
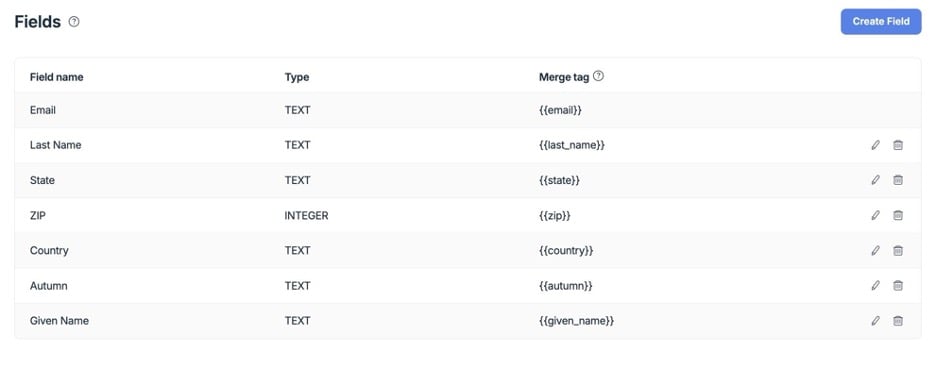
After creating your Mailtrap account and logging in, navigate to Contacts and then to Fields.
Here, using the Create Field button, you can identify variables, such as first and last name, date of birth, address, etc., and create custom fields for those variables.

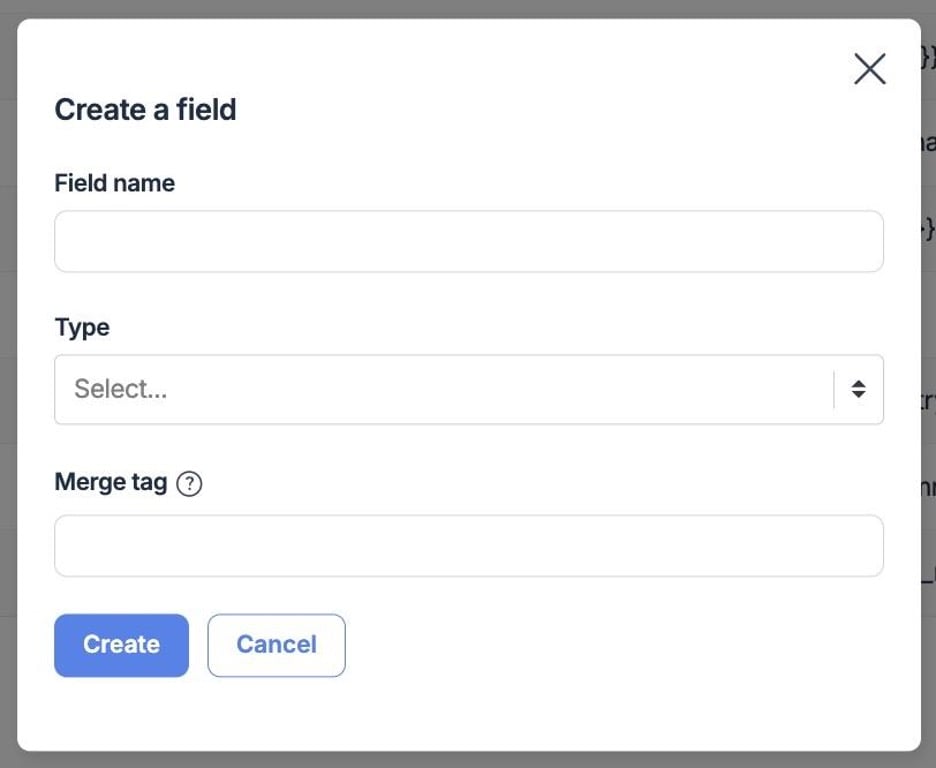
Of course, for each variable in a dialog box, you’ll need to enter a name, select a type, and assign a merge tag.

But once you’re done with that quick process, Mailtrap will allow you to use those custom variables in your email templates and then send them off using Email API/SMTP – Mailtrap’s reliable high-deliverability sending solution.
Pretty simple, right?
FAQ
Can I perform a mail merge in the Word web app?
No, the Word web app preserves all mail merge settings in existing documents created with the Word desktop application, but it does not support performing a mail merge or editing its settings. To complete a merge, click open on a document in the Word desktop application and proceed from there.
Why are my dates and currency values not displaying correctly in my mail merge?
When previewing your merged fields, you may notice that dates and currency values are formatted incorrectly, such as displaying in the American date format or missing currency symbols. This happens because your computer’s regional settings may override the format in your data source.
To fix this, you need to adjust the field codes manually following these instructions:
For dates, right-click on the mail merge field that isn’t displaying correctly and select TOGGLE FIELD CODES. The field will appear like so:
{MERGEFIELD Date_of_Birth}
Then, before the last curly bracket, add: \@ dd/MM/yyyy, so it looks like this:
{MERGEFIELD Date_of_Birth \@ dd/MM/yyyy}
This will ensure that the date appears in day-month-year format.
You can also modify the format by adjusting the number of d’s, M’s, and y’s inside the brackets.
For example:
dd MMMM yyyy→ 22 September 2008dddd dd MMMM yyyy→ Monday 22 September 2008
For currency, right-click on the incorrect mail merge field and select TOGGLE FIELD CODES.
The field should look like this:
{MERGEFIELD RentOwed}
To format it correctly, add: \# £#,###.00, so it appears as:
{MERGEFIELD RentOwed # £#,###.00}
This will ensure that the currency displays with a £ symbol, includes thousands separators (e.g., 1,000), and maintains two decimal places.
Wrapping up
In a time where doing as few steps as possible is everyone’s priority, mail merge serves as the perfect addition to your email sending practices.
I hope that with the help of this article, mastering the mail merge Word process will be a breeze for you.
For more content on mail merge, make sure to check out our other articles on the topic:
- What Is Mail Merge?
- Mail Merge With Excel: A Beginner’s Guide
- Mail Merge With Gmail: A Beginner’s Guide
As well as our YouTube tutorials:
