


Contact forms have been around ever since the early 90s and still play a crucial role in modern web development. Whether you’re running a website or an app, a contact form allows visitors to reach out to you quickly and easily.
In this tutorial, we’ll guide you through creating a simple JavaScript contact form, making it pop-up, validating its data, integrating reCaptcha, and more.
How to create a simple HTML JavaScript contact us form?
A simple, functioning JavaScript contact form combines HTML 5 for the user interface, JavaScript for client-side validation, and a PHP script for server-side processing and handling the data submitted through the form.
PHP? Yes. 🙂 JavaSript is a powerful language, but in the context of a contact form, it handles just the frontend interactions. PHP takes care of backend processing, like server-side validation and email sending.
Let’s now break down the steps to create a form:
- Create an HTML file with a basic structure name it (e.g., contact.html)
<!DOCTYPE html>
<html lang="en">
<head>
    <title>Contact Form</title>
</head>
<body>

</body>
</html>- Add a basic HTML form with input fields (e.g., the user’s name, email, phone number, message) and a submit button inside the
<body>tag.
<form id="contact-form" method="POST" action="sendmail.php">
  <div class="form-row form-error" style="display:none;"></div>
  <div class="form-row">
    <label for="contact-form-name">Name:</label>
    <input id="contact-form-name" class="form-input" type="text" name="name" required>
  </div>
  <div class="form-row">
    <label for="contact-form-email">Email:</label>
    <input id="contact-form-email" class="form-input" type="email" name="email" required>
  </div>
  <div class="form-row">
    <label for="contact-form-phone">Phone:</label>
    <input id="contact-form-phone" class="form-input" type="tel" name="phone">
  </div>
  <div class="form-row">
    <label for="contact-form-message">Message:</label>
    <textarea id="contact-form-message" class="form-input" name="message" required></textarea>
  </div>
  <button type="submit">Submit</button>
</form>- Add CSS code to the
<header>tag with basic styles for the form.
.form-row {
    margin-bottom: 10px;
}

.form-input {
    display: block;
}

.form-error {
    color: red;
}- Create a PHP file to process the form data, name it sendmail.php file and add the following code to handle the form submission and send an email containing the form data using the PHP
mail()function. In the file, check the POST sending method and all required variables in the$_POSTarray from the form. If all the variables are there, use the data from the form to send the email.
<?php
if ($_SERVER["REQUEST_METHOD"] == "POST") {
    if(
        !empty($_POST['name'])
        && !empty($_POST['email'])
        && !empty($_POST['message'])
    ){
        $name = $_POST["name"];
        $email = $_POST["email"];
        $phone = $_POST["phone"];
        $message = $_POST["message"];


        $to = "your@email.com";
        $subject = "New Contact Form Submission";
        $body = "Name: {$name}\nEmail: {$email}\nPhone: {$phone}\nMessage: {$message}";
        $headers = "From: {$email}";


        if (mail($to, $subject, $body, $headers)) {
            echo "Message sent successfully!";
        } else {
            echo "Failed to send message.";
        }
    }
}
?>
***Note: These are just basic examples that provide a foundation for the contact form, you can adjust the code snippets depending on your specific use case and requirements.
How to add a pop-up website contact form?
A pop-up contact form appears as an overlay on your website when a user clicks a specific button or link. Implementing a pop-up contact form provides a quick and convenient way for users to reach out to you without navigating away from the current page. It can also increase engagement by drawing attention and encouraging users to interact. By making it simple and accessible, you increase the likelihood that visitors will provide valuable feedback, inquiries, or sign up for your services.
Here are the steps to create one:
- Add a new div element to your contact.html file with a unique ID, and include the same form structure as before.
<div id="popup-form-container" style="display:none;">
  <!-- Your form HTMLcode from the previous section here -->
</div>- In your website’s CSS file (e.g., styles.css), style the pop-up to make it visually appealing and overlay the content.
#popup-form-container {
    position: fixed;
    top: 0;
    left: 0;
    width: 100%;
    height: 100%;
    background-color: rgba(0, 0, 0, 0.7);
    display: flex;
    justify-content: center;
    align-items: center;
    z-index: 1000;
}

#popup-form-container form {
    background-color: #ffffff;
    padding: 20px;
    border-radius: 5px;
    width: 80%;
    max-width: 500px;
    margin: 30px auto;
}
For a quicker and more consistent styling approach, the widely-used CSS framework, Bootstrap will help you since it has a large collection of great templates. Just include it in your project and apply the relevant classes to your form elements.
- Connect the stylesheet to the contact.html file
<head>
    <title>Contact Form</title>
    <link rel="stylesheet" href="styles.css" />
</head>- Add JavaScript code to the end of the file by placing it inside the tag
<script>in the same HTML file, add a script tag and functions to show and hide the pop-up.
function showPopupForm() {
  document.getElementById("popup-form-container").style.display = "block";
}

function hidePopupForm() {
  document.getElementById("popup-form-container").style.display = "none";
}- Add a popup button to the contact.html file
<button id="show-popup">Show Contact Form</button>- Hang the event on the form popup button and on
Escapekey
document.addEventListener("DOMContentLoaded", () => {

  document.getElementById('show-popup').addEventListener('click', () => {
    showPopupForm();
  });

  document.addEventListener('keydown', (event) => {
    if (event.key === 'Escape') hidePopupForm()
  });

});
Again, the examples are a starting point for creating a pop-up contact form. Feel free to modify the code according to your use case and requirements.
Contact form data validation
Now that you’ve built the contact form, it’s time to validate its functionality and implement basic security measures. Practicing validation hands-on is widely regarded as the best way to learn JavaScript. By using regular expressions for input validation, checking for empty fields, displaying error messages, and adding reCaptcha, you’ll create a user-friendly and secure contact form that enhances your website’s experience and safety.
- Add JavaScript code to validate the form data when the user clicks the submit button. Make sure to prevent form submission if the validation fails.
document.getElementById("contact-form").addEventListener("submit", (event) => {
  const contactForm = event.target
  if (!validateContactForm(contactForm)) {
    event.preventDefault();
    displayError(contactForm, 'Invalid input')
  }
});- JS Regex to validate email addresses and phone numbers: Add the necessary validation functions to your JavaScript code in contact.html. Use Regex to validate the email address and phone number formats.
// Function to validate email addresses
function isValidEmail(email) {
  // Define the JS Regex pattern for a valid email address
  const emailRegex = /^[a-zA-Z0-9.!#$%&'*+\/=?^_`{|}~-]+@[a-zA-Z0-9](?:[a-zA-Z0-9-]{0,61}[a-zA-Z0-9])?(?:\.[a-zA-Z0-9](?:[a-zA-Z0-9-]{0,61}[a-zA-Z0-9])?)*$/;

  // Test the email against the pattern and return the result (true or false)
  return emailRegex.test(email);
}

// Function to validate phone numbers
function isValidPhoneNumber(phone) {
  // Define the JS Regex pattern for a valid 10-digit phone number
  const phoneRegex = /^\d{10}$/;

  // Test the phone number against the pattern and return the result (true or false)
  return phoneRegex.test(phone);
}- Checking for empty fields: In your form validation function, check if any required fields are empty and return false if any are found.
// Function to validate the contact form
function validateContactForm(contactForm) {
  // Get the values entered in the form fields
  const name = contactForm["name"].value;
  const email = contactForm["email"].value;
  const phone = contactForm["phone"].value;
  const message = contactForm["message"].value;

  // Check if the required fields (name, email, and message) are empty
  // If any of them are empty, return false to prevent form submission
  if (!name || !email || !message) {
    return false;
  }

  // Check if the email is valid using the isValidEmail function
  // If the phone field is not empty, also check if it is valid using the isValidPhoneNumber function
  // If either the email or the phone number is invalid, return false to prevent form submission
  if (!isValidEmail(email) || (phone && !isValidPhoneNumber(phone))) {
    return false;
  }

  // If all the validations pass, return true to allow form submission
  return true;
}- Displaying error messages: If validation fails, display an error message to inform the user of the issue.
// Function to display an error message on the web page
function displayError(formElement, message) {
  const errorElement = formElement.getElementsByClassName("form-error")[0];

  // Set the innerHTML of the error element to the provided error message
  errorElement.innerHTML = message;

  // Change the display style of the error element to "block" to make it visible
  errorElement.style.display = "block";
}
Another important part you might want to add to the form is reCaptcha, a security feature that prevents bots from submitting your contact form. Here’s how to add it:
- Create a reCaptcha account at Google reCaptcha and follow the instructions to create a new site.
- Add the Google-provided reCaptcha script to the contact.html file, and include the g-recaptcha div within your form.
<head>
  <!-- Add the following line within your head tag -->
  <script src="https://www.google.com/recaptcha/api.js" async defer></script>
</head>
<body>
  <form>
    <!-- Your form fields here -->
    <div class="g-recaptcha" data-sitekey="your-recaptcha-site-key"></div>
    <button type="submit">Submit</button>
  </form>
</body>- Add the reCaptcha verification to the sendmail.php file, and verify the reCaptcha response before processing the form data.
<?php
  $recaptcha_secret = "your-recaptcha-secret-key";
  $recaptcha_response = $_POST["g-recaptcha-response"];

  $url = "https://www.google.com/recaptcha/api/siteverify?secret=$recaptcha_secret&response=$recaptcha_response";
  $response = file_get_contents($url);
  $response_data = json_decode($response, true);

  if (!$response_data["success"]) {
    // reCaptcha validation failed, return an error message
  } else {
    // Your email sending code here
  }
?>
For a quick visual reminder on how to complete email form validation in JavaScript, make sure to check out our Mailtrap tutorial:

How to send emails via JS contact form?
JavaScript running in a web browser cannot directly communicate with an SMTP server, so a server-side language is required. We used the built-in PHP mail() function in our examples to send form data. However, for a more advanced and reliable email delivery experience, you can also use a third-party sending solution like Mailtrap Email Sending.
Mailtrap Email Sending provides devs with a stable email infrastructure for email sending and email performance monitoring that comes with high deliverability rates by design.
Our Email Sending comes with two sending solutions: SMTP for quick and easy integration with any application to start sending in seconds, and Email API for greater flexibility.

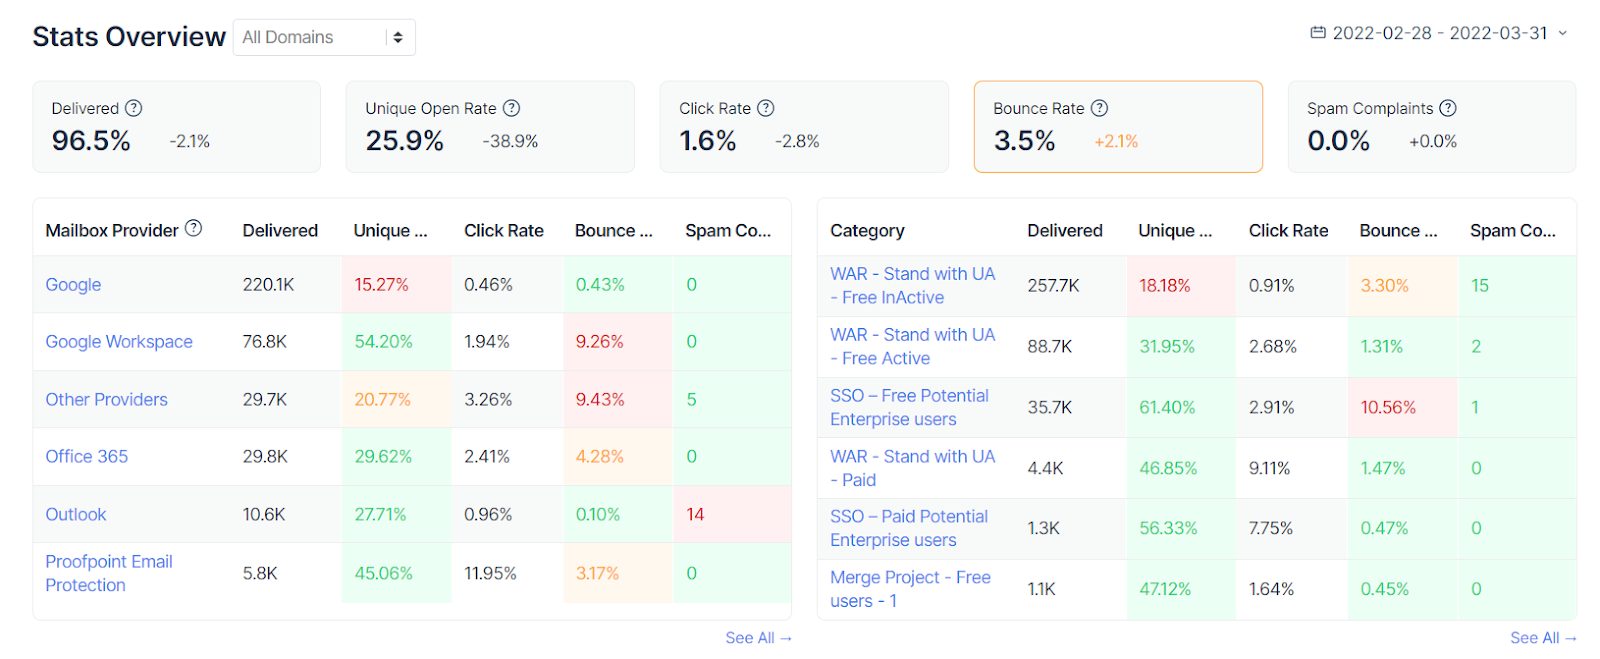
With Mailtrap Email Sending, you can monitor your email performance using unique tools such as helicopter-view dashboards, drill-down email reports for mailbox providers, and extended email history with hard historical data of up to 60 days.
Weekly reports with week-on-week comparisons and critical alerts for sudden drops in deliverability metrics help you stay on top of your email infrastructure performance.


Conclusion
We hope this tutorial has helped you to understand how you can create a simple JavaScript contact form that will improve the user experience on your website. With a well-designed and functional contact form, you’re one step closer to fostering stronger relationships with your audience.
Happy coding, and do check out more of our helpful JavaScript-related material on the following pages:
- Sending Emails with JavaScript
- Sending Emails with Nodemailer Explained
- Sending emails with Node.js
- Building Contact Form and Handling Emails with React
- Sending Emails with React Native
- Sending Emails with ReactJS
- Validate Emails in React Native
As well as our Vue.js contact form YouTube tutorial:
