Skip to Navigation


Telnet or Teletype Network Protocol is a client/server application protocol. It allows users to connect with the email servers directly from the command line of their computer.
The primary purpose of Telnet is to establish a standardized connection between terminal-oriented devices and processes (RFC 854). However, it’s also widely used for sending emails and, in that process, testing the Simple Mail Transfer Protocol (SMTP) connection.
Today we’ll explain how to send emails using Telnet on Windows and Linux operating systems.
Send emails via Telnet on Windows
Prerequisites
- Administrator access or equivalent
- Configured SMTP server
- Telnet enabled on the host’s computer or machine
- Basic knowledge of PowerShell and command prompt commands
Installing the Telnet client
Most versions of Windows operating systems don’t have Telnet enabled by default. So, to get started, first, we need to install the Telnet client. The installation process will differ slightly depending on the Windows version you’re using. Generally, we have three main options:
- Installing using the command line;
- Installing using the PowerShell;
- Installing from the Control Panel.
Installation using the command line
Press the Windows key or click the Start button. Locate the Start Search box, type cmd, and hit Enter. Right-click on the Command Prompt and press Run as administrator. That way, you’ll have the right to complete the installation. The next step is to dial in a specific command in the command line.
For Windows 7, Windows Server 2008 R2, Windows Server 2008, or Windows Vista, type in the following command and press Enter:
pkgmgr /iu:"TelnetClient" For Windows 8 and above, type in this command and press Enter:
dism /online /Enable-Feature /FeatureName:TelnetClientWait for the installation to be completed. You should receive a confirmation message on newer versions of Windows OS.
Installation using PowerShell
Another option is to use PowerShell to install the Telnet client. However, it’s only applicable to Windows 8.1, Windows 10, Windows Server 2012 R2, or later.
Open the PowerShell administrator window, type the following command, and press Enter.
Enable-WindowsOptionalFeature -Online -FeatureName TelnetClientWait for the installation to be completed.
Installation using Control Panel
Finally, you can install the Telnet client from the Control Panel. To do so, find Programs (or Programs and Features) and open it. Locate Turn Windows features on or off and click on it. You’ll see a Windows Features box. Find Telnet Client and mark the checkbox. Then press OK. Wait for the installation to be completed and restart the computer to apply the changes.
For other installation options, refer to the Microsoft documentation.
Sending the emails
The email-sending process follows the logic and order of SMTP transmission: handshake, transmission, and termination of the session. It uses SMTP commands and connects to the server through a TCP port. Check out this blog post to find more information on SMTP operation.
Note: Telnet isn’t a secure way to send an email. It establishes an unencrypted connection, as it doesn’t support SSL or TLS. This means that anyone with access to your network can hijack the transmission and access the contents of your message.
You can’t connect to SMTP servers with authentication either, as most of them require TLS or SSL encryption before allowing LOGIN and PLAIN authentication methods (authentication without TLS is allowed only on test SMTP servers). You should use OpenSSL instead of Telnet to connect to SMTP servers with encryption. We’ll be talking about OpenSSL below.
To start an SMTP session, you’ll need the full domain name or the IP address of the SMTP server you’re trying to connect to. For example, if we were to use Mailtrap Email Testing, we’d enter sandbox.smtp.mailtrap.io.
You’ll also need to identify the port, which can be 25, 587, 465, or 2525. The port number depends on the configurations of the SMTP server you’re trying to connect to. Most SMTP servers block transmissions through port 25. Port 465 is suitable when sending emails with SSL encryption, while port 587 and 2525 should be used with TLS encryption.
Type the command:
telnet sandbox.smtp.mailtrap.io 2525Note: Mailtrap Email Testing won’t accept Telnet connections through port 25. You’ll need to use port 2525.
You’ll see the response starting with code 220 if the connection is successful. For example,
220 sandbox.smtp.mailtrap.io ESMTP server readyThe next step is to identify yourself to the SMTP host.
EHLO example.com or HELO example.com Note: The HELO command will initiate an SMTP connection without service extensions. Therefore, corresponding ESMTP commands (such as STARTTLS, for example) won’t be supported.
All the supported SMTP extensions will be listed in the response. Each line will start with 250, indicating a successful connection.
250-sandbox.smtp.mailtrap.io
250-PIPELINING
250-SIZE 10485760
250-ETRN
250-STARTTLS
250-AUTH LOGIN PLAIN
250-ENHANCEDSTATUSCODES
250-8BITMIME
250 DSN
Then you can go ahead and transfer the necessary email fields according to the SMTP specification. First, type MAIL FROM, then RCPT TO, and then type DATA.
MAIL FROM: <sender@example.com>
250 2.1.0 Sender OK
RCPT TO: <recipient@example.com>
250 2.1.5 Recipient OK
DATA
354 Start mail input; end with <CRLF>.<CRLF>
From: sender@example.com
To: recipient@example.com
Subject: Telnet email

This is my first test message sent using the Telnet client on Windows
.
250 2.0.0 Ok: queued as ABC123456789
To end the session, you should type the QUIT command. The server will respond with 221 2.0.0 Service closing transmission channel, and the connection will be terminated.
A complete sample will look something like this:
telnet sandbox.smtp.mailtrap.io 2525
220 sandbox.smtp.mailtrap.io ESMTP server ready
EHLO example.com
250-sandbox.smtp.mailtrap.io Hello
250-SIZE 37748736
250-PIPELINING
250-DSN
250-ENHANCEDSTATUSCODES
250-STARTTLS
250-X-ANONYMOUSTLS
250-AUTH NTLM
250-X-EXPS GSSAPI NTLM
250-8BITMIME
250-BINARYMIME
250-CHUNKING
250 XRDST
MAIL FROM: <sender@example.com>
250 2.1.0 Sender OK
RCPT TO: <recipient@example.com>
250 2.1.5 Recipient OK
DATA
354 Start mail input; end with <CRLF>.<CRLF>
From: sender@example.com
To: recipient@example.com
Subject: Telnet email

This is my first test message sent using the Telnet client on Windows
.
250 2.0.0 Ok: queued as ABC123456789
QUIT
221 2.0.0 Service closing transmission channel
Send emails using Telnet on Linux
Sending emails using Telnet on a Linux console is mostly similar to Windows. The difference is in the installation process only.
Prerequisites
- Any version of the Linux distribution
- Administrator access via root user or sudo command
- Telnet
- Working mail server
Installing the Telnet client
If the Telnet client isn’t installed on your machine, you can install it from your package manager. Specific commands will differ depending on the Linux distribution you’re using.
For Arch Linux and Manjaro, type in the following command in the terminal window and press Enter:
$ sudo pacman -S inetutils For Ubuntu, Kali Linux, Debian, and Linux Mint:
$ sudo apt install telnet For Red Hat, Fedora, and Centos:
$ sudo dnf install telnet You’ll be prompted to enter your administrator password. Type it in and press Enter once again. Wait for the installation to be completed.
Sending the emails
To start sending emails, start the Telnet session by typing this command:
$ telnet sandbox.smtp.mailtrap.io 25Then proceed the same way we described above. Don’t forget to follow the exact order of SMTP commands, otherwise, the transmission won’t be successful. If you misspell any of the commands, you won’t be able to make corrections with backspace. It’s recommended to press Enter, wait for the error message, and send a correct command afterward.
Send email messages with HTML body and attachments to multiple recipients
It’s also possible to send HTML emails with Telnet. For that, you’ll need to define the Content-Type as text/html or multipart/alternative. This portion should be inserted into your email after the DATA command.
DATA

Mime-Version: 1.0
Content-Type: multipart/alternative; boundary="peaches";

--peaches
Content-Type: text/plain

This is a plain text message sent using Telnet

--peaches
Content-Type: text/html

<h1>This is an HTML message sent using Telnet</h1>

--peaches--
.
250 2.0.0 Ok: queued as ABC123456789
QUIT
221 2.0.0 Service closing transmission channel
Now let’s send an email with an attachment. To complete that task, we’ll need to format the message with MIME. The Content-Type should be defined as multipart/mixed to let the email server know that the email will contain multiple parts, including an attachment. The Content-Disposition header will include the attachment itself.
DATA

From: sender@example.com
To: recipient@example.com
Subject: Telnet email with attachments

MIME-Version: 1.0
Content-Type: multipart/mixed; boundary=boundary_9876

--boundary_9876
Content-Type: text/plain

This is the email message body.

--boundary_9876
Content-Type: application/octet-stream
Content-Disposition: attachment; filename="mylovelycat.jpg"

This is the content of the attachment.

--boundary_9876--
.
QUIT
Finally, let’s send emails to multiple recipients. That’s the easiest part of all. We just need to send RCPT TO command several times and include the recipients’ addresses in the to field after the DATA command. For example:
MAIL FROM: <sender@example.com>
250 2.1.0 Sender OK
RCPT TO: <recipient1@example.com>
250 2.1.5 Recipient OK
RCPT TO: <recipient2@example.com>
250 2.1.5 Recipient OK
RCPT TO: <recipient3@example.com>
250 2.1.5 Recipient OK
DATA
354 Start mail input; end with <CRLF>.<CRLF>
From: sender@example.com
To: recipient@example.com, recipient2@example.com, recipient3@example.com
Subject: Telnet email to multiple recipients
Can you send emails with Telnet using free SMTP servers?
Yes and no.
You won’t be able to send emails with the Telnet console to free SMTP servers using port 25. As mentioned above, it’s blocked by the majority of email clients. So, if you were to send an email to Gmail, Yahoo, or Microsoft Outlook, you’d need to use port 587.
Even so, the connection can only be used to test a specific port or a portion of the connection. Telnet doesn’t support SSL or TLS encryption, so the chances are you won’t be able to send emails successfully. We weren’t able to send emails by connecting to Gmail, Outlook, and Yahoo SMTP servers.
To test the connection on different ports, you can just use telnet smtp.gmail.com 587, telnet smtp-mail.outlook.com 587, or telnet smtp.mail.yahoo.com 465 commands. If the response is 220, it indicates that there’s no issue with the given ports.
Troubleshooting common Telnet errors
When something goes wrong in your SMTP session, you’ll receive error messages. By interpreting them, you’ll be able to understand what’s the problem with the connection or the SMTP server.
Here’s a list of the most common errors and how to fix them:
- 550 Invalid recipient – usually occurs when the recipient’s email address is incorrect or doesn’t exist. The solution is to check for typos or use another address to reach them;
- 535 Authentication failed – you’ll see this error if the SMTP server is unable to authenticate the Telnet client. Common causes include incorrect usernames/passwords and invalid authentication methods. Make sure you’re using the correct credentials. Also, check the list of the supported commands while choosing between LOGIN and PLAIN authentication methods.
- Connection closed or timed out – you’ll see these errors when the Telnet client fails to establish a connection with the SMTP server. Typically, this is due to a network issue, an incorrect port number, or a firewall blocking the connection. Workarounds include trying different ports, checking your network connectivity, checking SMTP configuration, and disabling the firewall on your host.
- 502 Unrecognized command – occurs when an incorrect command is used. To solve the issue, double-check the commands you’re using. Press Enter to dial in a new command. Remember, Backspace and Delete won’t work once the connection is established.
- 421 Service not available – this error usually happens when the SMTP server is unavailable or unable to process the request. This could be due to a network outage or the server undergoing maintenance work. To troubleshoot, you can wait and try again, check your network connection, or verify the SMTP configuration.
Is there an alternative to sending emails using Telnet?
As we mentioned above, Telnet is a non-secure way to send emails. Even if your chosen SMTP server allows you to use SMTP AUTH without SSL/TLS (most likely, none of the live SMTP servers will allow you to do so), your credentials will still be visible to anyone connected to the same network.
Plus, your credentials will be encrypted with Base64 only, which is quite simple to decipher. That will leave you vulnerable to attacks. If your credentials are compromised, it will be easy for the attackers to send spoof emails or read the contents of your email messages.
Moreover, to use the SMTP AUTH command on Windows, you need basic authentication. Unfortunately, Microsoft has deprecated basic authentication for new tenants, which means you won’t be able to undergo SMTP authentication from newer versions of Windows. This will force you to complete the session without SMTP AUTH.
That’s why Telnet is usually used to send test emails, debug SMTP connections, or check if the SMTP server or Exchange Server is accessible through port 25. You should never use Telnet to send emails in production. And even if you just want to test email servers, there are better alternatives on the market, such as OpenSSL and Mailtrap.
OpenSSL – Telnet alternative for encrypted email sending
OpenSSL is an open-source command-line tool that supports SSL/TLS encryption. For installation instructions on Windows, Linux, and other operating systems, check out the official documentation. On Windows, you can also download the installer. On Linux, you can use base repositories and install OpenSSL using the following commands:
- Ubuntu, Debian, Kali Linux, Linux Mint:
sudo apt-get install openssl - Red Hat, Fedora, Centos:
sudo dnf install openssl - Arch Linux, Manjaro:
sudo pacman -Sy openssl
Once the installation is completed, use the line below to connect to the SMTP server:
openssl.exe s_client -starttls smtp -connect sandbox.smtp.mailtrap.io:25 Then you can greet the server and identify yourself with EHLO as we did with Telnet. Follow it up with the STARTTLS command and authenticate yourself using AUTH LOGIN or AUTH PLAIN commands.
OpenSSL can be used for both staging and production environments. However, OpenSSL isn’t recommended for sending high volumes of emails.
Mailtrap – Telnet alternative for testing and sending large volumes of emails
Mailtrap is one platform to test, send, and control the performance of your infrastructure. It has two solutions: Email Testing and Email Sending.
Mailtrap Email Testing is an Email Sandbox that enables you to safely inspect your emails in staging without spamming recipients.
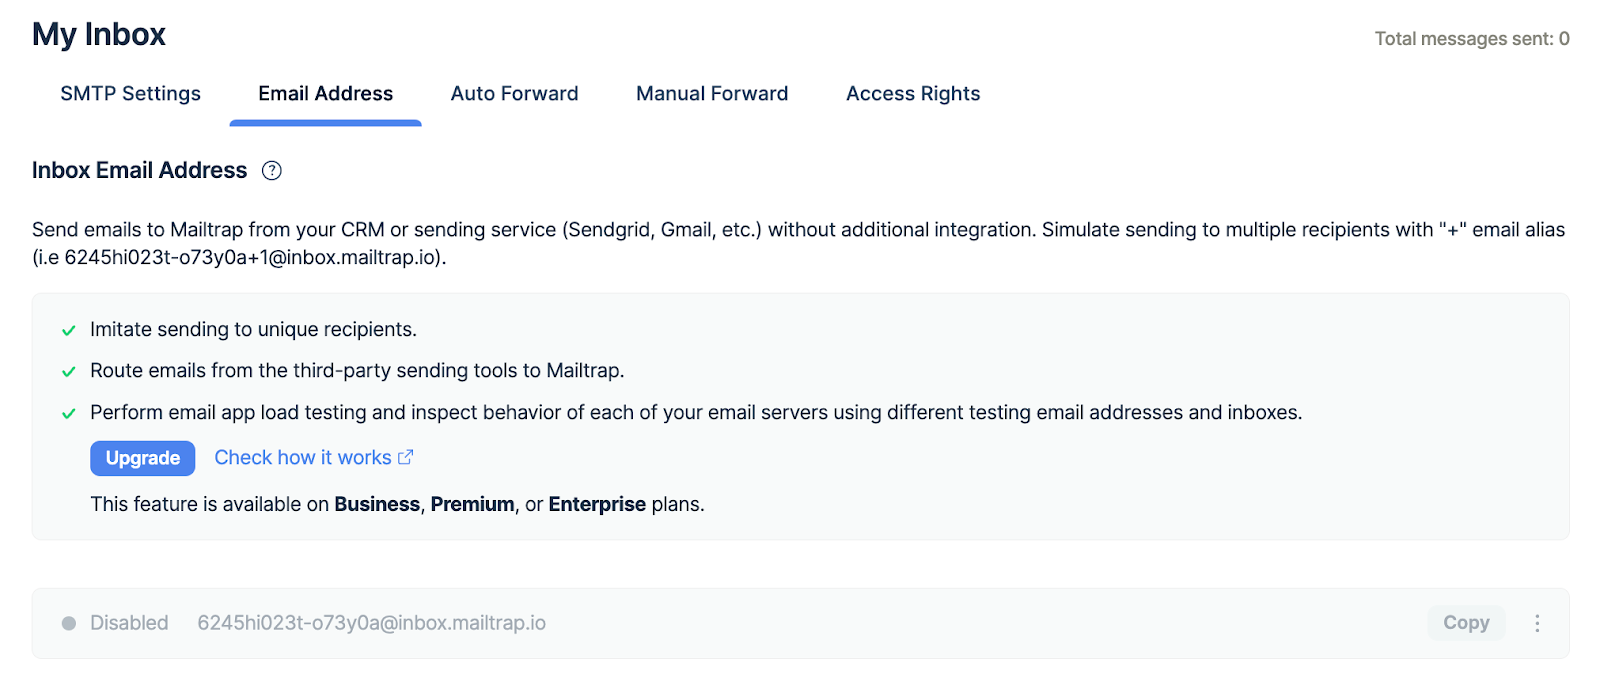
With Email Testing, you can test an SMTP relay or SMTP server by sending an email to a virtual inbox. You’ll just need to enter the Inbox Email Address as your recipient and easily troubleshoot sending issues.
On top, Email Testing provides the credentials of the fake SMTP server, allowing you to easily integrate it with your app. For more flexibility and automated testing, you can use SDKs or ready-made code snippets.
Once Email Testing is integrated, you’ll be able to check HTML/CSS, preview your emails, check the tech info to validate headers, and inspect the spam score. All of this is available without the security issues Telnet has.
When all the tests are completed, you can send high volumes of emails in production with Mailtrap Email Sending – an infrastructure with high deliverability rates by design. It can be integrated with your app using SMTP service or RESTful API, allowing for an easy and smooth setup.
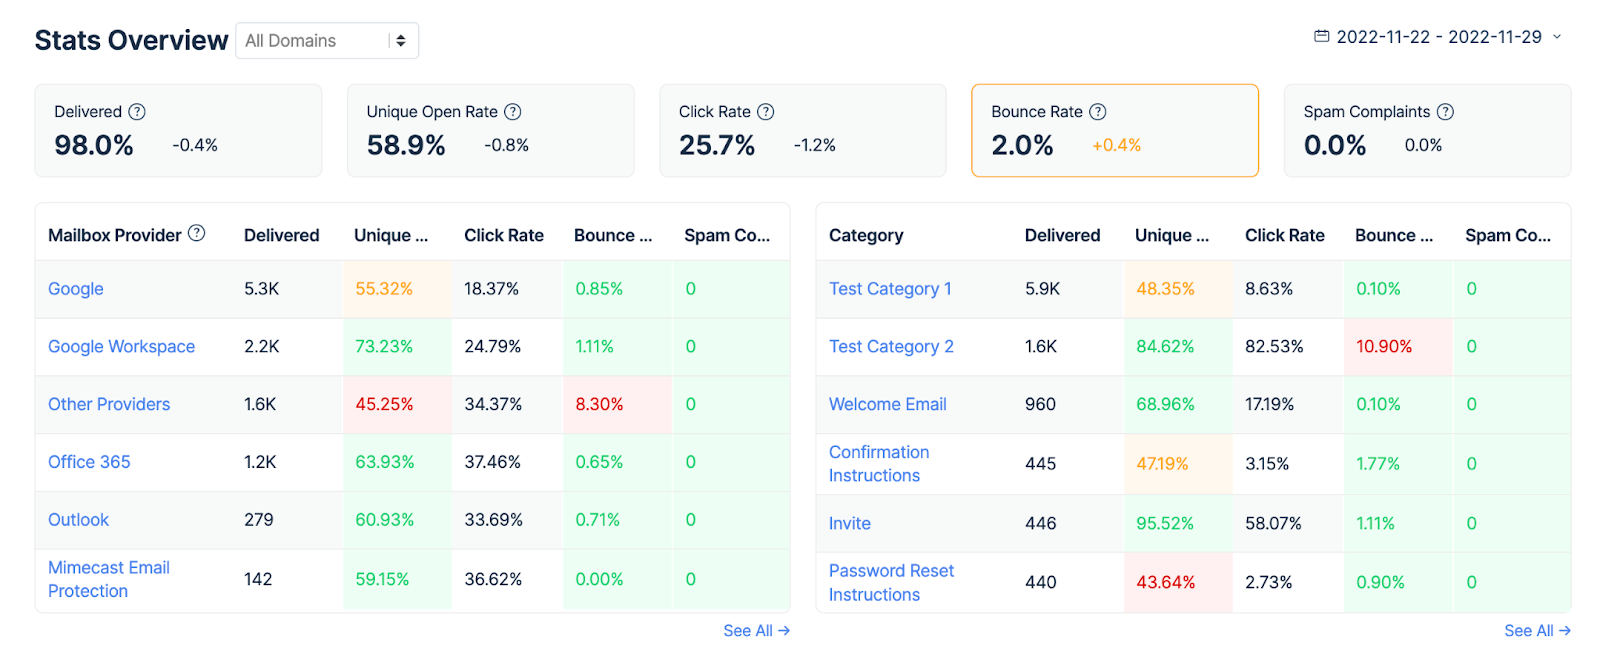
After sending the emails, you can monitor their performance with Email Sending’s Actionable Analytics feature. You can track essential email metrics or troubleshoot any unexpected sending issues if they occur.
Wrapping up
That’s it! Now you know how to send emails using Telnet from Windows and Linux. You can send simple email messages or add an HTML body, and even attachments.
Remember, you should avoid sending emails using Telnet on production to prevent security issues and vulnerabilities. Using other tools such as Mailtrap Email Delivery Platform is much more reasonable. If you enjoy our tutorials, check out our guides on sending emails with PowerShell or sending emails with SMTP.